Slider

Showing posts with label OPI. Show all posts

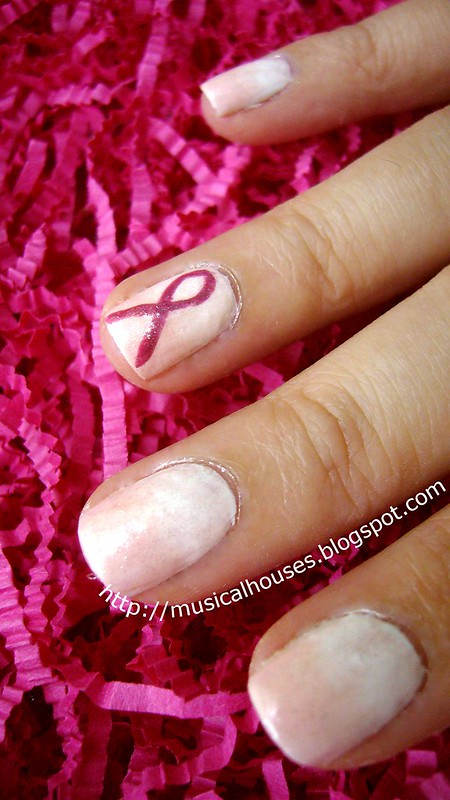
Breast Cancer Awareness Month Manicure: Pink Gradient Glitter Nails

Tuesday, October 8, 2013

6 comments
October is Breast Cancer Awareness Month, and I thought I'd do a BCA-themed manicure because breast cancer is actually the 5th top cause of deaths. If you're in the at-risk age group (50 to 74), the best way to detect breast cancer is to get a mammogram once every 2 years. And as with all illnesses, early detection helps!


My BCA manicure that's pink, shimmery, and IMHO, awesome!

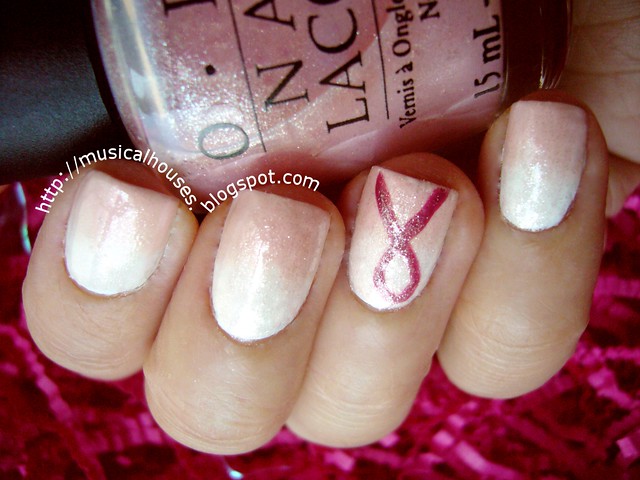
Pink and White Gradient BCA Nails

Monday, October 15, 2012

1 comment
So after my first Breast Cancer Awareness month manicure, I decided to do a second BCA mani! This time, I used the same pink and white colour scheme, but I used a bit of glitter as well! And of course, the pink ribbon is there on the accent nail.


Although this mani is simple, I actually used a total of four different polishes. For the white and pink gradient, I used Wet n' Wild White (duh), while the pink was RBL Lulu, a very pretty pastel pink of the BCA variety.

breast cancer awareness nail art 1

The pink ribbon is Wet n' Wild Quartz of Course, and I freehanded the ribbon again this time. And then I topped that with OPI Princesses Rule! which actually is tiny glitter in a base that has a slight tinge of pinky sheerness. I kinda overestimated how sheer the polish was, and when I applied it over my mani it actually made everything look pinker. Oops.

breast cancer awareness nail art 2

So that's my second BCA mani! Hope you guys like it! Stay healthy and pretty everyone, and take care of your health! You can read up further on breasts cancer here, and there are lots of other resources available too. Breast cancer is the 5th top cause of deaths, so if you're in the at-risk age group (50 to 74), the best way to detect breast cancer is to get a mammogram once every 2 years.

Caviar, oops, Fish Egg Manicure, aka Bad PR 101: How NOT to Handle Bloggers

Sunday, April 15, 2012

16 comments
Here is my Caviar, oops, I mean, Fish Egg Manicure! I'm sure by now, you would have heard of how Ciate stupidly unleashed a backlash against its own brand. Well, that's a large part of the reason why I'm writing today's post, too.


It all started so well. One of the more unique trends that was coming up this season for nails was Ciate's Caviar Manicure. This basically a nail surface that is polished, and then covered with beads. It lends a texture and look that resembles caviar, hence the name. (I guess maybe "bubble manicure" didn't sound as good.)

A lot of nail bloggers were inspired by the look, and began doing their own DIY versions. Most brands consider it a good thing, even if these bloggers aren't using their own products (Ciate's manicure sets aren't avaialble til June). The reason is simple - more publicity leads to increased sales, or at least, increased general brand awareness. This was a virtuous cycle - bloggers love a product, readers know about it, brand gets good publicity, and sales.

(Source)


So far, so good. Then Ciate began sending Cease and Desist letters to bloggers (an example here), on the grounds that they are infringing on their intellectual property. Ciate claims that because they are in the process of trademarking the terms "caviar manicure" and "caviar nails", all nail bloggers using either terms are liable for IP infringement.

Of course, nail bloggers, being a tight-knit bunch, were unhappy. The outrage culminated in "Fish Egg Friday", where bloggers all did their own DIY caviar manicures (now re-named "Fish Egg manicures") to express solidarity and unhappiness with Ciate regarding the situation. (One of my favourite posts regarding the entire situation is here.)

As it turns out, Ciate didn't even invent the caviar manicure. It was first done by Dashing Diva more than a year before Ciate, for the Cushnie et Ochs show in 2011. And back then, it was called a caviar manicure too, not as a trademarked term, but more as a general description (like shatter polish doesn't specificaly refer to OPI's shatter range). And yet, if you read the Ciate website, it says, "The inspiration behind the Caviar Manicure™ came about when Charlotte, CiatĆ©’s Creative Director, was looking to create 3-dimensional nails for a front cover magazine shoot and wanted to develop something feminine, indulgent yet delicately extravagant."
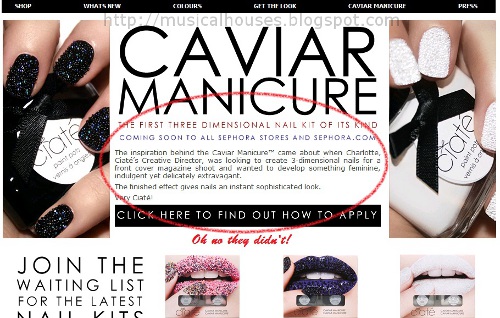
ciate claims

(Screen-capped from Ciate website. Snarky text and red circle added by me.)


So in essence, Ciate is claiming that they invented the cavair manicure, which was invented over a year ago by someone else under the same (non-trademarked) name, and now they are going to trademark it so that noone else (including the original creator, Dashing Diva), can use the words "caviar manicure" or "caviar nails". That's just total and utter crap to me.

Ethical issues aside, this has to do with dealing with bloggers. If it was some skeevy Ebay seller selling fake Ciate beads, then by all means, excercise your IP and slap them with a C&D. But for bloggers, who are individuals acting in a non-commercial manner, and who could be your customers, this is overkill. Even if you have the legal right to do so, a savvy company would not use that as the first step. As I wrote in my previous post the last time something like this happened, it's not a good idea, and I quote:

"However, sending a lawyer's letter right off the bat is a very heavy-handed response given that they are just dealing with one individual, and is one that is too harsh, and bound to give the company a bad reputation. Instead, a much better thing to do would have been to get a PR person to send out a more friendly-sounding email clarifying the situation - that would have gotten the same effect, and have avoided the drama. Justified or not, this is still really bad publicity for [Ciate], which could have been avoided. A lawyer's letter should be the last line of resort, not the first thing you think of, especially when dealing with harmless individuals who are your customers!"

Ciate has since then softened its stance against bloggers, but it does seem like too little, too late.

Anyway, I'm sure you had enough of my ranting (well, what is my blog good for if not ranting I guess!). Let's move on to the actual good stuff - more photos of my very own Caviar Fish Egg Manicure! I'm too late to the party to add in my blog for the link list that's been going round since I was at work all week, so this is not for any type of publicity I could get from the outrage, but more to just express solidarity in my own way.
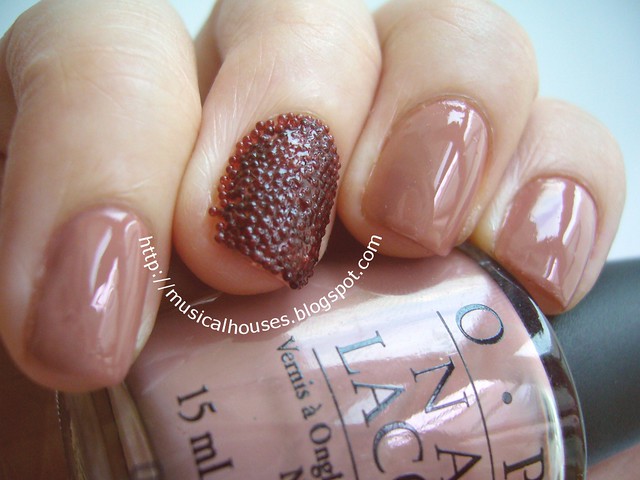
ciate caviar manicure inspired look 2


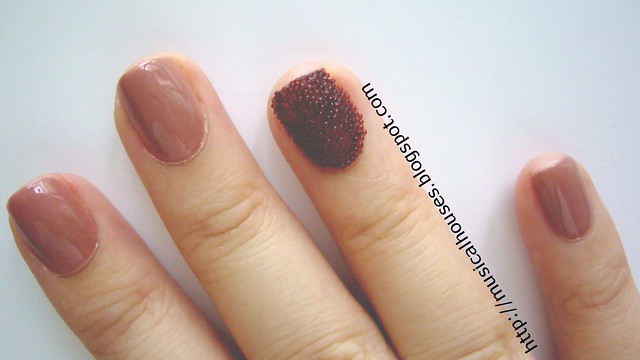
For this Caviar Fish Egg Manicure, I used OPI's Barefoot in Barcelona as the base. It's been sitting around in my untrieds for over a year, and I can't believe it took me all this time to use this baby. It's a gorgeous pinky-brown sandy neutral, and would look good on almost anyone, I think. Heck, I think this would even make a great lip colour too!

ciate caviar manicure inspired look 4


For the beads, I used some random beads I got from Born Pretty Store. Mine were only one colour, but you can get a few colours and mix them together, if you're more artsy than me. In order to get the beads onto the nails, I painted two coats of Barefoot in Barcelona, then basically poured beads over my nail while it was still wet. Some areas are harder to reach than others, so if you want you can dip your nails too. Once I was satisfied with how the beads looked, I added some topcoat to seal everything.
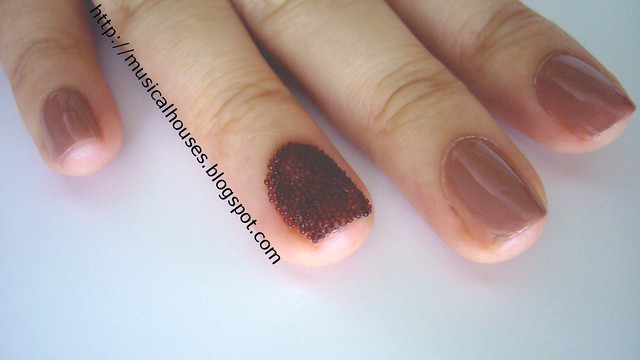
ciate caviar manicure inspired look 3


All in all, this was a really easy manicure to do. I mean, pouring stuff over your nail - doesn't get much simpler than that! The downside though, is that some of the the beads came loose, and I felt like my manicure was going to drop off eventually, bead by bead. I suppose it's great for a night out, but I don't expect these to last more than a couple of days. Besides, I also have this really horrible habit of picking at my nails, and a rough and bumpy texture like that of the Caviar Fish Eggs manicure would really tempt me to pick at them soo much.
ciate caviar manicure inspired look 5


The bottom line? I'd probably wear this for a glamorous night out, but not for everyday. And although it's easy to do, you'd have to be quite patient to work with tiny little beads that may be prone to spilling and rolling all over the floor. But otherwise, I think it doesn't look that bad - it's really a hate or love kinda thing, but I am actually starting to get to like it. I just don't think I'll be getting Ciate's version of the beads.

OPI Pink Friday Nicki Minaj NOTD: Just Celebrity Hype?

Wednesday, March 21, 2012

3 comments
OPI's Nicki Minaj Collection, released sometime back, was quite well-received by the blogger community. I think part of all the hype was just because it was Nicki Minaj, you know? I personally didn't find the collection that inspiring or original, in that similar colours already exist elsewhere.

Anyway, I got OPI Nicki Minaj Pink Friday in my Vanity Trove last month, so I thought that since it was one of the much raved-about colours in the collection, I should at least do an NOTD with it, right? So I busted my mini-bottle out and did a mani with it.

reverse chevron manicure tutorial 1


I know a lot of bloggers have liked it, and about how it's such a great pink. Apparently this was Nicki Minaj's favourite colour (not hard to see why, I guess). Perhaps it's the celebrity factor, but this didn't do much for me. It's a light pastel pink with a warm lean, which would make it ideal for warm-toned girls looking for the pastel pink that won't look ashy on their skintone. And in that sense, it brings something to the table, since most pastel pinks are cool-toned. But otherwise, I found the colour just meh. It didn't look particularly great on my skintone, and I mean, pink-lipstick-similarity aside, this colour is a big yawn to me. Another pastel pink? Great, let's just move on.


Another gripe I have about Pink Friday is the application. This is kinda thick, so it tends to pull and be really streaky upon application. If you're lucky you can get away with two coats, but mostly I used three to even things out, and it ended up looking a little bit thick in the end. It doesn't really have the best application. I was hoping for a really opaque two-coater, but this wasn't quite it.

pink friday opi nicki minaj 2


Anyway, I KNOW that this is the same shade as Nicki Minaj's lipstick, and that it's cool and all, but for some reason I can't like this colour. Maybe it's the crappy application, maybe its the fact that pink (seriously, pink lipstick aside, why would an artiste known for making daring sartorial choices put a pink in her nail polish collection?), or maybe it's just that the colour doesn't look all that great on me. Overall, I feel like this is a over-hyped colour I could do without.

Reverse Chevron Manicure Tutorial with OPI Nicki Minaj Shades

Wednesday, February 29, 2012

4 comments
When I got my Feburary Vanity Trove, my mind was just racing with all the possibilities for some nail art fun. Finally, I settled on these pink and black glitter Chevron nails.

These were pretty easy to do, too. The tutorial below shows you just how easy it is.

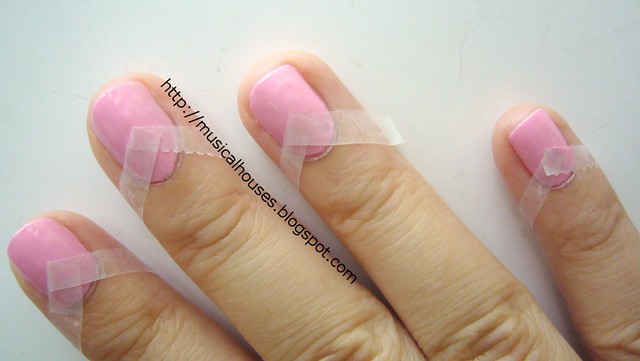
1. First, paint your base colour. (I'm assuming you already have base coat on, of course.) Here I used OPI Pink Friday from the Nicki Minaj Collection.

reverse chevron manicure tutorial 1


2. After the base layer is dry, stick tape on top of the base layer in your desired Chevron shape.

reverse chevron manicure tutorial 2


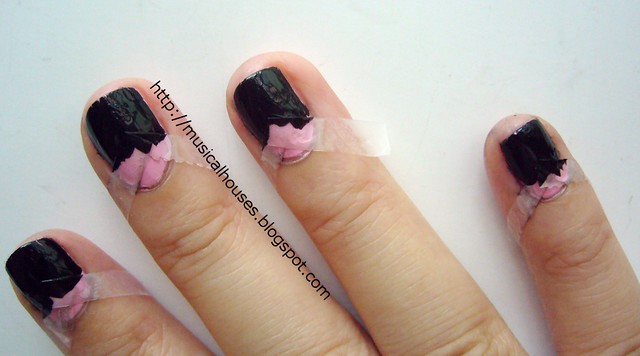
3. Then, paint the top shade from the taped area to the ends of the nails. Here I used Wet n' Wild Black.

reverse chevron manicure tutorial 3


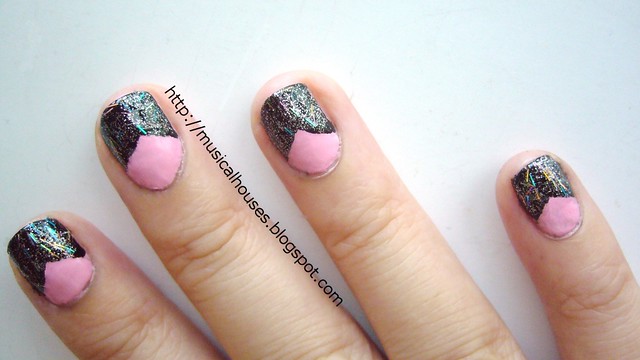
4. If you want to jazz up your Chevron, add a little glitter! This is OPI Save Me from the Nicki Minaj Collection.

reverse chevron manicure tutorial 4


5. Wait for the polish to dry, then peel off the tape, and viola! Chevron nails, with glitter on top!

reverse chevron manicure


Lastly, here are a few final tips I hope you'll find useful. Firstly, before you lay the tape over your base layer, make sure the base layer is really, truly dry. If not, the tape will peel the base layer off your nail. Also, for a sharper Chevron edge, wait til the polish is dry (or mostly dry) before peeling off the tape. If the polish is too wet, it will smudge when the tape is being peeled off.

I like this combination very much, I like the contrast of pink and black, and I also feel like the holo and silver glitter in Save Me really stands out against the black. I actually got these polishes in my Feburary Vanity Trove, so if you're interested you can check out Vanity Trove.

Anti-Valentine's Day Nail Art: Shattered Hearts!

Friday, February 3, 2012

17 comments
Not everyone loves Valentine's Day. Some don't have a significant other, some don't like the crass commercialization, and some just aren't the type to make a big deal out of things. So, here's my Anti-Valentine's Day nails - shattered hearts!

I figured, since I already paid my dues by having Valentine's Day nails (not once but twice! C.f. my Valentine's Day nails with a touch of spring and my Neon pink and black Valentine's Day nails), why not do an Anti-Valentine's Day mani? I decided to work with the theme of being heartbroken, and decided to have a girly pink base with broken hearts.


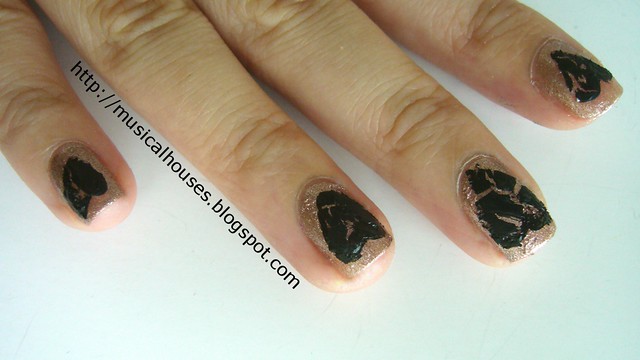
The pink base was Orly Rage (I've previously compared Orly Rage and GOSH Frou Frou), a gorgeous opaque, non-streaky and non-brush-strokey pink foil. (Is non-brush-strokey even a word?) The black hearts were made with OPI's Black Shatter, although any black crackle polish would have done too.

anti valentines day nail art hearts 2


In my head, this seemed like a good mani, since shatter polishes naturally crackle, so they lend themselves well to the "shattered hearts" look I was trying to achieve. The hard part was getting them to take the shape of a heart! I tried everything - freehand, tape, self-made stencils using paper and scissors - and nothing worked really well. They just looked like random shapes, not hearts. In the end, I just filled out the heart shapes more fully using my Wet n' Wild Black nail polish.

anti valentines day nail art hearts 3


I don't know if these look anything like hearts to you, but that was probably the best I could do. I liked the concept and the "shattered hearts" idea, but I'm feeling a bit meh about my execution. But still, here's my Anti-Valentine's mani! What do you guys think? Shattered hearts, or just mere blobs?

Chanel Graphite Dupe Search: Comparisons with OPI and Face Shop

Sunday, October 9, 2011

13 comments
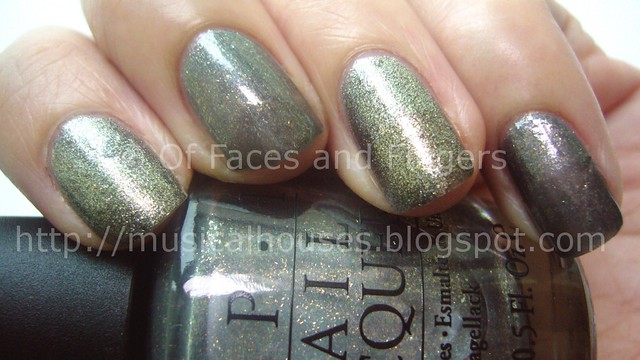
Chanel's Graphite nail polish, one of their Fall releases, has been making the waves, with its stunning shade and foil finish. I suspect part of the hype is just that it's Chanel - few brands just have that je ne sais quoi that cause such a frenzy everytime something new is released.

As usual, I ooh-ed and aah-ed over the new Chanels, but was less keen on the price point. So I swatched Chanel Graphite next to other existing polishes I already had, just to see whether I really needed it or not. *Sighs* Oh well, what's a girl on a limited budget to do?

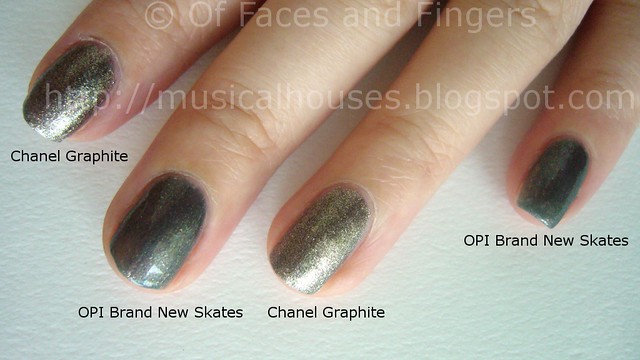
The first polish is OPI Brand New Skates. Now this has been established by other bloggers to NOT be a dupe, but I thought I'd just swatch them side by side for anyone who was still curious about the differences between the two.

Chanel Graphite OPI Brand New Skates Comparison 1


L - R: Chanel Graphite, OPI Brand New Skates, Chanel Graphite, OPI Brand New Skates

Both OPI Brand New Skates and Chanel Graphite have the same greyish, slightly green leaning base, but the shimmer in both polishes is totally different, despite the same base colour. Chanel Graphite is obviously a lot more blingy - the foil finish is very strong, and the foil glitter is very dense, while Brand New Skates isn't a foil - it's more of a grey-green base with dispersed gold/bronze/silver glitter. Also very pretty, but not a dupe.

Another difference is that OPI Brand New Skates is really sheer. What you see applied is 3 coats of medium thickness. Graphite, on the other hand, is fully opaque in 2 coats.

Chanel Graphite OPI Brand New Skates Comparison 2


L - R: Chanel Graphite, OPI Brand New Skates, Chanel Graphite, OPI Brand New Skates

Brand New Skates is a gorgeous colour, to be sure, it isn't a dupe. Perhaps for someone who liked the base colour of Graphite but not the foil finish, Brand New Skates may be a better pick. For me, the best part of Brand New Skates is that I got it for a cool S$8 from my friend Luna in a blogsale, so to me, that's a total steal!

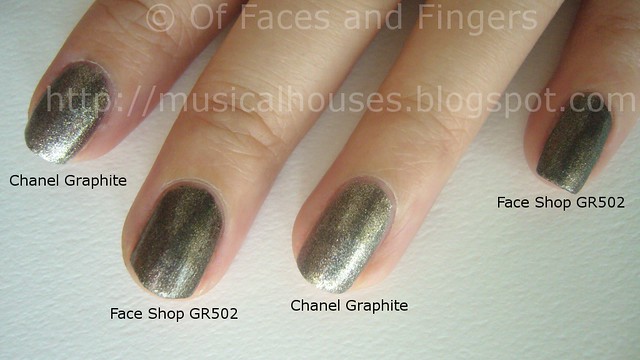
The next polish that I thought looked similar to Chanel Graphite in the bottle was a really random Face Shop polish I had purchased sometime back. This is The Face Shop's Face It! nail polish range, and the colour is GR502. It's absolutely gorgeous, and I'm ashamed to say I've only worn it once! Here's a comparison with Graphite:


L - R: Chanel Graphite, Face Shop GR502, Chanel Graphite, Face Shop GR502

Since I wasn't really expecting the Face Shop one to be a dupe, I was surprised to see that it was actually quite similar to Graphite! Granted, they aren't exact dupes, but they are pretty close. Both Graphite and GR502 have the same green-grey base that looks a little olive in certain lights, and both have that intense gold foil.

The only difference is that Chanel has a more intense foil finish than Face Shop. This difference in foil finish is more obvious in some lights than in others - in stronger lights, GR502 looks quite convincingly similar to Graphite, but in low lights, it doesn't. The photo above shows the two in sunlight, where they look similar. The photo below shows a shot of both in lower lights, where you can see the difference in foil finish.

Chanel Graphite Dupe Face Shop GR502 (2)


L - R: Chanel Graphite, Face Shop GR502, Chanel Graphite, Face Shop GR502

So although Face Shop GR502 isn't a dupe for Chanel's Graphite, I do think they are close enough to kill my very expensive Chanel lemming. And for our ladies in Asia, this is so much cheaper, and more accessible too. If I remember correctly, in Singapore the Face Shop Face It! polishes are around S$8 or so, making them less than a third of the price of Graphite.

If all three of them were the same price, though, I'd spring for Graphite in a heartbeat, just because it's the bling-iest of the lot, and you know I love me some bling on my nails! But I guess since I'm not willing to pay exorbitant prices for bling, I'll have to settle for the lesser blinged out alternatives, and just wait until the drugstore brands put out their dupe versions. Are you a dupe-lover? Or would you prefer to spring for the original?

OPI DS Extravagance: Awesome Holo Goodness

Friday, June 18, 2010

7 comments
Ahem ahem *clears throat and looks awkward* Before I show off the awesome holo-ness on my nails, could you guys do me a teensy favour and vote for me? (I bet you knew that was coming..) It's a simple two-step (or one, even) process: Go HERE, and look for the girl called "Grace". Looks familiar? Umm well that's because that's me! So if you've enjoyed my blog and would love to see me swatch/review more stuff, be nice to me and click on the "Vote" button. :) You can do it once a day, but I don't imagine anyone's going to do that LOL, so I'd be happy if you just voted a couple of times. If you're really lazy, CLICKING HERE leads you directly to the voting form for me :D All you need to do is enter your email address, and you can uncheck the box if you don't want Stila's spam :P

Today's NOTD is one of my favourite holos of all time. There are some holos that are awesome because of the way they totally bring out the holo rainbow on your nails (like GOSH Holographic, from THIS POST) and there are some which have a more diffused holographic glitter - you get holo glitter bits, but not the entire holo rainbow. I usually don't fancy these types of holos, but OPI DS Extravagance is one I make an exception for.

Although the holo is a little more diffused in this one, I still love it nonetheless, and I can't quite say why. Maybe its because of its holographic sparkliness, maybe its the rich pinky-plum jewel tone that really feels extravagant (like the polish name, haha) and makes me feel like I've got little gems on my fingertips everytime I wear it, maybe it's the way it glints and winks in the sunlight. Whatever it is, I love this baby. And summertime is the perfect time to wear holos - the extra daylight just makes them so much more glitzy.

Here's two coats in natural sunlight:

OPI DS Extravagance

Application on this one was good, as good as OPI's usually get. Not streaky, opaque in two coats, and generally trouble-free. I'm personally a huge fan of OPI's Pro-Wide brush, so I love the huge brush size because it lets me do my man-hands in fewer strokes, but girls with slimmer proper ladylike hands might not fancy it so much.

Like all holographic polishes, this one was a little high maintanence and chippy. It chipped after a couple of days, which is not unusual for a holo polish. I really love this one, and it's a pity the entire DS series was limited edition. I really wanted DS Original too, but I never got to lay my greedy paws on it before it wasn't sold anymore.

Nail Polish Haul: OPI, Essie, China Glaze, and Orly!

Wednesday, April 14, 2010

12 comments
Awhile back, to reward myself for getting through a particularly stressful period of school (believe it or not, despite all my professors' assumptions about the "copious free time" we have, us grad students are actually a relatively busy bunch), I decided it was time to place an order of my lemmings. Hey, don't judge me - my groupmate bought himself a camera, so I figured it was perfectly reasonable for me to buy nail polish. And so I did. And these babies arrived all the way from the great USA, the land of cheap Chinaglaze, etailers of nail polish, and buy-1-get-1-free drugstore makeup promotions. Oh, just thinking about it makes me so jealous!

Anyway here is my amazing haul. Please pardon the crappy pictures, they were taken at night under my yellow lamplight, and I suck at using photo-editing software:


Ooh, China Glaze Khromes! I've been wanting these FOREVER for konading purposes! I got China Glaze Sci Fi, Robotika, Millenium, and 2030, in that order from left to right. I'm going crazy just imagining the konading possibilities! Oh, I also got Essie Chinchilly. Mmmmm, grey. But this is not any ordinary grey. This is grey with the slightest green tinge, so chic and unique.


Ooh holos! And duochromes! And my favourite nudey greige mushroomy colour! In order it was Orly Golden Halo (this one is supposed to be sheer though, darn), Orly Country Club Khaki (my favourite! I know I have enough greige nudes, but I can't help it...I need to collect them ALL), and OPI DS Signature and DS Extravagance. I kind of prefer Extravagance, because it has that jewelled quality to it in the base colour, but DS Signature shows more of the holographic "rainbow" in the bottle. I can't wait to try these on my nails - I just KNOW they'll be amazing!

So that's my stress-induced haul. I know I can't be the only one hauling during times of stress, and hey, I figure at least getting a few more pretties is a better way of coping with stress than smoking pot, gambling or drinking :P Yeah, yeah, I know I'm full of excuses...But I can't help it, they're all so pretty!

OPI Jade is the New Black Dupe? Asos Paints by Ciate Pixie

Monday, February 1, 2010

17 comments
Of course, we've all been looking at pictures of OPI's upcoming Hong Kong collection that will be released in Spring, and while I was browsing the gorgeous pictures of many a beautiful finger, a thought suddenly struck me - Jade is the New Black looked hauntingly familiar. In fact, it kind of looked like something I already had in my stash, and that was released in Winter!

Ooh. Just goes to show you that these types of emerald-jade slightly dustied jewel greens are awesome and chic year round, be it Winter, Spring, Summer or Fall. Anyway, regular readers of this blog will probably be able to guess what I was talking about, because awhile back, I posted bottle pics of potential-dupe-in-question here. But of course bottle pictures are inconclusive. And as it so happens, I've actually used it for a mani since then!

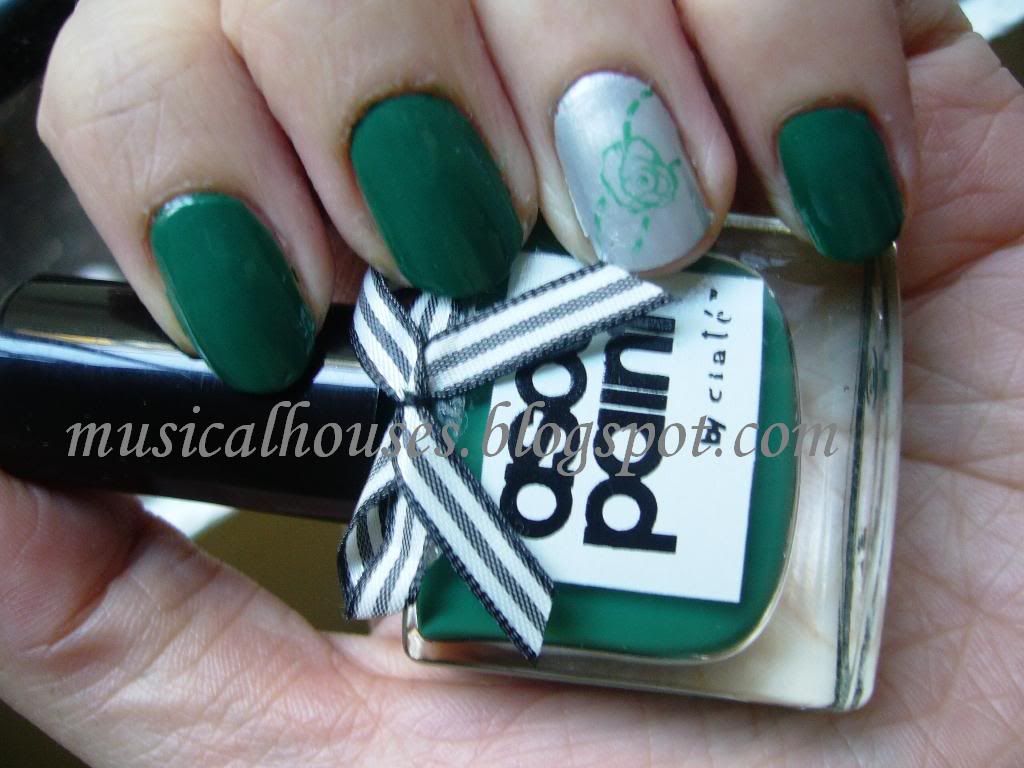
Behold, a potential dupe-or-not for OPI's Jade is the New Black. Maybe it's not a dupe, but it's definitely in the same family, or if not, a close neighbour. From what I could tell based on other bloggers' swatches, the main difference is that Pixie is a little more blue-toned, while the OPI is more yellow-based. I do think they are close though. I only wish I had the actual OPI colour so I could do a side-by-side comparison. But anyways, this maybe-it's-a-dupe-maybe-it's-not isn't too shabby either. It's cheaper (for the UK ladies, that is), it's beautiful and creamy, it covers in one coat (although I used two out of habit) and it's none other than Pixie, from the Asos Paints by Ciate Winter Collection!

Observe it's beauty, in natural light:

Asos Paints by Ciate Pixie

And here it is indoors:

Asos Paints by Ciate Pixie

Of course, I couldn't leave well enough alone, so I had to pair it with $OPI's Run With It, a beautiful, albeit streaky and sheer, silvery grey, and I konaded over the ring finger with Pixie, using Konad plate M57 (I think. I'm bad at remembering which plates I used).

Anyway, can I just sing the praises of Pixie again? Oh Asos and Ciate, you have done it again. Beautiful, pigmented, creamy, good texture, and very smooth creme. Unfortunately, it's let down by a brush that likes to skip and make application not as great as it could be. Which is really unfortunate, because the formulation of this was near perfect, and it was a shame that it was let down by the brush.

I also really liked Pixie, because it is something of a chameleon, colour-wise. Indoors it leans a little blue, and sometimes I swore it looked rather teal on my fingers. But outdoors, it looks most mostly green. And this isn't a wimpy mint-jade green (haven't we had enough of those already?) but it's a much sexier, much more sophisticated, much more chic older sister of those green wannabes. It's deep, but not too deep, and it's a mix of emerald and jade colours, and is bright but still a little dusty, making it eyecatching but still very wearable. And of course it likes to tease me by being bluish and teal sometimes.

So OPI, don't say I didn't warn ya, but you have competition! I only wish I could get my hands on OPI Jade is the New Black to do a side-by-side comparison!

Bookmark and Share

NOTD: OPI Lincoln Park After Dark Suede

Sunday, January 10, 2010

6 comments
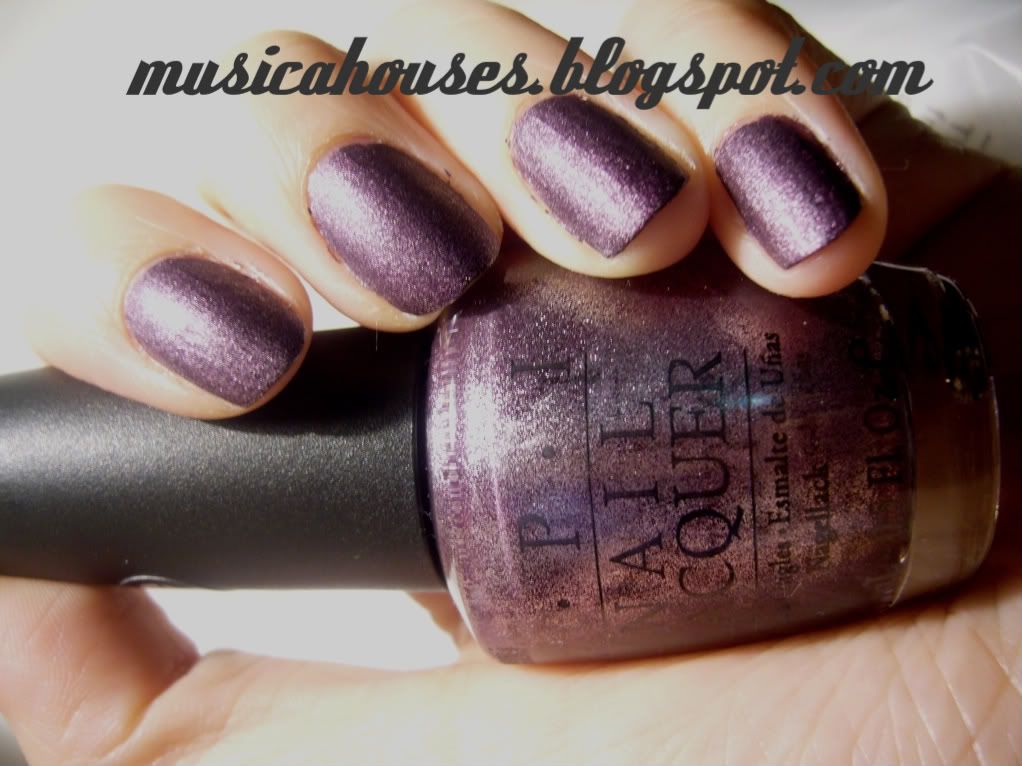
Today's NOTD is OPI's Lincoln Park After Dark Suede. I really love this colour, and the OPI Suede line in general - it really does matte without being flat. It's also incredibly fast drying, as in REALLY fast drying, although I guess you already knew that. It's also increibly chiptastic - I got a chip the very same day. Argh.

I really love the Suedes though. They're great for when I'm in a hurry.

These were with a basecoat underneath - I know people say you shouldn't use them, but I think as long as you let the basecoat dry completely before putting on the nail polish, there isn't a problem.

OPI Lincoln Park After Dark Suede

OPI LPAD Suede

Color Club Fashion Addict and OPI Lincoln Park After Dark: KOTD

Sunday, December 27, 2009

5 comments
Hey guys! I'm back from X'Mas break and crazy laptop hard drive issues!

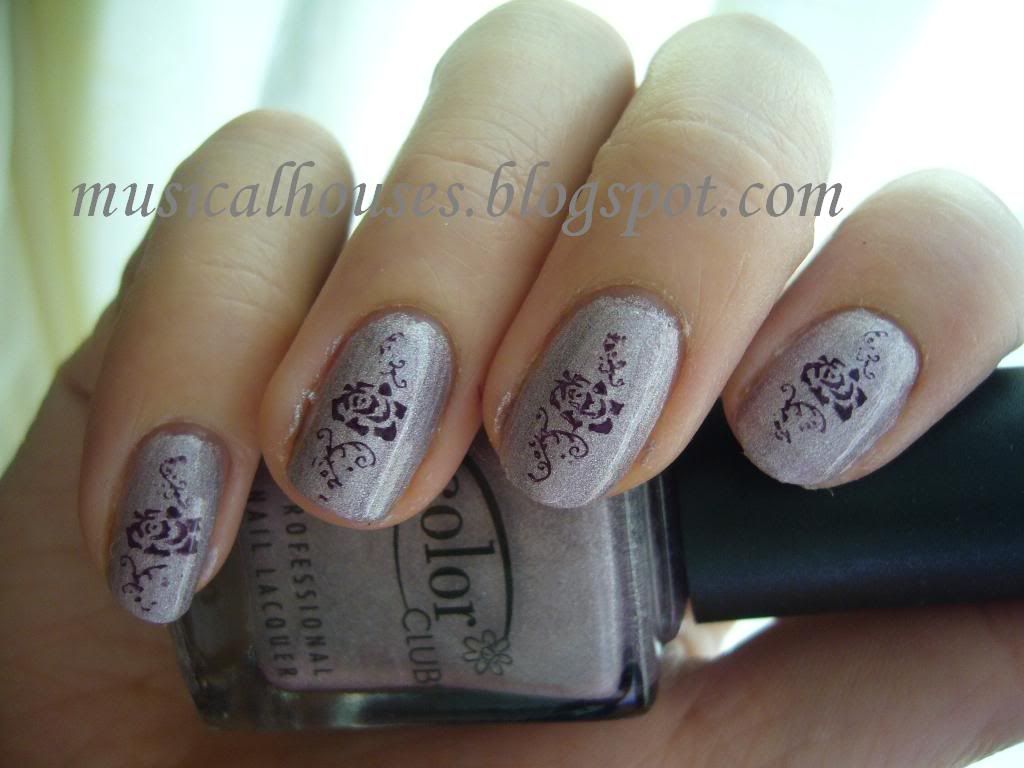
Today's KOTD is Color Club's Fashion Addict as the base with OPI's timeless LPAD for the flowers. Plate is M34 I believe.

Once again, excuse the frazzles, the pre-clean-up pics, and the general sloppiness of application - I'm so not a pro. I so suck at nails, but I promise I'm getting better. Slowly. Sort of.

Color Club Fashion Addict OPI Lincoln Park After Dark

I liked this, but it's not the most creative or the best KOTD/NOTD ever. I don't mind it though, This was 2 coats of Fashion Addict. Unfortunately the holo effect is rather weak on me - I don't know how other bloggers get their awesome holos to show on photograph, but this was under natural light in my room beside the window, and it doesn't look holo at all! I'm utterly crushed. Maybe I got a dud. Sigh.

I tried getting other pictures of this KOTD in other lighting, to see if I could get the holo to show up - warm light, white light, natural light, a mix of lights - and this was the best I could get:

Color Club Fashion Addict OPI Lincoln Park After Dark

Don't you just hate it when holos aren't holo enough?

Comparison Swatches: Nude/Beige Nail Polishes

Monday, December 21, 2009

6 comments
So I've finally decided to do a comparison of the various nude/beige nail polishes I have. So far I have 7 of them.

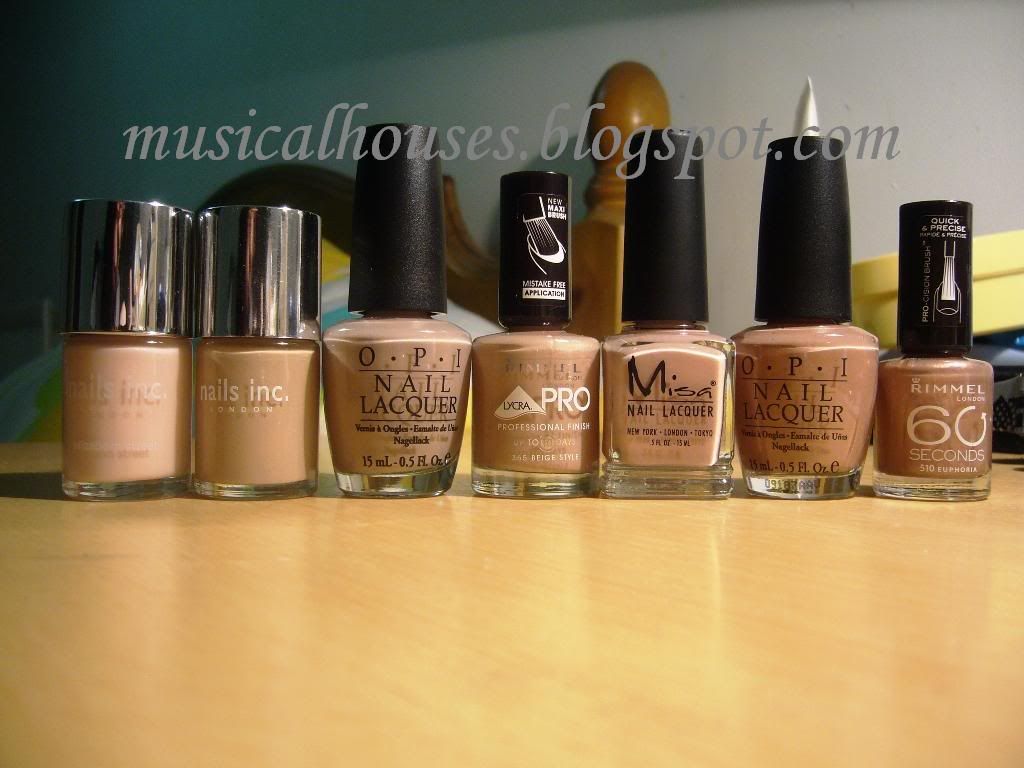
Nude nail polishes comparison

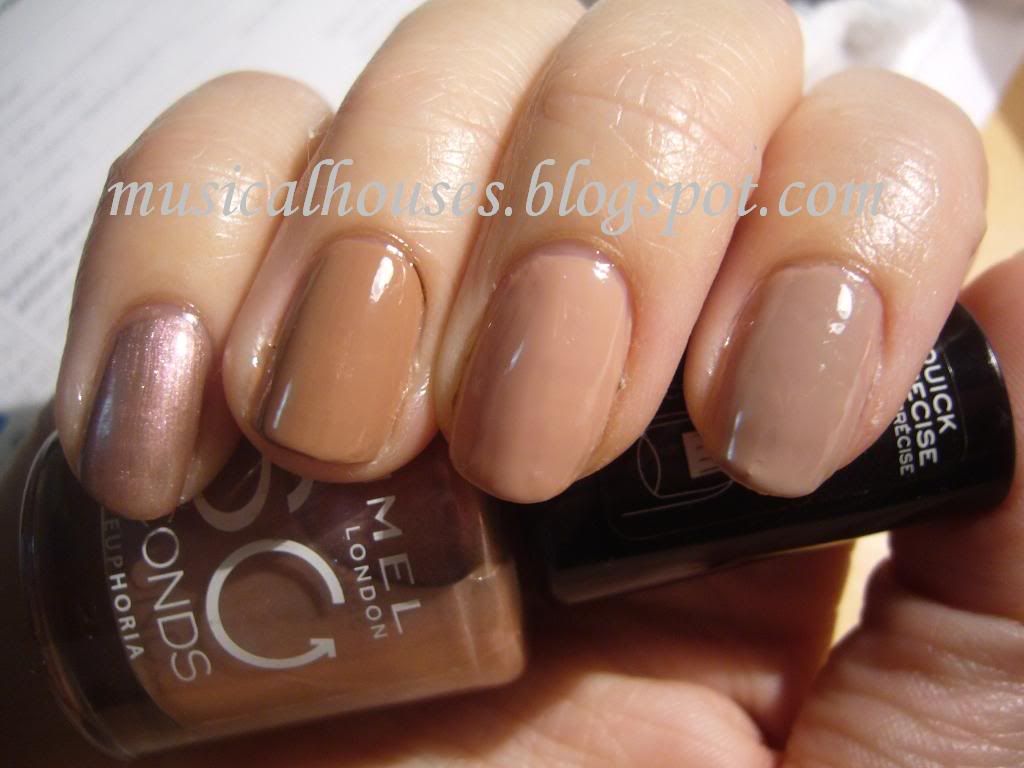
L - R: Nails Inc Elizabeth Street, Nails Inc Basil Street, OPI Tickle My Francey, Rimmel Beige Style, Misa High Waist Hue, OPI Barefoot in Barcelona, Rimmel Euphoria

OK OK so I know Nails Inc Elizabeth Street isn't really a beige nude..But I'm putting it in there anyway.

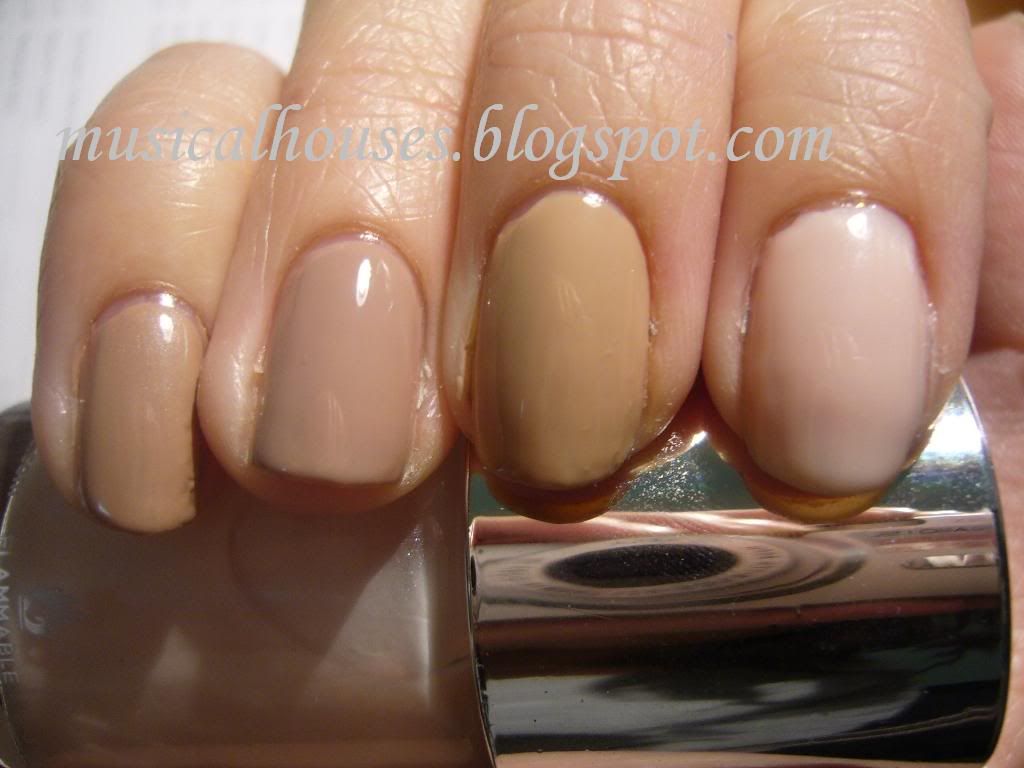
Here's the first four of the nail polishes, swatched. Each of these were 3 coats, although most only needed two.

Nude nail polishes comparison

Index to Pinky (that's R - L): Nails Inc Elizabeth Street, Nails Inc Basil Street, OPI Tickle My Francey, Rimmel Beige Style

Nails Inc Elizabeth Street was a bit disappointing. First of all, it was streaky and uneven and sheer, and required 3 coats to be opaque, and even then it didn't really look that good :( This was why I had to use 3 coats for all the swatches - I figured since I had used 3 coats for Elizabeth Street, for comparison's sake I might as well use 3 coats of the rest, although they weren't nowhere as sheer. It's a pale milky baby pink type of colour, a creme finish. I don't mind this colour, I just wish the quality was better.

Nails Inc Basil Street...I've talked about this before haven't I? Creamy, smooth, and opaque in two coats. I really love this, and I really LOVE Nails Inc, so I have no complaints about this one. It has a little pink in it, but it's pretty beige for the most part.

OPI Tickle My Francey needs no introduction, with it's now-famous pink-grey-nude hue. I like this one a lot. The grey tinge gives it an edge and makes it more unusual. This requires two to three coats, depending on how thin or thick the coats are, to acheive full opacity.

Rimmel Beige Style also was a 2-3 coater. Unlike the other colours, which were all creams, this one has a slight shimmer. It's more pink than Basil Street, but less pink than Tickle My Francey. I really like this one, I imagine it'd be pretty much universally flattering on most people because it has a nice balance of pink and beige.


Here's the last three, along with OPI TMF again for consistency:


Nude nail polishes comparison

Index to Pinky (that's R - L): OPI Tickle My Francey, Misa High Waist Hue, OPI Barefoot in Barcelona, Rimmel Euphoria

Wow. These all look so different on the nail.

Sadly, Misa High Waist Hue and OPI Barefoot in Barcelona seem to veer very warm on me - and I have no idea why. Barefoot in Barcelona looks positively orange, and Misa High Waist Hue looks like it has a slight peach tinge to it. Unfortunately I don't really like how they look. The OPI was nicely opaque in 2 coats, while the Misa required a little more, 3 to be perfectly even.

The last one, Rimmel Euphoria, is a pinky nude that seems to have a little bit of taupe thrown in - maybe its the shimmer. I really like this one, and I think it's a rather interesting colour. It applies a bit unevenly, but nothing nightmarish.

I guess out of the entire lot, my favourites are Nails Inc Basil Street, Rimmel Euphoria and of course, OPI Tickle My Francey. But of course, a good nude is so dependent on skintone that it's hard for me to say who would look good in which nude. I just hope these pictures and my ramblings have helped someone.

Linkwithin

Related Posts Plugin for WordPress, Blogger...