Growing up as an Asian girl in Asia, I couldn't help but notice that the girls around me were concerned with looking beautiful. Now the desire to look good is, of course, universal to all women (and men, I'm sure), but in the Asian context, it seemed to me to focus on two specific areas: the eyes, and the nose. I always found this a little bit funny, because it seemed to just be an Asian thing, perhaps. Girls around me were always trying to make their eyes look, bigger, rounder, and have a more prominent crease - basically, they were trying to make their eyes look more Caucasian. And then there was the nose. Basically, if you have a nose with no bridge, and a nose tip that isn't well defined - in Asian-speak, a nose that isn't Caucasian-looking - then your nose isn't as pretty.
Now of course, not all Asian girls want to look Caucasian, and not all Asian girls are obsessed with beauty, but it just happens to be a trend I've noticed over time. I always like to tell my American friends, just like how American girls are obsessed with boob size (and again that is another generalization), Asian girls are obsessed with the shape of their eyes and noses. I guess it's just human nature - there's always something about yourself you're not quite happy with, and it doesn't matter whether you're Asian, Caucasian, or Alien. LOL.
So it puzzled me when I discovered this little invention. I know most of my Asian readers will know what this is, but I bet my Caucasian friends are going to be a little confused as to what this contraption is:

It's a nose clip. Yup, you heard me right, a nose clip. It's been around in Asia for awhile, and seems to have a steady stream of buyers, despite looking a little like a torture device. But what is it used for?
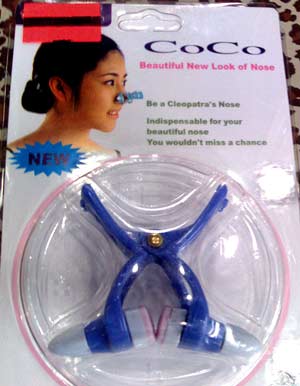
(Picture from: http://texyt.com/plastic+clip+diy+nose+job+cheap+00078)
Yes, you are indeed supposed to clip your nose, as in the illustration on the package. Basically, if you are one of those girls with - heaven forbid - a non-Caucasian-looking nose, you can now clip it into shape with this handy little gadget.
Don't believe me? Check out the product description, complete with Engrish explanations exhorting you to "be a Cleopatra nose" (what!):

(Picture from: http://texyt.com/plastic+clip+diy+nose+job+cheap+00078)
Personally, I'm not a fan of these devices. I mean, I can understand girls who are unhappy about their nose - in fact, if you
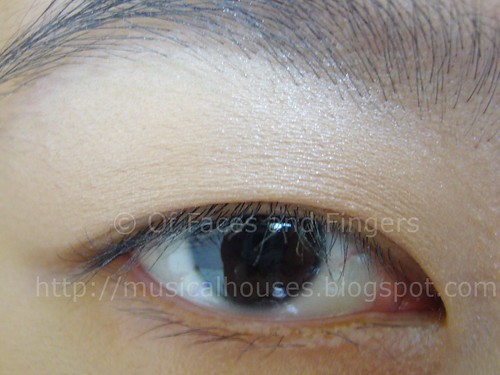
take a trip through any of my FOTDs, you'll see that I have the most bridge-less, flattest, un-Caucasian-like nose you can ever find. So I fully emphatise. But to go to the extent of clipping your nose like that? Personally, I'd rather whip out the contouring powder. More painless, and still effective, and it wouldn't make me feel like I was selling out by trying to reshape a part of my body in a rather painful way. (For the record, I don't actually have any contouring powder. I'm too lazy.)
That said, these little nose clips were all the rage for a period of time. Everyone and their mothers had one. Heck, even my roomate had one - and back then, we were studying in Chicago, and she had hers flown in all the way from Singapore just so she could use it! I never had one, but I thought it was crazy. I mean, I borrowed my friend's nose clips and tried it out once, and I couldn't keep that clip on for more than 5 seconds. It was PAINFUL, because those nose clips were made of hard plastic, and they were basically no more than glorified clothes pegs. Try putting a peg to your nose and telling me it isn't painful! In fact, I distinctly remember my roomate clipping her nose so much that the flesh on her nose became red and tender. Not very sexy, but at least it made her happy.
But nose clips aside, what really bugs me is also the advertising of these nose clips. Take a look at this photo on the packaging, advertising the nose clip:

(Picture from: http://texyt.com/plastic+clip+diy+nose+job+cheap+00078)
Asian girl looking longingly at Caucasian girl, check. Caucasian girl is on a TV screen while Asian girl is sitting at home, check. Asian girl is having this "I-wish-I-was-like-you" look while gazing wistfully at Caucasian girl, check. I don't know about you, but something about that image just unsettles me. It's almost as though that image is saying "Hey Asian girl, we both know you would rather be Caucasian, because Caucasian girls are all prettier. So why not use our nose clip, and you can be just like her?" I've always been a bit annoyed by ads that play into this whole "buy our product and you'll look more Caucasian" mindset, becaue it seems a little bit sterotypical. And I'm not too keen on companies attempting to cash in on sterotypes to make a quick buck.
Anyway, just in case anyone has questions about the efficacy of these products - well, I suppose if you did have the patience to clip your nose til it almost resembles Michael Jackson's, these products might just end up working - but only a tiny little bit, and only for a very short while. This is because these products just mold your nose by applying constant pressure to it. Over time, the pressure deforms the nose, and it attains a slightly different shape. However, this effect is only slight, because the underlying shape and structure of the nose remains unchanged. Furthermore, because this change is brought about only through sheer pressure, the result is that the change is not permanent. So the pressure has to be constantly applied in order to maintain the effect. It's kind of like Botox - it may help things for awhile, but it's not a permanent fix, and it doesn't do any real change. I also wouldn't be surprised if in the long run, it actually damages your skin and tissue underneath - I mean, all that pressure and squeexing can't be good.
So obviously, you can tell I'm not really a fan of such gadgetry. But I know lots of girls are. And I know this because the inventors of the nose clip have come out with yet another grotesque-looking nose-shaping device to make more money:

(Picture from http://inventorspot.com/articles/nose_jobs_without_surgery_devices_fix_your_flaws_39881)
Yup, I guess that must be for those who are REALLY unhappy with their noses, because it clips not just the nose, but the entire friggin nose bridge. Can you just say OUCH?
Anyway, like I've said before, I don't judge anyone. I don't judge people who wear only neutral makeup, I don't judge people who paint blue eyeshadow pigment all over their faces, and in the same vein, I don't judge people who wear nose clips. It's really that person's choice, after all, and what other people do to their noses is not in my purview.
But as I've said before - there is always something about yourself you're not going to like. If you're Asian, it could be your nose or eyes. If you're Caucasian, it could be your boobs. If you're Indian, it could be that you wish to be fairer. If you're African-American, it could be your hair. And the list goes on. What I'm saying is that no matter what ethnicity we are, no matter whether we think nose clips are OK or not, noone can ever be 100% happy with themselves, because nobody is perfect. So, past a certain point, we just have to accept ourselves for who we are. And I know that this going to sound odd on a beauty blog, but there is only so much makeup and skincare can do. At the end of the day, no matter who we are, or what our race is, beauty products and beauty companies can't love us, and they can't make us love ourselves more, although they can make us look more pretty. At the end of the day, we just have to love ourselves.


Monday, January 31, 2011
3 comments