Slider

Showing posts with label Shimmer. Show all posts

Beauty Asia 2014 Haul: Hakuhodo Brush and Nail Polish!

Wednesday, February 26, 2014

6 comments
Beauty Asia 2014 was held for 3 days in February last week, and I am excited to say, since it was in a central area, I managed to head down during my lunch break to take a look! And of course, I couldn't resist hauling! This time, unfortunately, unlike last year, I missed the guided tour meant for press and media, so I guess I'll just focus on the hauls that I had this year!


One of the highlights of Beauty Asia 2014: Hakuhodo brushes!

Etude House & Rose Review and Swatches: Rosy Lip Tint and Flowering Nails

Monday, October 14, 2013

6 comments
Etude House's & Rose Collection has just launched, and it is indeed a gorgeously girly collection. Etude House claims that the & Rose Collection is inspired by the fairy tale ‘Sleeping Beauty’, and is supposed to capture the magical moment when Princess Rose is blossoming out into a alluring lady from a pure little girl. So that explains the name of the & Rose collection.


Etude House & Rose Collection: Pink and Pretty!

Name aside, I've had a chance to try the & Rose Rosy Lip Tints and & Rose Flowering Nails from the collection. Both have really impressed me! Both have really impressed me, and I think they are worth getting! I'll start off with the & Rose Collection Rosy Lip Tint and then move on to the & Rose Flowering Nails sets.

Etude House Rosy Lip Tint Collection
Etude House & Rose Collection Rosy Lip Tint: A range of 8 shades of pinks and roses.

Breast Cancer Awareness Month Manicure: Pink Gradient Glitter Nails

Tuesday, October 8, 2013

6 comments
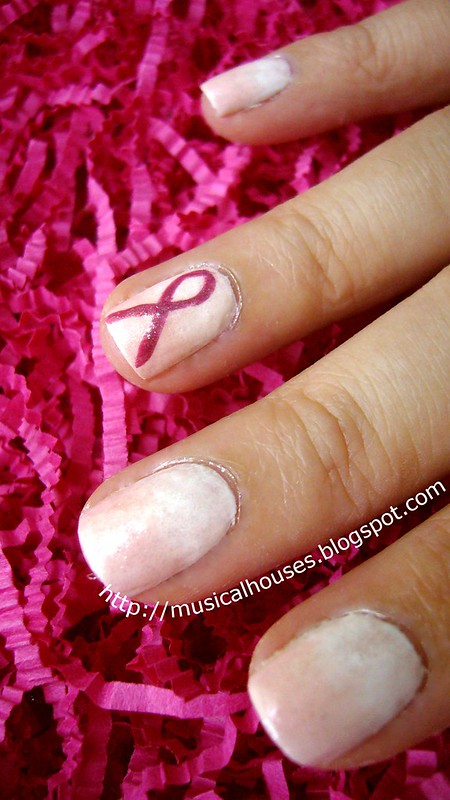
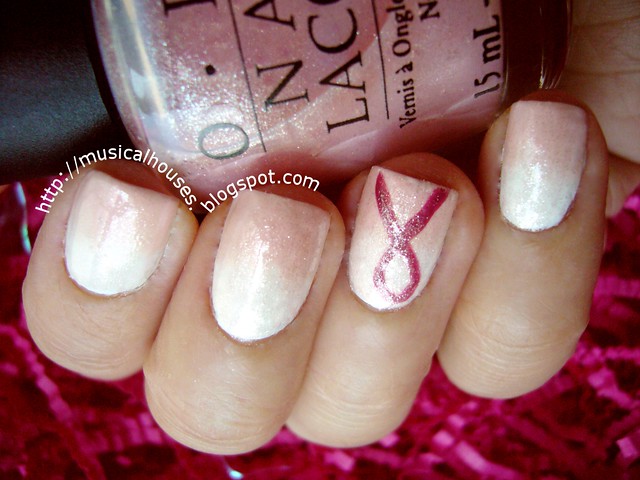
October is Breast Cancer Awareness Month, and I thought I'd do a BCA-themed manicure because breast cancer is actually the 5th top cause of deaths. If you're in the at-risk age group (50 to 74), the best way to detect breast cancer is to get a mammogram once every 2 years. And as with all illnesses, early detection helps!


My BCA manicure that's pink, shimmery, and IMHO, awesome!

Libertine Fall 2013-Inspired Nail Art: Gold and Gems (AKA So Much Bling!)

Tuesday, September 24, 2013

5 comments
As a total fashion noob, I've never heard of Libertine, but when I saw their nail art for NYFW (New York Fashion Week) Fall 2013, I just KNEW I had to try it. It was gold. It was full of gems. It had bling. And, it didn't require a heck-lot of precision. And look at what I came up with!


Libertine-inspired embellished manicure on gold base with gems!

Isn't it lovely and all blingy and stuff? This might make better sense if I showed you the original, at the runways of NYFW. The polish looks kinda gold-olive-muddy-a-bit-brown here, but it's described as gold (and it looks more gold) in the comments and in some other photos.


Libertine's Embellished manicure at NYFW Fall 2013 (Source)

When I saw this manicure, I thought, hmmm...blingy gems and jewels and stuff over a gold base. I can do this! So I decided to check out my stash of gold polish to see which one looked the most similar to the polish in the photos I was seeing.

China Glaze Swing Baby: Glamorous Gold Nails!

Saturday, September 7, 2013

1 comment
China Glaze Swing Baby is one of the untrieds in my stash. I bought it when it was a brand spanking new colour, and only just got around to wearing it! Swing Baby was a Fall or Winter (quite possible Christmas, in fact) release from 2010, I think. So given that this collection is a few years old, you can imagine that I've had it for a few years and have only just taken it out for a ride! Ah, such are the perils of beauty blogging when you have too much makeup and nail polish.


China Glaze Swing Baby: Look at all that gold on my nails!

Now that I'm wearing it, though, I wish I had taken it out sooner!

St Patrick's Day Gold and Green Gradient Manicure!

Tuesday, March 5, 2013

2 comments
St Patrick's Day is coming up, and I always love any excuse to wear green! This time, for my St Patrick's Day nails, I decided to attempt a gradient manicure - sideways!

For this look I used three shades - a darker green, a lighter green, and a gold. The darker green was Etude House Petit Darling Nails GR609, the lighter colour was Nicole by OPI One Time Lime (OMG Yes I actually own a Justin Bieber polish! Well it was on sale and I was in the US on holiday...), and the gold was Collection 2000 (now known as Collection Cosmetics) Aztec Gold (which I really love and have worn before as an NOTD by itself).


Halloween Nail Art: Purple Glam, Stars and Scars

Friday, October 19, 2012

4 comments
Halloween is coming up, and I just feel so inspired to do some Halloween nails! I'll be frank - the Halloween nail art that I did last year sucked, so I thought that this year, I had a lot of room for improvement. And this year, I present to you this!


This year, I used the classic Halloween of purple and orange. I used Zoya Yasmeen as a base. I have to tell ya, Zoya Yasmeen is da bomb. I've done a Zoya Yasmeen NOTD back in the day waaay back when, and I still love it!

halloween nail art 3

I then placed these orange stars randomly on my mani, and then I added in the white scars freehand with a long nail art brush.

halloween nail art 4

I actually really like the overall effect, the stars over the purple add a little bit of glam, while the white scars added a little bit of an edge. It's glam but still very much a Halloween manicure! Actually it already looked good enough with just the orange stars, but I figured out that a little edge to the nail look couldn't hurt!

halloween nail art 2

Actually, I don't really celebrate Halloween at all, but I kind of just like utilizing some of the colours for nail art just to go along with the festive mood of the season. Anyone else having fun with Halloween on your nails?

Pink and White Gradient BCA Nails

Monday, October 15, 2012

1 comment
So after my first Breast Cancer Awareness month manicure, I decided to do a second BCA mani! This time, I used the same pink and white colour scheme, but I used a bit of glitter as well! And of course, the pink ribbon is there on the accent nail.


Although this mani is simple, I actually used a total of four different polishes. For the white and pink gradient, I used Wet n' Wild White (duh), while the pink was RBL Lulu, a very pretty pastel pink of the BCA variety.

breast cancer awareness nail art 1

The pink ribbon is Wet n' Wild Quartz of Course, and I freehanded the ribbon again this time. And then I topped that with OPI Princesses Rule! which actually is tiny glitter in a base that has a slight tinge of pinky sheerness. I kinda overestimated how sheer the polish was, and when I applied it over my mani it actually made everything look pinker. Oops.

breast cancer awareness nail art 2

So that's my second BCA mani! Hope you guys like it! Stay healthy and pretty everyone, and take care of your health! You can read up further on breasts cancer here, and there are lots of other resources available too. Breast cancer is the 5th top cause of deaths, so if you're in the at-risk age group (50 to 74), the best way to detect breast cancer is to get a mammogram once every 2 years.

My $1 Version of Revlon Runway Pearl: Sally Hansen Platinum

Saturday, June 16, 2012

3 comments
Recently, there's been a lot of hype over Revlon Runway Pearl, as it's one of the newer Revlon polishes to be released. When I saw it in Walgreens while I was on holiday, I was intrigued by it, but in the end I didn't bother, since it seemed like just another frosty ol' white, although with an interesting pink flash in the colour.

Next thing you know, I'm walking past the Dollar Tree, and lo and behold, I see this little baby. And although it, too, also looks like just another frosty ol' white with a pink flash, hey, I guess for a dollar, I could just buy it first, and rationalize later, right?

sally hansen platinum bottle

So here you go. Picture spam! I suppose it's what I expected to be, nothing more, nothing less. That is, sheer frosty-ish white with a pink flash. And as such, it's just an okay-ish kind of manicure. This here is three coats, and it's pretty opaque at three.

sally hansen platinum 1


I suppose I wouldn't have bought this if I hadn't caught sight of Revlon Runway Pearl first. I don't know how the psychology goes, but I suppose it's the equivalent of seeing a more branded product (say, Jergens Hand Lotion), feeling like maybe you want it, and then seeing right next to it is the Walgreens own brand version of the same hand lotion. I don't know about you, but I end up going for the Walgreens sometimes. Human psychology, I guess...


Anyway, this isn't a bad colour. It looks very light, clean and pearly on my nails. And I think the pink reflects make it a tad more interesting, too. I tried getting more photos of the colour to show you the tinge of pink reflect, but I couldn't really get it on my camera.

sally hansen platinum 3


Although this isn't really a colour I'd wear typically, I don't mind, it's a good palate cleanser once in awhile. And for a dollar, I can't complain. And although it required three coats, it applied well and wasn't streaky or anything weird.

sally hansen platinum 4


For me, this is good, it helped me to squash my half-hearted lemming for Revlon Runway Pearl. What about you? Do you like these types of pale, pearly shades, or are they just not your cup of tea?

Syrup Manicure and Sparkles: China Glaze Beauty and the Beach and Fairydust

Monday, May 14, 2012

2 comments
I tried my hand at the syrup manicure the other day. I liked colour, but I didn't really like how the manicure itself turned out. I think I kinda sucked at the gradiation. So of course I did what anyone covering up for a failed syrup gradient manicure did - I put glitter over it! Here's the final look.


The syrup manicure uses just one colour, typically a very sheer jelly, in order to get the gradient effect, in contrast to other gradient manicures that use two colours. The sheer jelly shade would then be applied in successive coats to give the gradient effect. For this look, I used China Glaze Beauty and the Beach, which I bought like, in a haul a long time back, but haven't used til now (shame, I know). Anyway, I thought that since it was such a sheer jelly shade, it would be perfect for the syrup manicure.

In order to get the gradient effect, I started off with a coat of Beauty and the Beach all over the nail. I then applied a second coat of Beauty and the beach from three-quarters of the nail, and a third coat from halfway up the nail. The last coat was applied just to the top quarter of the nail, nearest the tip. That created the gradient look.

china glaze beauty and the beach fairydust syrup manicure 1


Sadly, I wasn't very pleased with how the gradient turned out. I felt like the gradient was too sudden, and wasn't very "gradient"-like. Anyway, I decided to salvage it by adding glitter on top. I mean, glitter makes every manicure look better, right? So on went a coat of China Glaze Fairy Dust. Muahaha, now with my tips all covered with glitter (holo glitter, no less!) noone's going to notice that the syrup gradient isn't done right! How smart am I, seriously?

china glaze beauty and the beach fairydust syrup manicure 2


Anyway, if I had done the syrup manicure bit properly, I think I would have liked this a lot more. Although China Glaze Beauty and the Beach is annoyingly sheer, when layered it has a gorgeous lit-from-within glowy shimmer that I love. And of course, its annoyingly sheer nature makes it perfect for the syrup manicure. I also like China Glaze Fairydust - I swear, this polish just looks good over anything.

china glaze beauty and the beach fairydust syrup manicure 3


So there you have it - my failed attempt at a syrup manicure, and an equally fail attempt to cover it with glitter. Maybe next time I should do a few practice nails before jumping into these things. But for now, this is perfect for the spring and summer seasons - bright, happy, and tropical.

Magnetic Nail Polish NOTD: L'Oreal Star Magnet Purple

Saturday, March 17, 2012

7 comments
Magnetic polish is back in vogue again, with China Glaze releasing their Magnetix Collection, a line of six magnetic nail polishes. I'm always amused by how trends come and go with nail polish - first crackle/shatter polish, which Covergirl had in the late 90's that has made a comeback in the past 1-2 years again, and now, magetic polish. I remember these during just a few years back, perhaps in 2007 or 2008 (anyone remember?). Back then, L'Oreal and Lancome both had magnetic polishes, and both of them made quite a splash, too. The L'Oreal ones I have were from this range called the Star Magnets, which have since been discontinued.


This one that I'm wearing is in the colour Purple, although to my mind it's not really truly purple. It's a gorgeous shimmery pinky-purple that looks more pink than purple, and if you hold the magnet over your nail when the polish is still wet, you get a star design on your nail. Pretty cool, huh?

loreal star magnet purple 2


There are various ways of using the polish and the magnets to get the best possible star design on your nail (meaning, clear designs that actually look like a star shape, not a blotch). The one important thing is to hold the magnet over the polish while it's still wet, so the magnetic particles can move into shape. Once the polish is dry, you won't get any design. Because the L'Oreal Star Magnets are discontinued, a lot of people I know conserve their bottles by painting a base coat of similar colour, and then layering the Star Magnet colour on top. For me, I personally don't get as nice a star shape that way, so I just do it the wasteful way, and do two coats of Star Magnet polish.

loreal star magnet purple 3


I still remember all the trouble I had to go through to get my L'Oreal Star Magnets. I only wanted them after they had been discontniued (of course), so fortunately the lovely ladies on MUA (Makeupalley) pointed me to an online etailer based in the UK, who still had some bottles left. These have been the babies of my stash since then. Anyway, since magnetic polish is in again, I thought I'd dust off my L'Oreal Star Magnets and give them a shot!

loreal star magnet purple 4


I'm loving these magnetic polishes, although I feel like they're a little more time-consuming to apply, because you have to hold the magnet over the polish while letting it dry. But they're pretty fun, and I like seeing the stars form. Anyway, has anyone else been bitten by the magnetic polish bug? Do you already have any magnetic polishes? Tell me!

Valentine's Day Nails with Flowers and Gems!

Tuesday, February 7, 2012

6 comments
After my Valentine's Day nails with no pink at all, as well as my Anti-Valentine's Day nails (gasp, I know!), I decided to be nice and do a proper Valentine's Day nails - with a little of my style added, of course. I did do a nail look with flowers and girly colours, but it's also something I would actually wear out, that's not puke inducing (you know, all pastels and stuff).


Basically, for this Valentine's Day nail look, I used Nails Inc Queens Park, a gorgeous deep pinky-purple with a shimmery, almost-metallic-y, duochrome-y finish. I really love this colour, the jewel tone of the shade just makes it so striking, and very gorgeous! I can't think of very many colours I love more than this, and if purple is your thing (as it is mine) you know you HAVE to get this shade, even if it's only sold half the world away.'

On top of Nails Inc Queesn Park, I added some flower stickers, to give that girly touch. And if I were a little bit more normal like most people, I would have been happy to stop there, and it would have been a perfectly fine Valentine's Day manicure for a night out. But nooo, something inside me was crying out for more bling. So I added on some flower-shaped gemstones! So now my nail is so blingy right now. Both the nail art stickers and gemstones were bought from Viva La Nails.

valentines day flowers 1


The first thing I did after I had done this nail look of course, was take it to Twitter (if you follow me on Twitter you would have seen this) and Facebook (ditto the friending me on Facebook), to ask professional opinion (by professional I meant "other awesome bloggers and whoever was online then") if I had really over-blinged my nails. Fortunately, noone thought I over-blinged my nails. I guess there's worse out there, for sure, but I don't think I've ever worn so many stickers and gems on my nails at one go...

valentines day nails flowers 2


Anyway, since noone thought my nails were too blingy, I wore them out to work the next day, and to my surprise, the world didn't crumble. So there you have it - my overenthusiastic attempt to add some flowery girliness to my nails! I think, though, next time I wear Queens Park, I'm going to wear it alone. I feel like the colour is stunning enough to deserve a whole mani by itself.

a-England King Arthur v Ciate Velvet Tuxedo: Comparison

Thursday, January 26, 2012

5 comments
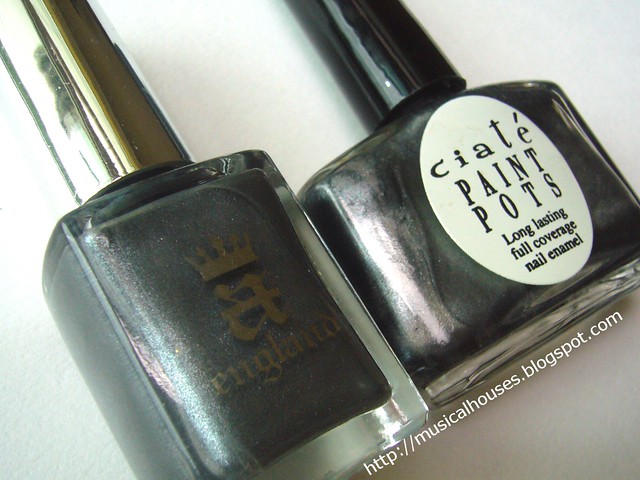
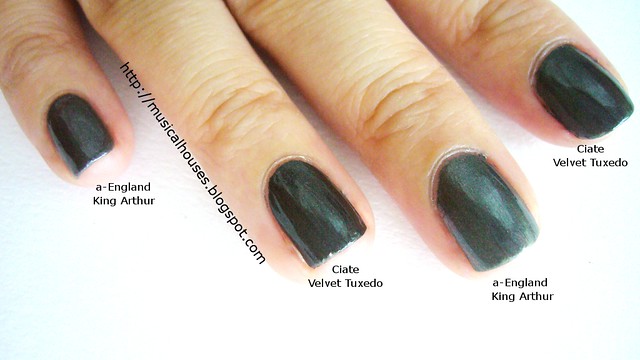
It's dupe comparison time! In a previous post, I wrote about a-England King Arthur, a gorgeous gunmetal grey. I thought it looked similar to Ciate's Velvet Tuxedo, so I decided to do a comparison to see if these were dupes or not.

In the bottle, both look quite similar. Both are deep gunmemtal greys with shimmer in them. My Ciate bottle used to have a cute ribbon on it (I actually have a super old NOTD and a bottle pic of Ciate Velvet Tuxedo on the blog - it's super old, so look at your own risk). But over time the ribbon came off, so now I have a ribbon-less Ciate bottle. No cute ribbon...it actually makes me a little sad.

a england king arthur ciate velvet tuxedo comparison bottle


Here's a swatch picture of the two in natural light. You can't really see it in the photo, but Ciate Velvet Tuxedo is actually a shade darker than a-England King Arthur. It's not a big difference, so for some reason the camera didn't pick up on it. The shimmer is the same in both colours, though.


L-R: a-England King Arthur, Ciate Velvet Tuxedo, a-England King Arthur, Ciate Velvet Tuxedo

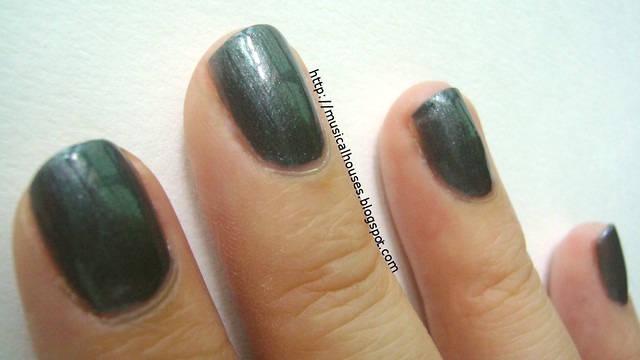
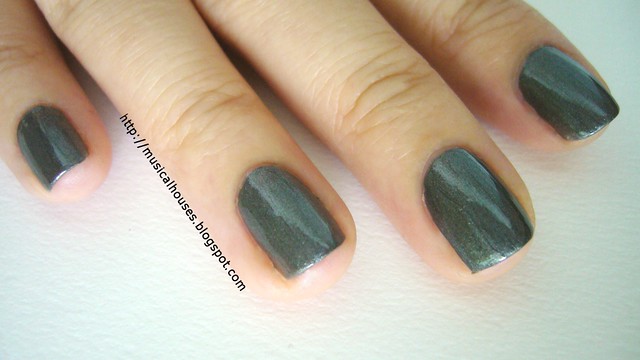
Below is another swatch picture, this time in more shaded lighting conditions. You can see the shade difference a little bit more clearly here. The Ciate shade is a shade darker than the a-England shade, but otherwise, both are quite similar.

a england king arthur ciate velvet tuxedo comparison 1 (2)


L-R: a-England King Arthur, Ciate Velvet Tuxedo, a-England King Arthur, Ciate Velvet Tuxedo

So, the final verdict - do you need both? To be honest, I feel like they are both quite similar. I'd get a-England King Arthur over Ciate Velvet Tuxedo, just because it's lighter and thus looks a little more grey and less black, especially in lowlights. But unless you wore the two side-by-side and looked closely at them, it's easy to think they're the same colour.

(a-England product was sent for review. All other products were bought. Review is my complete and honest opinion. I am not affiliated with/compensated by the company.)

A-England King Arthur: Gorgeous Gunmetal Grey

Sunday, January 8, 2012

6 comments
So I finally got around to trying A-England polishes! After hearing all the hype about them, I kinda felt like I was missing out. The UK-based brand does have some gorgeous colours, and a lot of their polish names are themed around medieval England. So good colours, great names - what's not to like?


A-England King Arthur, the colour I tried, is a gunmetal grey with a shimmer finish. It's a basic colour, but still very nice to have. I think I'll have to make a comparison post to another gunmetal shade I have in my stash. But I love the name King Arthur for this polish. It kind of reminds me of the blade of his sword, or the metal of his armour. Very romantic and evocative.

A England King Arthur 2


One of the things I really liked about this polish is that even indoors, it doesn't look black. It looks grey most of the time to me, which is always a plus. I also like the shimmer inside the polish. A-England describes it as "subtle diamond shimmer" (another very romantic description I love), and although it's subtle indoors, when the sun hits it, you can really see the sparkle. I'm all for bling on my fingers, so I love it.

A England King Arthur 3


Application of King Arthur was good, and I had no issues with either the polish formula, or the brush size and shape.

A England King Arthur 4


I can see why these have been so hyped-up lately. They do have some pretty colours with great formulas. Also, perhaps equally adding to the hype are all the very evocative medieval names. The only downside is that they aren't widely available. Within Asia, you can get them from Singapore-based Mei Mei Signatures, which is an online shop selling all kinds of hard-to-get-within-Asia nail polish brands. They also carry Nubar, Nfu-Oh (two other awesome brands), and a range of others, so do check it out if you're thinking of getting some!

(Product was sent for review. Review is my complete and honest opinion. I am not affiliated with/compensated by the company.)

How To Save Dried Out Nail Polish Strips Tutorial!

Friday, December 30, 2011

31 comments
Over the past year, I've been seeing more and more companies putting out nail polish strips. It started with Incoco, and then before you could say "trend", Sally Hansen, Sephora, OPI for Sephora, Nailene and a bunch of others all started putting them out too.

Unlike most nail appliqués, which tend to be made of a plastic material, I much prefer nail polish strips because the removal process is much kinder to your nails. Most plastic-based appliques involve soaking the entire nail in acetone for proper removal, but because these are essentially semi-dried polish strips, you can just remove them like normal nail polish, with cotton wool and nail polish remover. I've reviewed nail polish strips before in a previous post, and found them to be pretty good for a fuss-free application.

incoco soho chic strip


So, what happens when those nail polish strips - like real nail polish in bottles - dry out? I stumbled upon a solution the other day, when a months-old Incoco nail polish strip set I wanted to use had dried out. Fortunately, the answer is simple. All you need is this:

orly smudge fixer


Yep, that's all. Just a bottle of Orly Smudge Fixer. When I realized my nail polish strips had dried out, I was sad, and thought I'd have to throw the entire set out. And then a thought struck me: since these strips were made of nail polish, couldn't I rehydrate them with thinner, just like real nail polish? And isn't my handy bottle of Orly Smudge Fixer mostly made out of thinner anyway?

So began the experiment. The strip I'm using here is Incoco Soho Chic, a gorgeous deep brown with flecks of gold/red shimmer. It's absolutely gorgeous, which is why I was so loathe to just let it die like that.

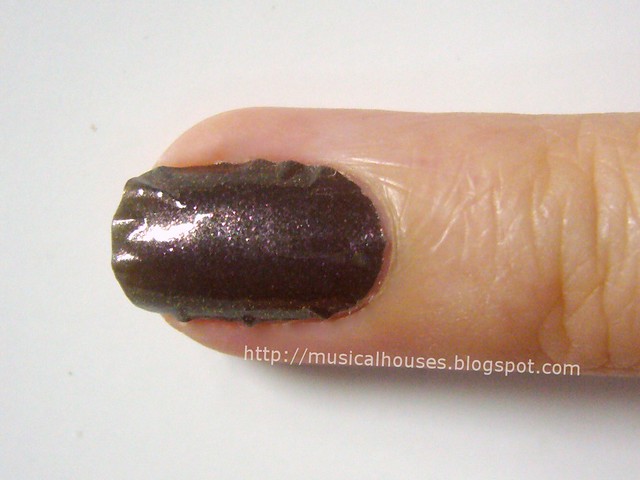
First, I placed a strip on my nail (if you've never done this before, here's a nail polish strip tutorial to help you out). As you can see, because the nail polish strip is dried out, it doesn't stick nicely to the nail. It's all bunched up and uneven at the sides. Normally I don't have this problem with the nail polish strips - they usually just stick quite flat to the nail.

saving dried nail polish strips 1


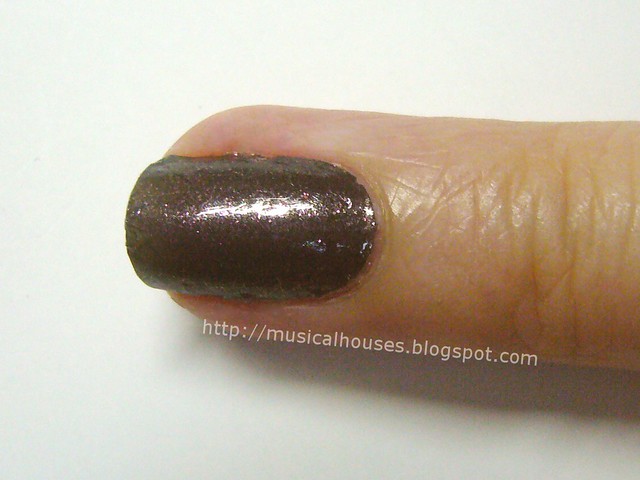
Next, we add a little of our secret sauce - Orly Smudge Fixer. I just painted the smudge Fixer over the unsticky parts of the strip, and the bulges. You can also just paint over the entire nail with Smudge Fixer if the strip is really dried out, but the general idea is to wet the strip enough for it to adhere properly to the nail.

saving dried nail polish strips 2


And you're done! Look, no more weird bulges! Wasn't that simple? Just wait for the strips to dry, and you're good to go! Well, there is a small catch, though. Because the strips have been wet with Smudge Fixer, they will take a little while to dry. If you are impatient, a layer of quick-dry topcoat would help to speed things up.


And there you have it! Good as new! Other than Orly Smudge Fixer, I think you could use any other brand of nail polish solvent or thinner. The general idea is just to put back the solvent which had evaporated and thus caused the strip to dry out. I'm pretty excited about this method, it's simple and it works! Now I have an awesome manicure, and saved myself bunch of money!

Mixing Nail Polish and Pigments: Sprinkly Glitter NOTD

Wednesday, December 28, 2011

4 comments
After doing my green/gold Christmas eye look, I was left staring at my Evil Shades loose eyeshadows, and a thought came to me - wouldn't it be awesome if I could have a nail polish with a finish like that? And so began this experimental NOTD.


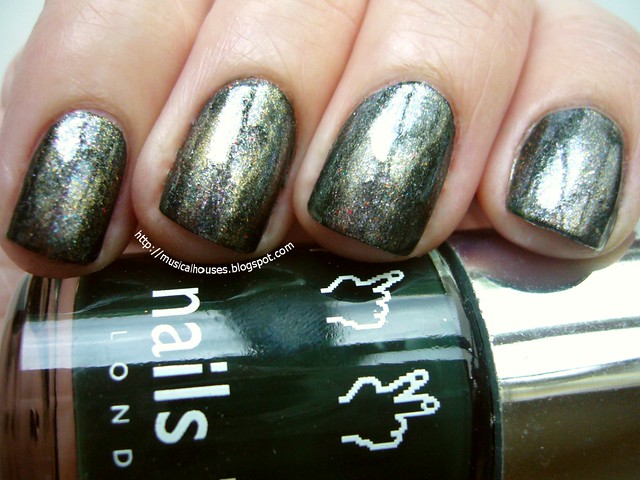
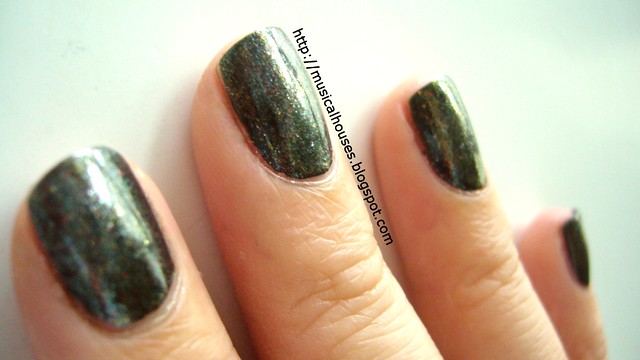
For this NOTD, I used Nails Inc Fitzhardinge Street as a deep green creme base, and basically loaded my Evil Shades eyeshadows in Ice Star and Morning Star over it. I picked these two shades because they have more chunky glitter than the rest of my eyeshadows, which made them perfect for adding some glitter to my nails!

nails inc fitzhardinge street and eyeshadow glitter 1


I know people do franken their own shades, but I didn't feel up to an all out franken, since the last time I tried to mix my own colour, it was a big fail. Instead, I waited til the nail polish was semi-dry, and then sprinkled the eyeshadow powders on top. Surprisingly, this was actually easy to do. The glitter stuck to the polish, and I realized how easy it is to create a gradient look with this method. Just imagine all the possibilities - gradient manis, glitter tips, and galaxy nails!

nails inc fitzhardinge street eyeshadow glitter 2


I'm honestly quite excited to try this again. The only downside is that after I was done, my fingers were all smothered in eyeshadow powder, which was a total pain to remove. Although I washed my hands numerous times, there was always some glitter stuck somewhere, LOL.

nails inc fitzhardinge street eyeshadow glitter 3


Glitter adventures aside, I love this look and I think it's a great way to experiment without going all the way to frankening new shades. And it's also an awesome way to find new life out of loose eyeshadows that you don't often use and would otherwise sit untouched.

Collection 2000 Aztec Gold Nail Polish: Classy, Understated and Neutral

Saturday, November 19, 2011

5 comments
Collection 2000 is probably one of the cheaper UK-based drugstore brands out there, and as a fan of drugstore gems, I'm starting to really like some of what the brand has to offer. For a good price, you get products of decent quality. Here's a quick NOTD (Nail of the Day) featuring one of my favourite Collection 2000 products, the Nail Polish in Aztec Gold.

I'm really love this colour because it's a very understated gold - it's not a blingy, catch-your-eye foil gold, but it's really more of a muted antique gold, with a shimmery metallic finish. And, it's not too brassy-looking for cooler skintones, either. Very classy, understated, and neutral. And if you ask me, it's wearable to the office, too (if your office environment isn't too strict).


Application was alright - it can be prone to brushstrokes, but I didn't have too many major issues, and the brush suited me just fine. It was also nicely opaque in two coats. The only gripe I have with Collection 2000 nail polishes is really the weartime - they typically wear well for a couple of days before chipping on me. I love this colour, and I wish it lasted longer, but for the price, I'm not complaining.

Sparitual Twinkle Collection Swatches

Saturday, September 17, 2011

7 comments
Sparitual's Twinkle Collection, consists of six shades meant to sparkle and shine. If I'm not wrong, this is meant as a seasonal collection for Christmas, and if this is indeed meant for Christmas, then Sparitual has done a good job of making some festive shades while eschewing the traditional all-red-green-gold-and-white colour schemes we see so often in Christmas collection. Sparitual's Twinkle Collection does have its fair share of usual colours (another red shimmer), but overall this collection does look pretty interesting.

Now without further ado, let's jump straight into swatches! First up, we have the swatches for the first three colours from the official Sparitual colour wheels.


Top - Bottom: Blue Moon, Illumination, Solstice

And here are the swatches for these three colours as they appear on my finger. Let's start with Blue Moon. Blue Moon, as the name suggests, is a blue colour - but this isn't quite the deep, almost-black type of blue you'd expect from a colour name like that. Instead, Blue Moon is always discernably blue, even in low lights, and looks to me to be a deepened colbalt blue, not quite dark enough to be called navy. It has small suspended glitter bits that give the shade a slight twinkle - just like a blue moon.
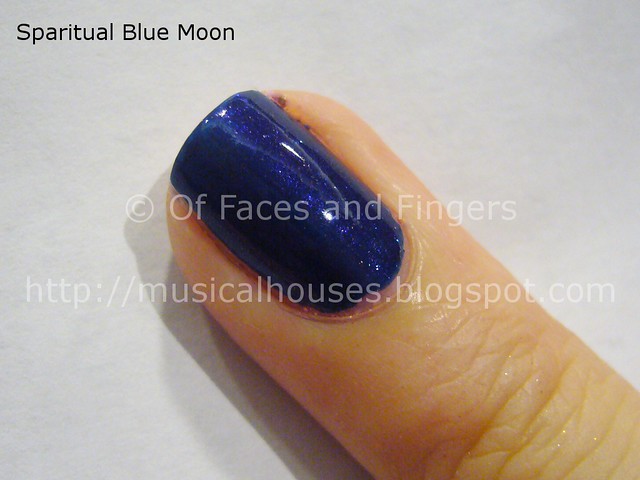
sparitual blue moon twinkle collection


Illumination, as the name suggests, is pure bling. This is actually a mix of holographic and non-holographic glitter bits suspended in a clear base. The glitter bits are rather large, and really add to the bling factor. My photo doesn't really capture how the holographic glitter bits dazzle when hit by the light, but I'm sure you know what I mean. What you see on my nail is two coats, and coverage is pertty decent, although you'll need three coats to ensure opacity.
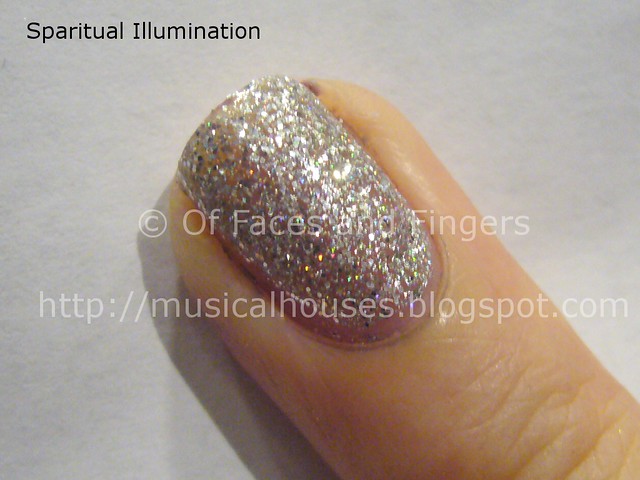
sparitual illumination twinkle collection


Solstice was marketed to us as a gold shade that would suit Asian skintones, and I can't say I really agree with that. For one, Solstice is a gold that I see as bordering on the warm side, so it probably would end up looking a little "off" on cool-toned girls, Asian or not. No doubt, the colour is certainly stunning, being a true yellow gold that is reminiscent of gold jewellery. However on me I felt it looked a tad weird. I felt that personally, for myself, a cooler shade of gold, like Orly's Luxe (which I've blogged about before), would have been more flattering. But to each his own right? And a great gold foil is always a good addition to any collection.
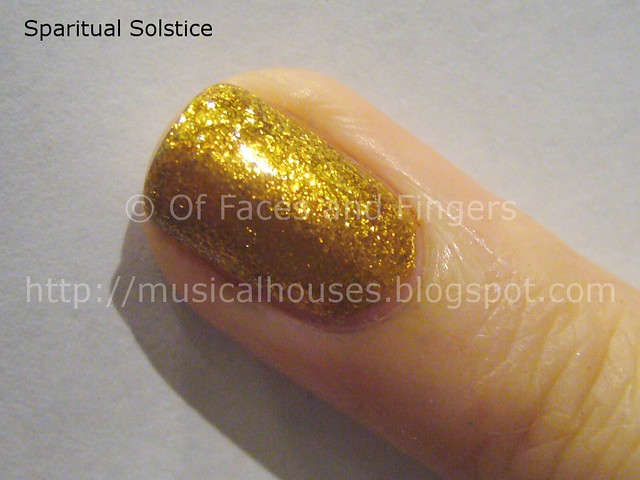
sparitual solstice twinkle collection


Now for the second half of the Twinkle Collection. These consist of the darker, deeper shades, as well as more traditional reds, purples, and vampy shades.
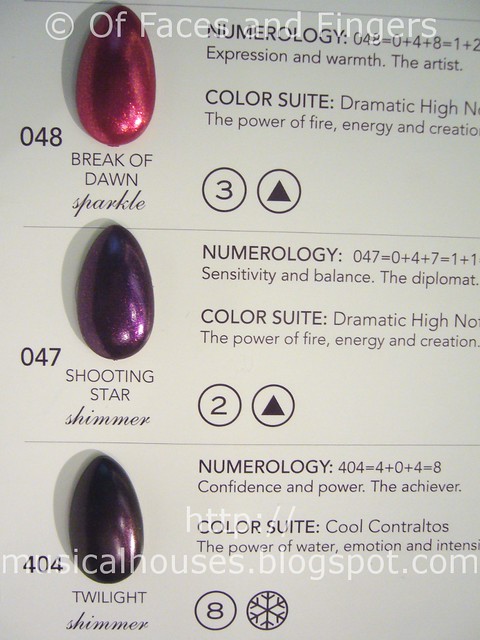
sparitual twinkle collection 2


Top - Bottom: Break of Dawn, Shooting Star, Twilight

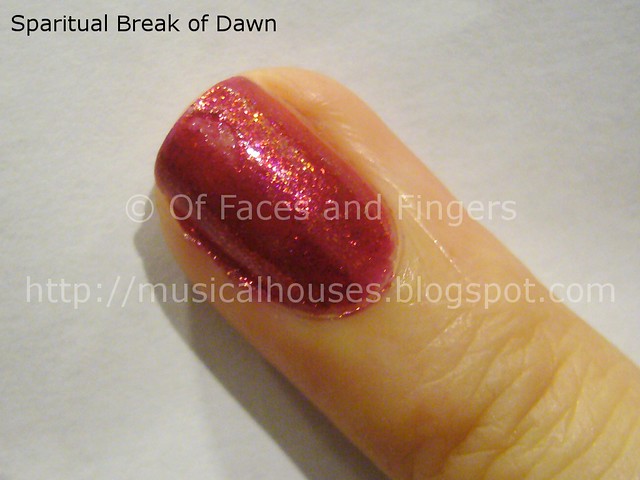
Break of Dawn is a red with shimmer, some of which is holographic. To me, this was the least interesting of the collection (oh yeah, another shimmery red for the holiday season), but this is pretty if you are looking for a red shade. The shimmer is generously added to the red base, so the shade sparkles even in low lights. And as you can see, in the photo below, I accidentally nicked the swatch, and flooded my cuticles. Oops.
sparitual break of dawn twinkle collection


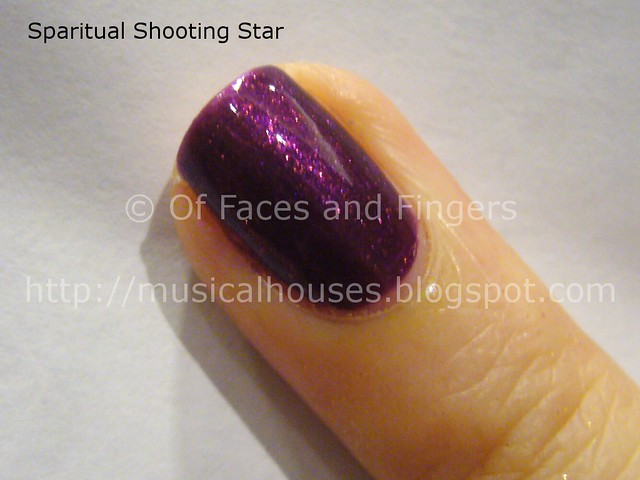
Shooting Star is a deep royal purple loaded with glitter bits of medium size. This one has that "lit from within" (in Scrangie's terms) quality to it - you see the shimmer really bursting and sparkling where the light hits it. This is visibly purple, and visibly shimmery even in low lights, and is very pretty, although it does remind me of something in my collection...I'd have to go look it up.
sparitual shooting star twinkle collection


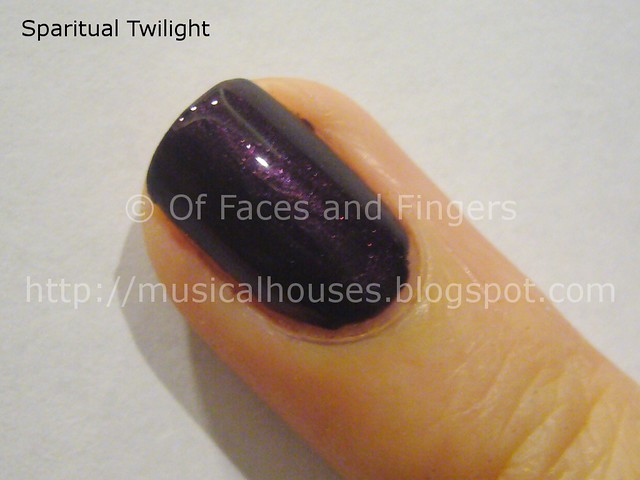
Twilight (oh man, those movies and Stephenie Meyer have ruined any polish called that for me now) is a deep, vampy purple with slight shimmer., It's one of those almost-black colours, but to be honest, in low lights (e.g. dim indoors lighting), it looks mostly black. It does look purple where the light hits it, so you'll probably need stronger lighting to showcase this shade at its best.
sparitual twilight twinkle collection


To me, Solstice is the clear standout of the collection, even though it makes my hands look jaundiced. I also quite liked Shooting Star and Blue Moon, although neither is all that unique. Generally, application on these polishes was also pretty good - nice, even application that was pretty streak-free, and a nail polish texture that was neither too thin or thick. Overall, I'd say Sparitual's Twinkle Collection is a very pretty collection that is festive without being too cliched.

Lastly, my Singaporean girls can all get 10% off on their Sparitual purchases with the code sparitual_musicalhouses - all you have to do is email squovalicious (at) hotmail (dot) com to place your order (she's the Sparitual ambassador in Singapore), and put the code sparitual_musicalhouses in the subject line of your email. And ta-da, instant discount code! Hope the swatches help you make your purchasing decisions!

(Some information supplied by PR at an event. Photos and content are my own. Post is my honest and complete opinion. I am not affiliated with/compensated by the company.)

Linkwithin

Related Posts Plugin for WordPress, Blogger...