
I was so upset I had to Twitter about it, and my non-nail fanatic friends were laughing at me because they thought it was so funny that I could get so worked up over a nail. But you know how it is with these things. You spend months growing them out, shaping them, caring for them with hand lotion and cuticle cream, and then, just when you think "My nails don't look like rubbish after all", they tear. It's heartbreaking, really, because if you trim them all the way down after a tear, you start from scratch, all over again.
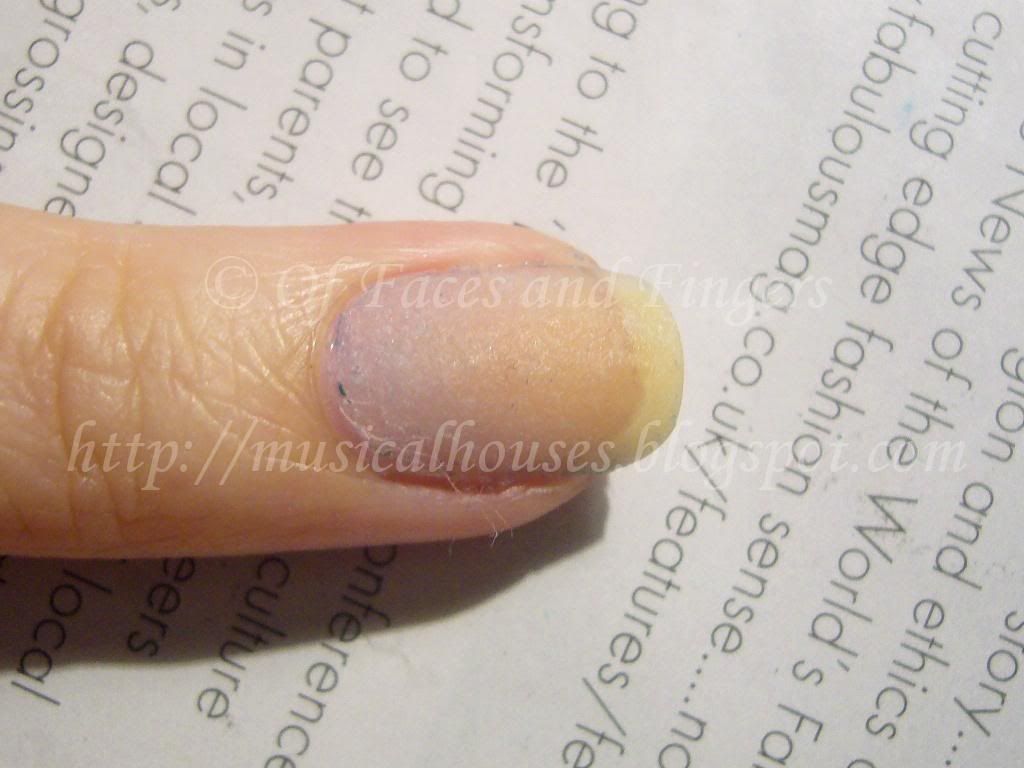
Have a look at the damage. The freezer needs to DIE. I'd have smashed it to bits, but it had three tubs of ice cream inside, and I didn't want to ruin the ice cream.

I didn't want to trim my nails all the way down and start from scratch again, so I decided to try a DIY wrap with a tea bag to hold the nail in place until it grew out. I don't do this very often, so my skills at making teabag wrap are really Noob-ish, so you'll have to put up with the lousy skills here.
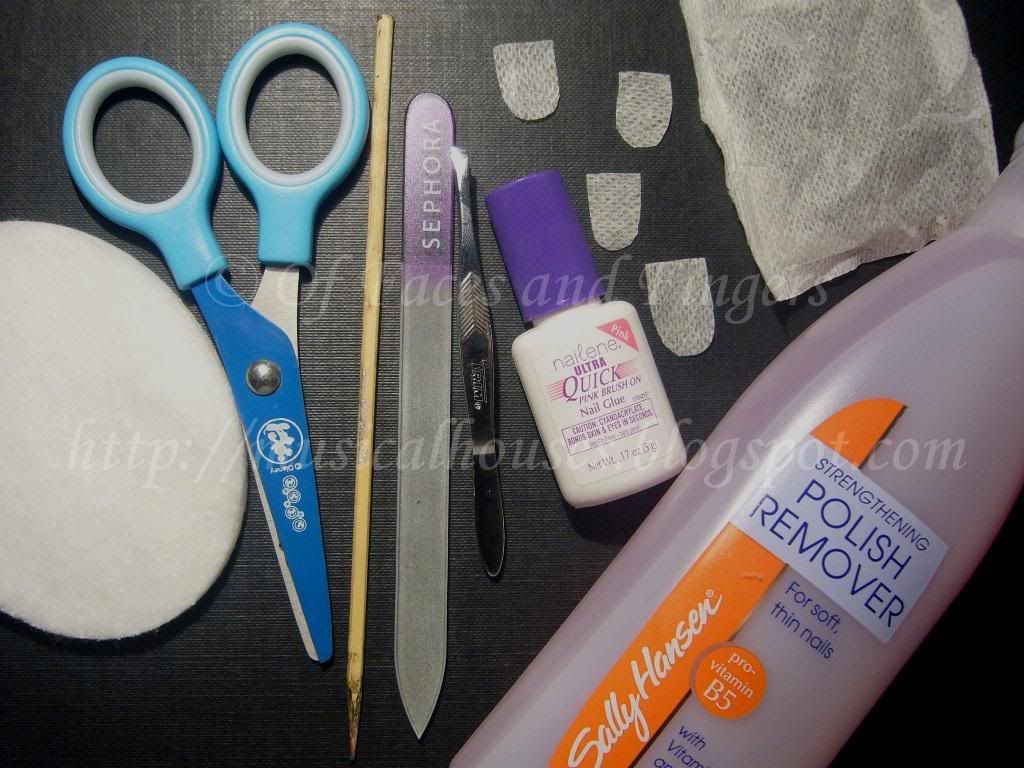
You'll Need:
1. Nail Polish Remover or Acetone (swipe over nail before applying the wrap)
2. Cotton Pad (for swiping acetone over nail before application)
3. Nail Glue (not base coat or nail treatment)
4. Tea bags (cut to just slightly smaller than nail size)
5. Scissors (for cutting tea bag wrap to size)
6. Tweezers (for placing the tea bag wrap over your nail surface)
7 Orange Sticks (for holding down the wrap while they dry)
8. File or Buffer (for smoothing out the wrap after application)
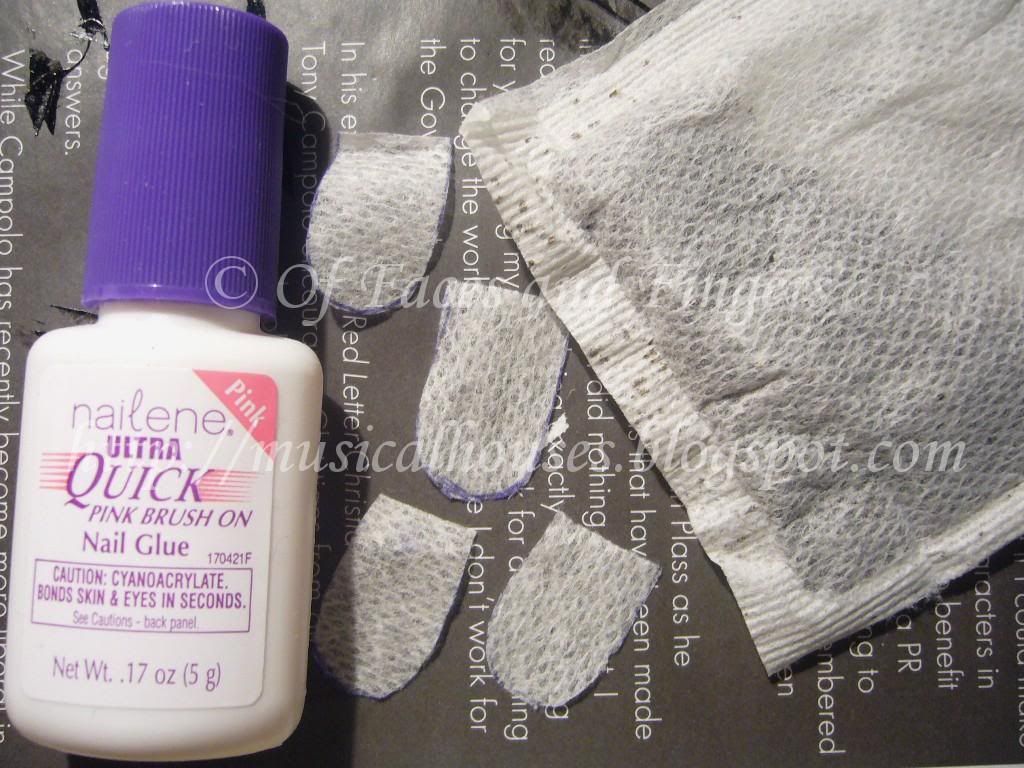
I'd like to point out that it HAS to be nail glue that you're using, as I had a question from a reader asking if she could use base coat or nail treatment instead. These weren't made to funtion as adhesives, so if you use them, the tea bag wrap won't stick to your nail. Any kind of nail glue will do, as long as it's a nail adhesive. I used the Nailene Ultra Quick Brush On Nail Glue, which dries fast, and also dries clear, which is useful if you don't want to sit around waiting for the nail glue to dry.
I also used a tea bag. Yup, your normal average tea bag. Cut it out to the size and shape of your nail. I just used a pen and a scissors for that. The cutouts here shown are the actual shape of my nail, but before you apply them you might want to make them a bit smaller than your actual nail size, so that you don't accidentally glue down the wrap onto the skin around your nail (which was what I did).
Step 1:
First, swipe your entire nail plate with acetone or nail polish remover. This helps get rid of the oils on your nails and helps the wrap adhere to your nail more securely.
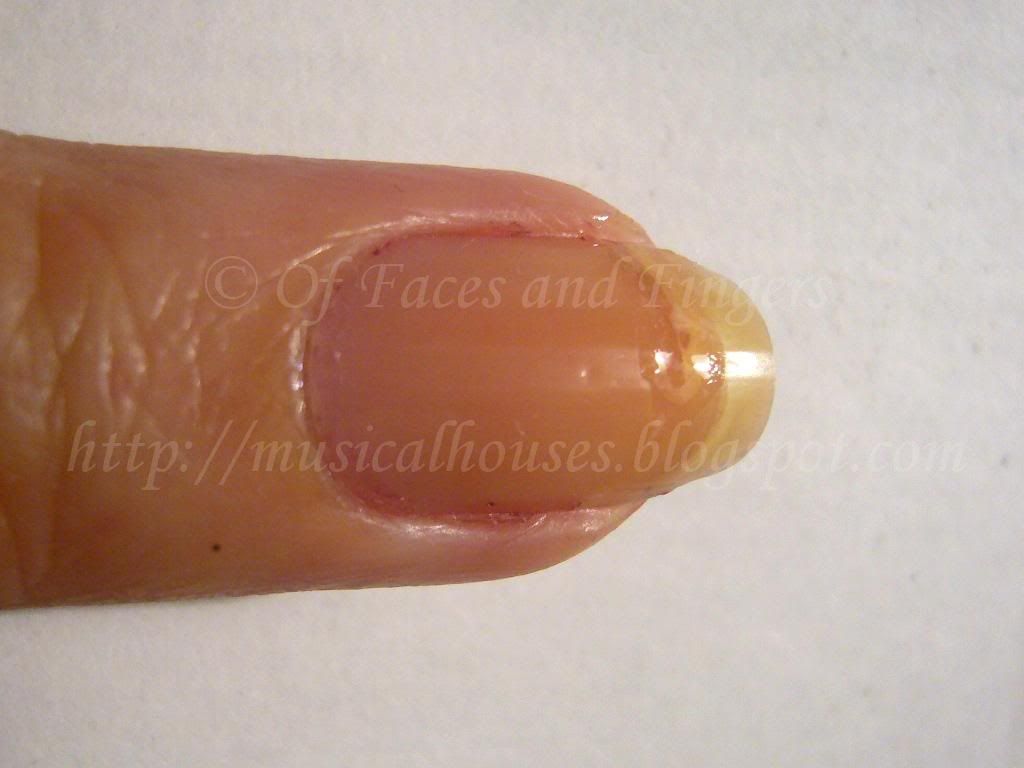
Step 2:
Seal the tear with a bit of nail glue. You don't have to do this if the tear is small, but for a huge tear where the torn bit doesn't stay in place and might move around, it's a good idea. I think I put a bit too much here. You only really need a little bit to seal the tear. Too much and it will cause a bulge on your nail, which will make it harder to apply the wrap on top. You want to keep the surface flat so the wrap goes on more easily:
I don't have pictures for the next couple of steps, because you have to work quickly, so there wasn't time to stop and take photos.
Step 3:
Apply nail glue over the entire nail. Leave a little gap at the sides and at the base of the nail, near the skin and cuticles and the sides and bottom of the nail. This is important because you don't want to glue your cuticles or skin to your nail wrap!
Step 4:
Then, working quickly, use a pair of tweezers and place the nail-shaped tea bag cutout over your nail. Use tweezers, and not your fingers, or you will glue your fingers to your nail. And that's painful. (Um, not like I would know....*looks away and whistles*)
Step 5:
After the wrap is on the nail, use an orange stick to press down and hold the wrap in place while the glue dries. Remember, use an orange stick and not your fingers, or you'll get your fingers glued to your nail. This step will take a few minutes or longer, depending on how fast your nail glue dries. The important thing in this step is to make sure that there are NO air bubbles under your wrap, between the tea bag material and your nail. If there are any air bubbles, moisture could collect in them, and lead to bacterial growth, on the nail. So if you do see air bubbles, it's better to redo your wrap at this point. Better safe than sorry!
This is what my nail looks like at this point:
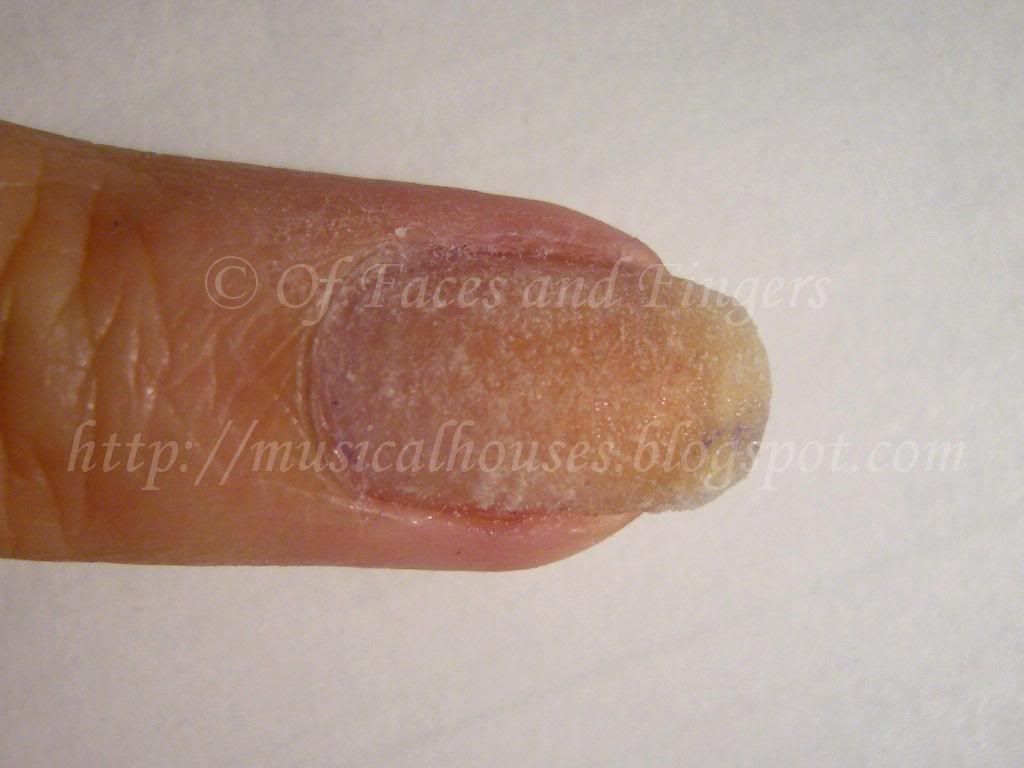
As you can see, I am a DIY nail wrap noob, and I glued my cuticles and skin to my nail wrap, because I accidently put too much nail glue and cut the size of the nail wrap a little too big. I ended up using a bit of nail polish remover to un-stick my skin.
Step 6:
Next, put another layer of nail glue on top, and let it dry. The nail glue will saturate the wrap and make it turn clear (or at least, clear-ish). This way, the wrap will be secure, and it won't look as obvious.
Step 7:
You're all done. All that's left is to lightly file or buff down the surface of your wrap to smoothen it out. Don't overdo it, or you'll end up buffing through the wrap. Once you're done filing or buffing, and you can proceed to paint your nails with whatever colour you want.
Here's a photo of the finished wrap (pardon the lint and the remnants of previous polish, this was a photo of the wrap taken later in between manicure changes):
This wrap, noob-ish as it was, lasted me for around 2 weeks. Eventually I redid it because my nails were growing out, and for some strange reason a corner of the wrap chipped off. (Seriously, how does that happen?!)
Here's my fixed-up and pretty-fied nail. You can tell its the middle finger that broke, because the too-big wrap is sticking out from the sides of my nail. Oops.
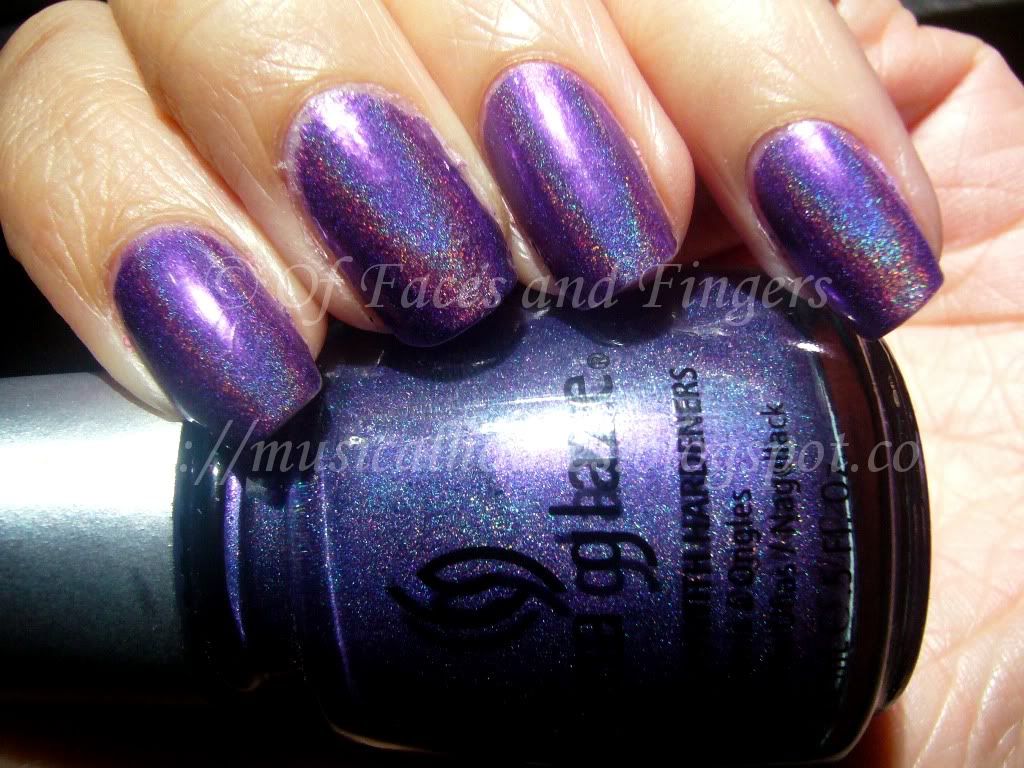
I love China Glaze LOL, it's an awesome royal purple holo. The only thing is that I feel sad about is that the holo effect was a little bumpy and rough on my broken nail, because the surface of the wrap isn't totally smooth, even after filing. And here's a slightly more flattering photo of my nails:

I guess this means I'm not going to be able to wear holos for the next couple of months until my tear grows out and I don't need the wrap :( And yes, this does mean that you'll see my nail wrap sticking out of all the next few NOTDs, unfortunately. They get less obvious as the wrap grows out, but I hope you guys can pretend it's not there! :X


Wow did you come up with this idea or is it a known technique! I am sooo going to use this when a nail breaks! thank you! xxxx
ReplyDeleteAwesome...bookmarking this for when I grow my own nails out!
ReplyDelete@Nic: It's a known technique, and has been around for awhile! I just thought since I broke my own nail it would be good for me to do a post on it, since I was doing a wrap for my nails, LOL. But if you google around, there are probably many more tutorials out there :)
ReplyDeleteWow, that's really interesting... never heard of a nail wrap before (as you can tell, I'm not all that into nail, hehe). I think you did a pretty great job for being a noob. I'm sure if I tried ... you wouldn't even want to look at it XD Bravo!
ReplyDeleteWOW, I've never heard of that. But I have to try it the next time my nail breaks (which will be hopefully never, but you know what I mean.) ANd that polish is just beautiful!
ReplyDeleteI totally get your tea bag trick. I use silk wraps for the same thing. And sometimes when I feel all my nails are extra weak and I want to grow them out some I use silk wraps for all of them. Same concept really. Maybe some ice cream will help make you forget about your nail? LOL
ReplyDelete👍 me too, have gorgeous long nails by reenforcing them .
Deleteawesome tip! never would have thought of this. Thanks!!!
ReplyDeleteMaricela
vividfusion.blogspot.com
Awwww poor little nail, my own nails cried in sadness to see it.
ReplyDeleteReally nice to see the teabag technique in use - I think I saw it mentioned somewhere but I've never seen it done - I always rip my nails off.... bad gem!
Such a good tutorial. I had never heard of this before and I am always ripping my nails. Thanks for sharing :) xx
ReplyDeleteNice tut!
ReplyDeleteI already knew this technique but I never really read a tut on this. So bravo! I dont really know the diffrence between a noobish and a professional doing bc i've never seen pictures x'] Bad me. And i know the growing out of the nails and caring etc etc etc, because i was a heavy nail biter when i was younger! Your nails look amazing!
Ps: I replied to your comment on my blog (gosh rose article)! I understand if you dont really remember, it was from the 17th of june!
Hehe I'm that reader who asked you about the nail glue! Thank you so much for your answer and your initiative to update your blog- it shows how dedicated you are to helping others!
ReplyDeleteI can come and kill your freezer for you? AFTER the ice cream is finished that is.
ReplyDeleteGreat trick, but hopefully I don't ever have to use it! *crosses fingers*
i love your posts! i cant believe ive not stumbled upon your blog until err recently! it's fab =). keep it up lovely! xx
ReplyDeleteWow! That's amazing! Thanks a lot for sharing this. It is really helpful. Please visit my blog and feel free to follow if you like! Here it is: http://boondynails.blogspot.com/
ReplyDeleteAhh, the fridge/freezer are my mortal enemies! I don't know how many nails I've lost to them. =(
ReplyDeletebrilliant idea - would never have thought of that
ReplyDeleteThanks for sharing this wonderful idea! Same happened to me and I had to cut all my nails :(
ReplyDeleteNext time I will try ur idea :)
My latest Konadicure: http://alexa1202.blogspot.com/2010/08/this-is-my-latest-design.html
Please come and visit my blog if you have time :)
Thanks
I'll give it a try!
ReplyDeleteallglamthings.blogspot.com
Thanks so much for sharing this! I really didn't want fake nails for my wedding -- stupid screen door!
ReplyDeleteThanks for sharing... nice post!
ReplyDeletepls visit my blog @ http://wklow.blogspot.com
Thanks so much for your nice comment on my blog! And also for this, I have a but of breakage on one of my nails and might need to do a wrap like this soon.
ReplyDeleteGreat tip :)
ReplyDeleteGreat tip. I will definitely use this when I grow my toenails out again! The BGLT community surely appreciates this.
ReplyDeleteWow! nice idea.Next time my nail tears, i am also going to do the same. THANKS !!!
ReplyDeleteThanks for sharing. I will definitely use this technique next time!!
ReplyDeleteTTHHAANNKKSS!!
ReplyDeleteThank you soooo much for the tip!! I broke my nail at work and was trying to figure out what to do. Your instructions were easy to follow and it worked!!! After repairing it, it doesn't hurt and I didn't have to cut it.
ReplyDeletewow . . . . .. . . . . . . .. .
ReplyDeleteThank you so much ! My tear is a lot more inwards and I thought i was losing a hunk of my nail forever ! You're a life-saver ! I can't thank you enough !!! : )
ReplyDeleteThanks because I am so tired of losing nails. Thank you... Thank you... Thank you...
ReplyDeleteWow, amazing!! I've never heard of this method and I ALWAYS BREAK my nails! I totally understand how frustrating it can be...:/
ReplyDeleteThanks for sharing this ;)
Absolutely brilliant. Can tell you're a true beauty and make-up fanatic. Thank you so much for posting such a thing on the net. I've always wondered what to do about torn nails. And it's invariably the prettiest one that gets torn :-(.
ReplyDeleteIve done this when I was in my teen yrs and most recently. SADLY...for me, its a very temporary fix and my nail ended up being filed all the way down. Iwill say it really makes the nail(s) feel very strong unfortunately the tea bag begins to lift after a few days or the break just finally comes thru. Isn't there a fiberglass nail wrap out there??
ReplyDelete@Anonymous: I'd like a fiberglass nail wrap too! If you find your wrap coming off, then it's best to re-do the wrap to prevent the nail from breaking. Good luck with your nails!
DeleteI am so thankful that you posted this. I'd looked for something like this before, but didn't come across or click on this. This time, my nail will hopefully be safe until it grows out enough to not cause me some serious pain, tears, and and uneven set of nails. Thank you!!
ReplyDeleteThanks so much for your tip on fixing a split nail, I have just this moment snapped mine and it goes half way across my nail( ouch) and its raining hard. I didn't relish the thought of going out in thr
ReplyDeleteE rain so looked online and found you thanks on a again you are a lifesaver bigtime
I've just tried this using super glue (found that tip on another site). It may not work for long, but I know I won't be putting my fingers in my mouth in a hurry! One day my nails might not crack at the edges long enough to have 10 nice nails.
ReplyDeleteTHANK YOU! I bit my nails as a teen, but it didn't matter because I played the piano, so always kept my nails short, short, short. I've long since stopped biting my nails and have hardly (bad me!) played piano in a long time, so suddenly -- I have nails!
ReplyDeleteIt was such a novelty, I was really enjoying having these fun new hand accessories to prettify, and then, I have no idea what I did to them, I looked down and TWO nails, one on each hand, had a tear. I went to the local beauty supply place, where they suggested an epoxy-like glue ... and it tore again within hours. Boo. I called an aesthetician, and they suggested nail hardener. (That, clearly, was a dumb idea. But in the aethestician's defence, I spoke only to the receptionist, who said she'd have the woman call me. I never got a call.)
I wrapped bandaids around both fingers, which looked awful. Surely, I thought to myself, there has to be some way to shore them up while it grows out? So I went to the Internet, which knows all, and I found you.
And now, I have ten pretty nails again!!! Thank you, thank you, thank you! And, thanks to your commenters, I know to look for "silk wraps". I'll want something on hand for the next time this happens, and though I'm delighted beyond measure to have teabag-fixed nails, I'm betting silk looks smoother than teabags!
I probably shouldn't be this excited about fingernails, but I AM! :-D
Wouldn't the tea come out of the teabag when you cut it? Or is that the point? Lol
ReplyDelete@Anonymous: Yes the tea will come out of the bag. But for purposes of the nail wrap, we only need the tea bag paper, not the tea leaves. I usually just throw the tea leaves inside away, but if you want you can save them and put them aside for later. Hope this helps!
DeleteI have been doing this for a couple years now .just had to mend a nail today using teabag method
DeleteDo you need to put a base coat on top before you paint on a color, or is that not necessary with the wrap covering your nails?
ReplyDelete@Allie Hartman: I usually use a basecoat out of habit but, come to think of it, since you already have the teabag in your nails it may not be necessary. Hope this helps!
DeleteThanks for the tip. I was thoroughly enjoying my nails when I noticed tears on not 1, but THREE nails! Cut and filed both thumb nails, but could not bring myself to to the same to my index finger!
ReplyDeleteI also thought there has to be another way - hence my Net search - and my finding your very detailed and humourous tip:-).
So my nails now have a new lease of life. Yay!
i actually do use a clear coat instead of nail glue. i like green tea and bamboo clear base coat(but any clear with the right viscosity is fine), then with tweezers lay one cut - to - fit sliver of tea bag into the coat of wet polish. as long as you're careful it soaks right up and bonds to the nail very well. it works perfectly and comes off a lot easier than the glue when it's time to change it up. However, i've only used this for side cracks, so i can't attest to its usefulness with larger breaks.
ReplyDeleteI used to use nail glue but found it didn't hold well. Yours looks awesome, but for those who can't make it work cutting a bandaid worked well for me. It is preglued and lasted about a week. Not as perfectly smooth as yours though.
ReplyDeleteWas reading your tutorial a few days ago. Bookmarked it and what do ya know? I broke a nail and this totally worked. Looks great. Thanks for the tip. Thinking about doing it to all my nails while I grow them out.
ReplyDeleteThanx for sharing, i am keeping this bookmarked.
ReplyDeleteYour truly a life saver for the nails. I know you didnt want to make a mis-take, but for us ladies we need to know the do's & dont's, so thank for for ur honesty. <3
Hi! this is great, what can i use if i dont have nail glue?
ReplyDelete@Marissa Aizprua: I've heard of people using PVA glue (NOT PVC glue!). It will work as a temporary measure to seal the tear, by painting one layer over your entire nail. I don't think it will work with the teabag method though, as it may not work well with the teabag material. For the PVA glue nail fix, simply paint a layer over your nail. The PVA glue will harden and dry and form a clear layer over your nail. Hope this helps!
DeleteMan, i wished i saw your tutorial earlier!! I just broke my the nail off my big thumb, the kind of tear that's way down, and hurts like s*it! In the end i had to trim it off, so now my nail is lopsided!! *weah weah weah*
ReplyDeleteDoes it fix your nail or just cover up the tear?
ReplyDelete@Anonymous: It won't fix your nail in the sense that it won't make the broken part of your nails grow back together (I don't know of any tips or products that will make broken nails grow back, other than plain old time). But for those girls who have a tear and don't want to cut it down, this allows you to maintain the length of your nail as it forms a layer over your nails that will prevent further breaking. Usually I use this as a stopgap measure while my nails grow out. Hope this helps!
DeleteWhile doing this method will nails still be able to grow? Like do the nails grow from by the cuticles or by the tip? Because I want them to repair for the time being, but I want them to grow back as well. I hope you get what i'm trying to say. Thanks!
ReplyDelete@Anonymous: Your nails will still grow as per normal (i.e. from the base of the nail), this is just a fix to hold the broken part in place. Hope this helps!
DeleteFantastic! Sitting here with a plaster (band aid for you Americans :) ) over my broken nail, thinking about clipping it off...instead, I'm going to the shops to buy some nail glue! Thanks so much for this top tip! :)
ReplyDeleteJust stumbled upon this article. Love your fun sense of humor & honesty, as you shared your adventures of DIY nails. I'm sooo going to try this! Love the purple nails, pretty!
ReplyDeleteI want the name of the nail polish please it's soo pritty.
ReplyDeleteEnter your comment...hey do you paint your nail immediately after the teabag.also can I use a glue stick
ReplyDelete