Reverse Chevron Manicure Tutorial with OPI Nicki Minaj Shades

Wednesday, February 29, 2012

4 comments
When I got my Feburary Vanity Trove, my mind was just racing with all the possibilities for some nail art fun. Finally, I settled on these pink and black glitter Chevron nails.


These were pretty easy to do, too. The tutorial below shows you just how easy it is.

1. First, paint your base colour. (I'm assuming you already have base coat on, of course.) Here I used OPI Pink Friday from the Nicki Minaj Collection.

reverse chevron manicure tutorial 1


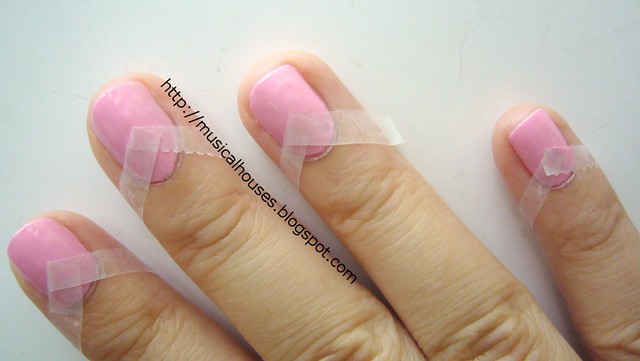
2. After the base layer is dry, stick tape on top of the base layer in your desired Chevron shape.

reverse chevron manicure tutorial 2


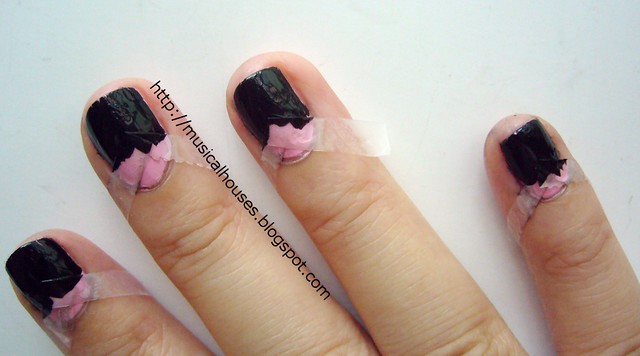
3. Then, paint the top shade from the taped area to the ends of the nails. Here I used Wet n' Wild Black.

reverse chevron manicure tutorial 3


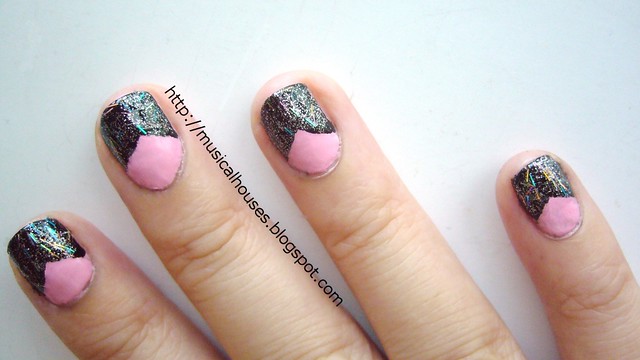
4. If you want to jazz up your Chevron, add a little glitter! This is OPI Save Me from the Nicki Minaj Collection.

reverse chevron manicure tutorial 4


5. Wait for the polish to dry, then peel off the tape, and viola! Chevron nails, with glitter on top!

reverse chevron manicure


Lastly, here are a few final tips I hope you'll find useful. Firstly, before you lay the tape over your base layer, make sure the base layer is really, truly dry. If not, the tape will peel the base layer off your nail. Also, for a sharper Chevron edge, wait til the polish is dry (or mostly dry) before peeling off the tape. If the polish is too wet, it will smudge when the tape is being peeled off.

I like this combination very much, I like the contrast of pink and black, and I also feel like the holo and silver glitter in Save Me really stands out against the black. I actually got these polishes in my Feburary Vanity Trove, so if you're interested you can check out Vanity Trove.

Vanity Trove: A Romantic Gift!

Monday, February 27, 2012

5 comments
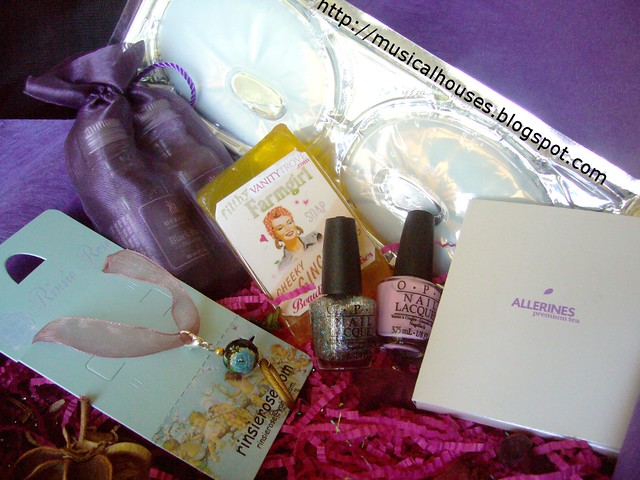
Vanity Trove is Asia's answer to the beauty box subscription trend. For $25 a month, you get a beautifully packaged box of samples and miniature beauty products! I was suitably impressed by January's Vanity Trove, so I thought I'd take a look at February's box and see if it was just as good.


Vanity Trove always has excellent packaging for the products inside, but this month's box really blew me away! The pox is packed with gorgeous pink shredded paper and potpourri, and smells absolutely heavenly! This is why this month's Vanity Trove products are all photographed against a pink and potpourri background - it's what was in the box :)

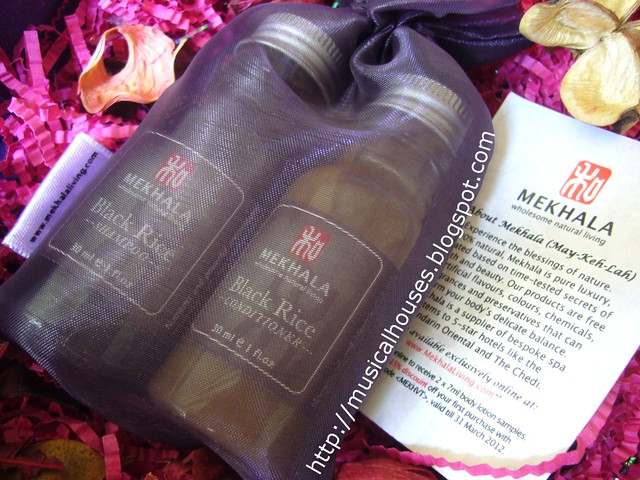
The first item is a small Black Rice Shampoo and Conditioner mini set (30ml x2 bottles), from Mekhala Living. Mekhala boasts products that are 100% natural, with no preservatives, fragrances, artificial colours and so on. The Black Rice Hair Pair is supposed to help regenerate hair growth.

vanity trove feb mekhala haircare


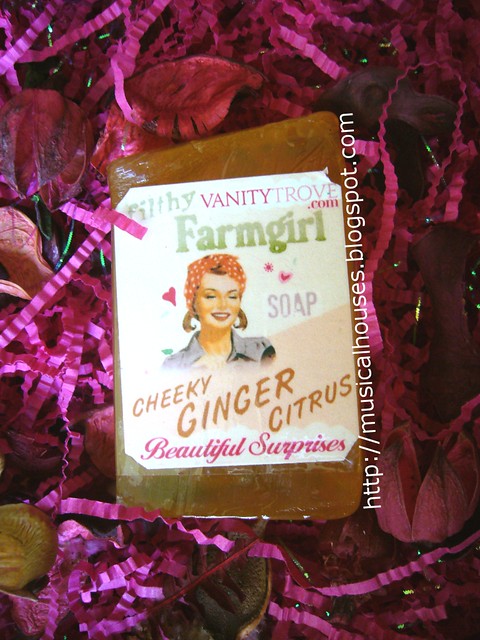
Next in the set is another very nice-smelling item, the Filthy Farmgirl handmade soap! I receive Cheeky Ginger Citrus, and it's a clear orange-coloured bar of soap, with a very sweet, fruity smell that smells of oranges. I'm not much of a bar soap girl, but I have to say, this smells absolutely gorgeous.

vanity trove feb filthy farmgirl soap


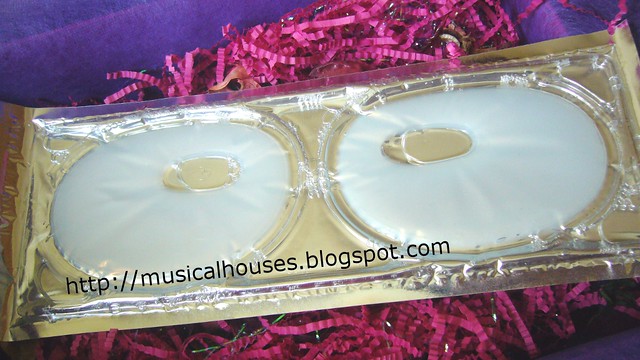
We also have a Skin Inc Pure Repair Whitening Eye Mask, which claims to brighten, repair, and replinesh the skin around the eye area. For better effect, you can also stick this in the fridge before use.

vanity trove feb skinc eye mask


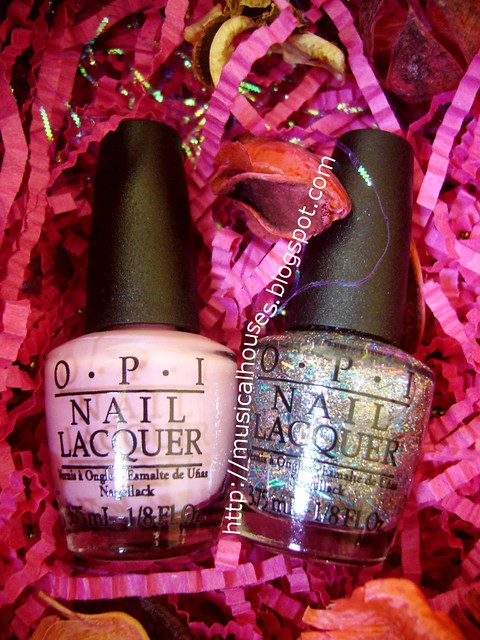
Here are my favourite items of the entire box - nail polishes! We have two mini bottles from the OPI Nicki Minaj Collection (5ml x2). The two shades are Pink Friday, the light pink creme, as well as Save Me, a clear base with round silver and holographic bar glitter. I love me some glitter, so this is right up my alley!

vanity trove feb opi polishes


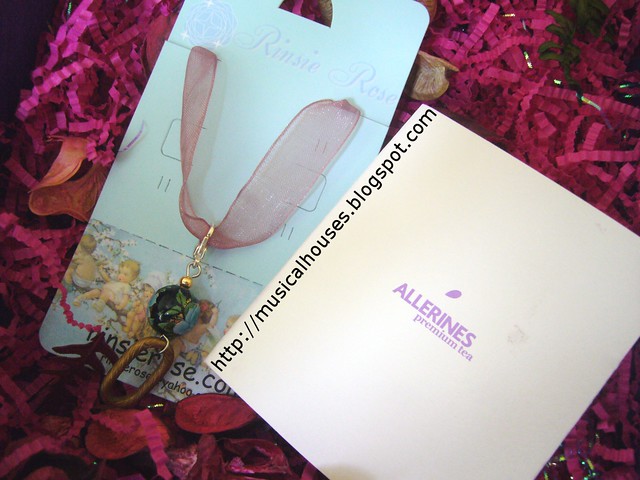
Lastly, we have a small bracelet charm, from RinsieRose.com, as well as a sachet of Allerines Premium Tea.

vanity trove feb allerines tea rinsierose jewellery


All in all, the standouts of the box for me were the OPI Nicki Minaj nail polishes, as well as the eye mask. I'm not really a bath and body products person, so the soaps and other stuff didn't appeal to me as much. This month's box seems to target girls and guys who like soaps, shampoos, and bath products. However, the contents change every month, so you never know what's next! If you're interested you can sign up for Vanity Trove, or just check out the site. You can buy your boxes one at a time, too, so for those afraid of signing up for a whole year's worth of boxes, you can pick and choose the boxes that appeal to you most.

vanity trove feb 2


You know I love nail polish, so I'll be doing a nail tutorial with the OPI Nicki Minaj shades soon, so keep a watch out for that!

Nicki Minaj Super Bass Inspired Nails: White and Hot Pink Crackle!

Saturday, February 25, 2012

8 comments
Say what you will about my music taste, but I gotta admit that Nicki Minaj single, Super Bass, sure is catchy. (I know the song isn't eactly new now, but believe it or not, I've listened to this song so many times that I can rap the entire song by heart! Who says nerdy Asian girls can't rap, huh?) I really like the video as well - so bright, colorful, and candy-like. I mean, just look at her outfit!

Source


Anyway, while I was watching the video and singing/rapping along, I thought - I could do my nails just like her outfit! So I did, and here is the result:


This look is really simple to do, thanks to the awesomeness of shatter polish. Here I used Wet n'Wild White for the base, and over it I put BeautyUK's Shatter Polish in Punk. Punk is a bright neon pink, which I absolutely love - I don't think there's a shatter polish colour quite like it.

nicki minaj super bass nails 1


I know Nicki Minaj's outfit is more animal print-ish than shatter polish, so I guess if you have a Konad plate that has a similar pattern it would probably work as well. But I don't, so I just cheated using my shatter polish.

nicki minaj super bass nails 2


I know shatter polishes aren't quite the trend anymore, but on the occasion that I use one, it still makes me smile. And I was just inspired by Nicki Minaj's outfit to bring it out!

Sleek Lash Out Mascara Review

Tuesday, February 21, 2012

6 comments
Sleek Makeup has released their Lash Out Mascara, pitched as both a volumizing and lengthening mascara with an innovative brush to give you lush, long lashes. What, a new mascara? You know I'm all over it like white on rice!

The Lash Out Mascara comes in a long, pink tube, with black print. It also comes in a pink and black box. Pink and black? Me likey.


The mascara wand on the Lash Out Mascara is pretty small. I'm used to big brushy wands, so to me, the size of the wand doesn't really matter (ha, ha, I know what you're thinking at this point. I'm talking about mascara here! :P). Some of the mascaras that have worked better for me, in fact, have hugeass wands, so I think I've pretty much mastered the art of using a big wand on my tiny, puny Asian eye and lashes. It's a skill, you know. Still, I appreciate a small wand that allows me to rotate, move, and maneuver the wand. The wand has tight, short nylon bristles.

sleek lash out mascara brush


So far, so good. But the real test of mascaras comes when you actually test them out. And particularly if you test them out on my puny, tiny, bald Asian eye with sparse, short lashes, that grow pointing DOWN (you have to see it to believe it). I kid you not. This makes me possibly the most demanding mascara user ever to have walked the planet. And I'm not shy about it - in fact, one of my most popular blogposts of all time is this post in which I ranted lyrically (by my assessment, of course) about how this famous Rimmel Lash Accelerator Mascara, which was "the" mascara product at the time it was launched, really sucked. I know that darn mascara was getting rave reviews everywhere, but on me it was a smudgey mess. (For the record, I continued using the mascara up until it dried up a few months later, and no, my lashes didn't grow either.)

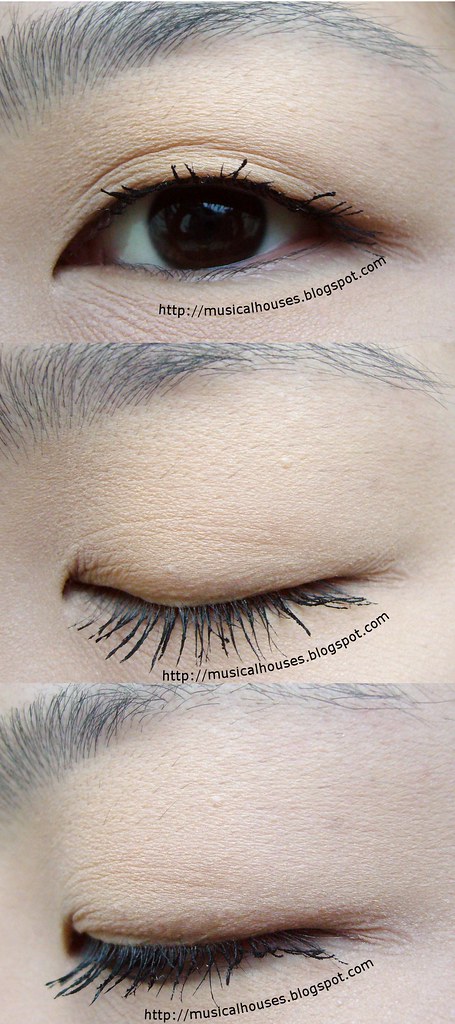
So anyway, where was I? Oh yes, my lashes. They're short, sparse, pointing down, and just generally wimpy. Here's a photo of my lashes with no product on at all, from not one but three angles, so you can see what I'm talking about.

sleek lash out mascara before w


Now, here's the "After" photo. This was two coats of mascara. One coat didn't really seem to have that much of an impact on my lashes, so I didn't bother with one-coater photos. I think it's just me though, I don't think I ever can get away with just one coat of mascara. And have I mentioned that my lashes are special and demanding? Now you see what I mean. This is what the much-raved-about Lash Out Mascara looks like on me:

sleek lash out mascara after w


As you can see, the Lash Out Mascara is alright on me, but not all that fantastic. I appreciated that it did lengthen my lashes and gave them more definition and volume. Overall, it seemed decent, but it wasn't really anywhere near the effect I had seen and read about on other blogs. To be honest, I felt a little underwhelmed, since almost every single review I've read on the Lash Out Mascara (except mine) has been overwhelmingly positive, and some reviews had really awesome "after" photos. I guess I'm just the odd man out when it comes to mascaras.

And as I've said this in my previous mascara review/rant, most mascaras don't work on me. Only 2 or 3 mascaras out of the many I've tried have made me happy, and it's not even the "Wow this is GREAT!" type of happy, just the "this seems to be the best I can find for now" kind of happy. This makes me kind of sad, because I don't ever think I'll find the perfect mascara. But based on my experiences, my take is that this mascara would give you good length, a good amount of volume, and some ability to hold a curl.

(Product was sent for review. Review is my complete and honest opinion. I am not affiliated with/compensated by the company.)

Gold and Navy Blue Eye Look Inspired by my Dress

Sunday, February 19, 2012

9 comments
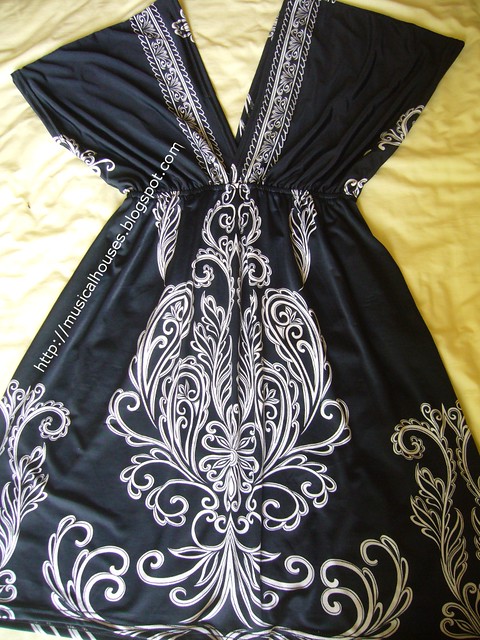
The other day, I got a yellow and blue dress. I know I have weird taste in clothes, so don't laugh at my dress sense (or lack thereof). I like this dress because it's light, flowy, and easy to wear. In fact, I wore the dress out to a recent Keratinology event, and you can see me wearing the dress in a photo.

yellow and blue dress


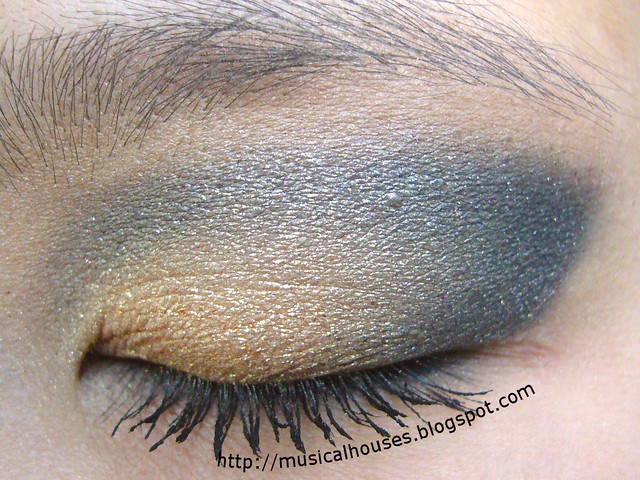
I felt inspired by the dress's yellow and blue colour scheme to try that out for an EOTD. And here is the result!


For this eye look, I used the navy blue from the Sleek Storm Palette, and the gold shade was either from a Sleek Palette or Evil Shades Morning Star. I placed the gold shade on the lid, and the blue in the contour area, and blended.

gold and navy eye 2


I quite like this look - it's dramatic and not exactly an everyday look, but I love the gold and blue contrast. Pigmentation and application on both shades was good - I don't have issue either with my Sleek Palettes or my Evil Shades eyeshadows.

gold and navy eye 3


I kinda feel like the patterns on my dress would look really good on the nail, and I keep thinking that I should do a blue and gold/yellow nail with that design, but I'm worried that my nail art skills are too fail to reproduce the design. Until then, I'll just do the eye look!

Spring Aqua Nail Polish Comparisons: China Glaze and Nails Inc

Friday, February 17, 2012

6 comments
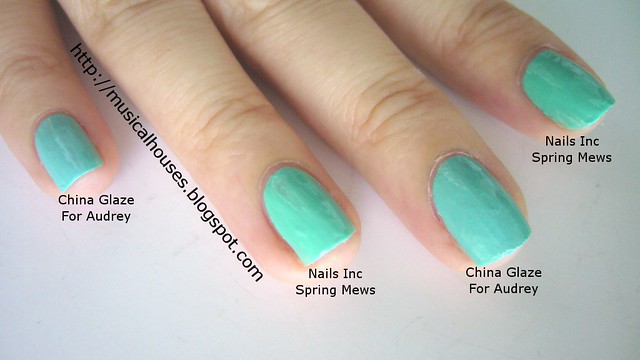
Varying shades of light green-blue (aqua, mint green, etc) seem to be a huge hit for Spring this year, especially with China Glaze's Aquadelic making a storm among nail polish lovers. I wasn't tempted by Aquadelic, since I already had two similar shades in the same colour family, so I thought that I'd swatch these two shades for you.

The two shades I'm comparing are China Glaze For Audrey, which has been much-compared to Aquadelic, as well as Nails Inc Spring Mews, which came out in the height of another green nail polish craze, Chanel Jade. I had bought both For Audrey and Spring Mews separately, so I hadn't realized that there was some similarity between the two. So here they are!


L - R: China Glaze For Audrey, Nails Inc Spring Mews, China Glaze For Audrey, Nails Inc Spring Mews

As you can see, the two are actually pretty similar, although they aren't exactly dupes. China Glaze For Audrey is a little more blue-leaning, while Nails Inc Spring Mews is more green. I'd say Spring Mews is actually a little bit more mint green-ish to me than aqua. Otherwise, the brightness and the creme finish of both colours is the same. I actually used Nails Inc Spring Mews in a Valentine's Day springy NOTD, so more photos of Spring Mews in action are available if you're interested.

china glaze for audrey nails inc spring mews comparison 1


L - R: China Glaze For Audrey, Nails Inc Spring Mews, China Glaze For Audrey, Nails Inc Spring Mews

So, do you need both? sure enough, both shades are different enough to own both, but I'm going to go out on a limb and say that unless you're a nail polish fanatic (like me), for your average Jane (or Joe), you probably don't. Which shade to choose would probably be down to your skintone. If you're cool, then a blue-leaning shade like China Glaze For Audrey would work better for you, while if you're warm, then a shade with more green, like Nails Inc Spring Mews, would look slightly better. As for me, I'm keeping both!

Benefit Hervana Swatch and Review

Wednesday, February 15, 2012

11 comments
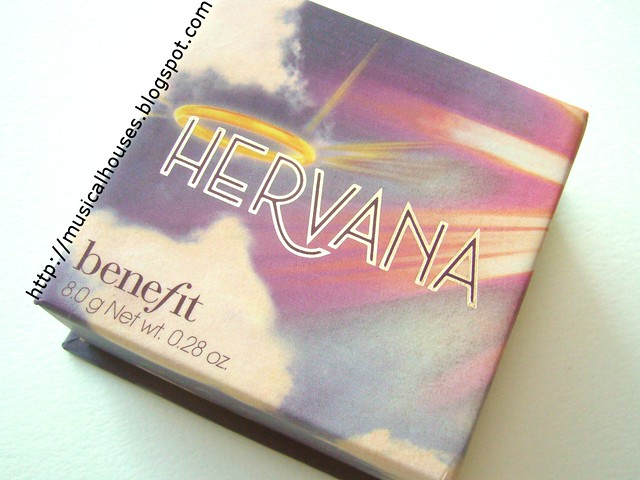
Benefit has launched Hervana, their latest addition to their range of boxed powder blushes that's garnered quite the cult following. I always get excited whenever a new Benefit blush launches, because other than the cutesy names (Her-vana? Like, her nirvana? How cute is that?) and really pretty packaging, these blushes are generally very good in quality, and universal in colour. I thought Benefit's previous release, Bella Bamba, was a gorgeous blush, so I was pretty excited to check Hervana out too.

Playing along with the themes of nirvana, Hervana is meant to give you that angelic, heavenly flush, and comes packaged in a very gorgeous box, complete with heavenly-looking clouds, sunlight, and a halo! I always love the playfulness that Benefit brings to the table - the brand's definitely got a sense of humour!

benefit hervana box


Hervana comes with a plastic tray with a large fluffy, flat brush, much like the other boxed powders, and a little mirror on the inside lid. The newer packaging of the box powders is now a flip-up lid, instead of the old lids where you had to pull the entire lid off.


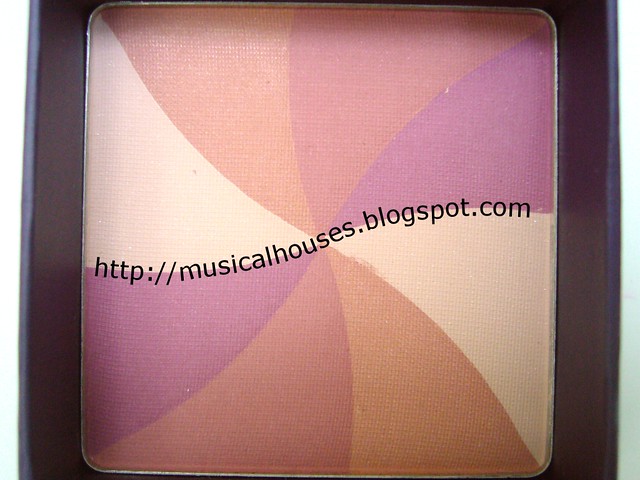
Here's a closer look at Hervana. The colours that make up Hervana are a pinky off-white shade ("lucky shell"), a pale peach shade ("divine peach"), a midtone rose shade ("heavenly rose"), and a purple-pink shade ("berry delight"). I got pretty excited once I saw the individual colours - they all look like they would make awesome blush or highlighter colours individually (and if you read the Benefit Blog entry on the making of Hervana Blush, you'd be able to see trays of the individual shades, and you'd probably agree with me!).

benefit hervana close


Since the individual colours looked so awesome, I couldn't wait to see how they'd fare together. Of course, because the individual pans of colour are rather tiny, there's no point in me making swatches of each of the four colours, since it's unlikely anyone would use them that way. Fortunately, mixed together, we get a very universally-flattering shade of light orchid rose. I love these types of shade, because regardless of your skintone, it's the kind of colour that looks good on everyone. It leans a little more the the cool side, due to the purple in the colour, but it's not so cool-toned that warmer people can't wear it.

benefit hervana swatches


Some Benefit blushes can be on the lighter side, and Hervana seems to be one of them. However, it's buildable enough to show up strongly if you layer it, so I imagine darker girls would probably be able to wear this with a little bit more layering. I definitely don't feel like it's a colour just for the fairer ladies only.

So, the question at the end of the day is - do you need Benefit Hervana? Well, why not? It's a great shade that's universally flattering and would look good on anyone, it's got the cutest packaging ever with a sense of tongue-in-cheek humour. If you're looking for a universally flattering light rose blush, Hervana is definitely worth looking at.

(Product was sent for review. Review is my complete and honest opinion. I am not affiliated with/compensated by the company.)

Pretty Purple Spring Eye Look on the Cheap

Monday, February 13, 2012

8 comments
Spring is in the air, So I thought I'd do a pretty purple eye look for Spring! Since pastel purple is the kind of colour that comes into fashion every Spring season (this year the exact shade is Bellflower, last year it was just plain ol' Lavender), and purple is one of my favourite shades, I thought that would be a perfect shade to use.


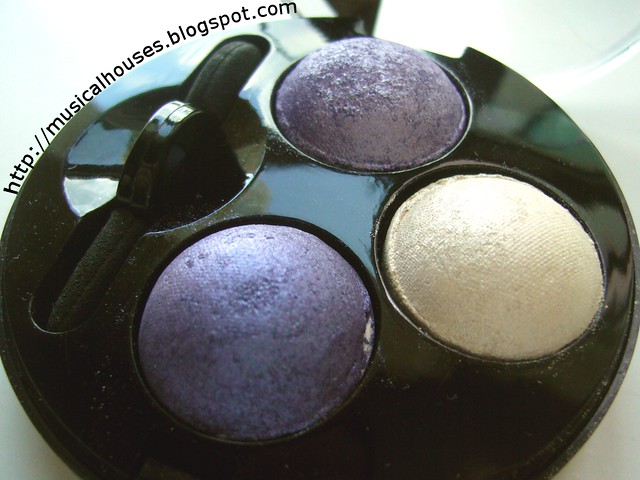
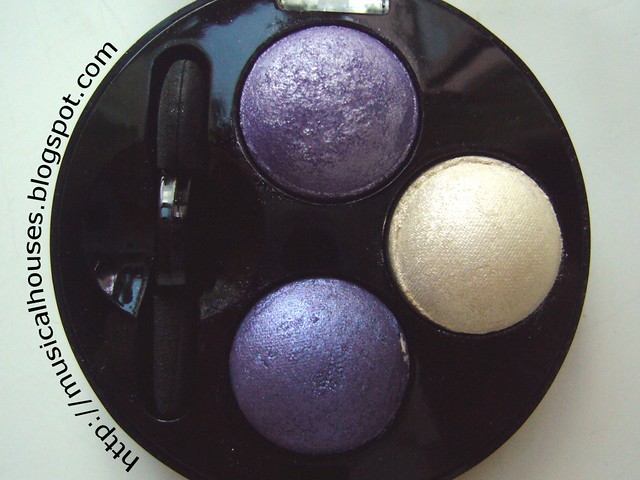
For this look, I used my much-beloved MUA Cosmetics Eye Shadow Trio in Passion. If this looks a little familiar, it's because I used it in my Valentine's Day candy hearts-inspired eye look - it's actually the purple shade in there. But I do like this trio, so I thought it deserved some individual lovin'.

mua eyeshadow trio passion 1


The MUA Cosmetics Eye Shadow Trio in Passion consists of three shimmery shades: a basic white, a pastel lilac shade, and a dusty mid-toned purple shade with a slight blue shift. The shimmer in the shades is visible, but not too much for everyday wear, and is quite fine. It also comes in it's little plastic case with a sponge-tipped applicator, which I don't use on a daily basis, but would do in a pinch if I didn't have my brushes on me.

mua eyeshadow trio passion 2


For those interested in a swatch of the MUA Passion Eyeshadow Trio, here it is. As you can tell from the swatches, the amount of pigmentation is actually pretty impressive. With the exception of the white shade, which is a little more unpigmented than the rest of the shades, both these purples have good pigmentation. Sometimes, companies make the mistake of (mis)formulating light shades as sheer shades, so I'm glad to note that these are light, but not unpigmented.

mua eyeshadow trio passion swatch


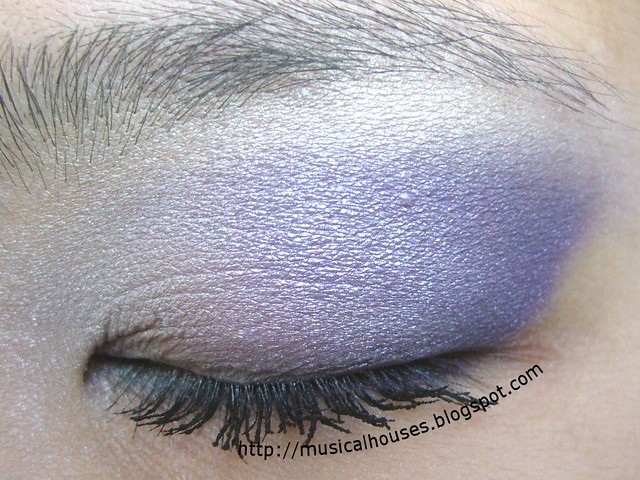
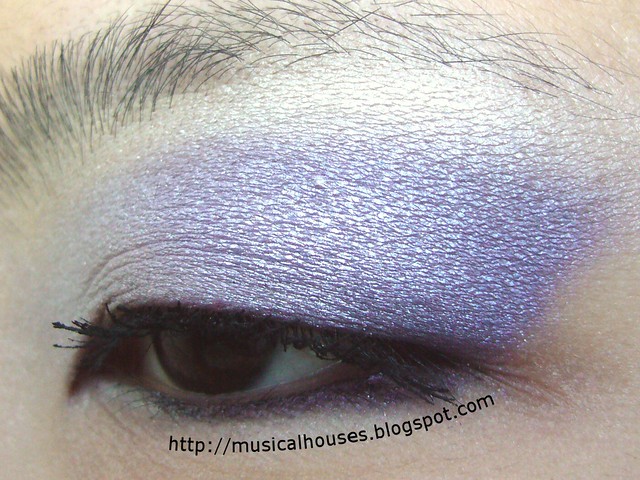
I'm generally quite fond of the MUA Trio Eyeshadows. I have a few, and I've previously reviewed the MUA Eyeshadow Trio in Innocence, and it even made it to my list of Top 10 Beauty Products last year, so a lot of the things I mentioned about that trio are applicable to this one too. For this look, I used your typical application - white on the browbone, lilac on the lid, and the darker purple on the contour area. I should get more creative with colour placement sometime.

spring purple eye mua eyeshadow trio passion 1


I liked this trio, I felt the shades blended easily without too much work.

spring purple eye mua eyeshadow trio passion 2


If you're looking for a cheap-but-good addition to your colour wardrobe this Spring, the MUA Eyeshadow Trio in Passion is a good bet. It's in line with colour trends, it's wearable, it's cheap, and actually of better quality than the price tag may suggest.

(Product was sent for review. Review is my complete and honest opinion. I am not affiliated with/compensated by the company.)

Stuff I do when Bored: Pink and Blue Lips!

Saturday, February 11, 2012

3 comments
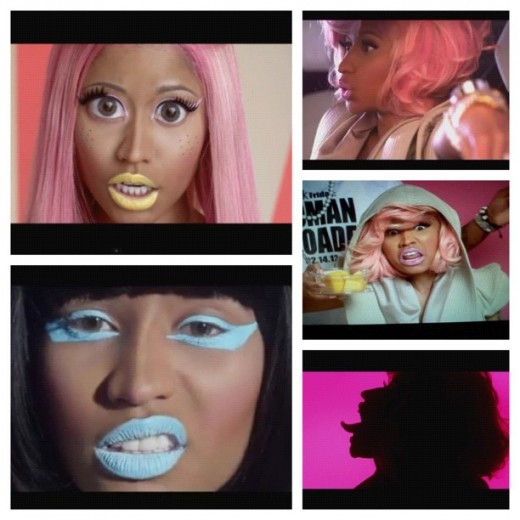
Sometimes I get bored and do really dumb things, just because. This post is one of those times. After attempting my pink and blue eye look a la Shiseido Spring, I thought - why not do a pink and blue lip? It also didn't help that at around the same time, Nicki Minaj released her new video for her latest single "Stupid Hoe" - you know, the one that goes "You a Stupid Hoe, You a, You a, Stupid Hoe" (man, music these days...). And she was sporting pink lips, and blue lips, although not quite at the same time. A bunch of stillframes from the video are below, just so you know what I'm talking about:

Source


So I thought, why not learn from a rap star and a makeup promo image, and try something crazy? And this, ladies and gentlemen, is the result of my crazy moment. To make this look, I used my Sleek Pout Paints. The pink was a bunch of shades I mixed together (I used Peachy Keen, Pin Up, Mauve Over, Cloud 9), while the blue was just Peek-a-Bloo straight out of the tube.

two-toned blue pink lips 1


After painting my lips in this ridiculous fashion, my next thought was: Oh well, since I already did it, why not just record it for posterity? (Who knows why I did that. Maybe I want to embarrass my future self. Or maybe it was just fun.)

two toned blue pink lips 2


Suffice it to say, I would never ever wear something like that out, and unless you have a reason to, I doubt anyone would really do this either. This was just something fun I thought I'd do, since I've already used the Pout Paints to mix up a bunch of serious shades (the warm rose lip, the coral lip, the mauve rose lip, and the purple lip). So there you are - a bored moment, and lots of fun. Enjoy, if you can.

(Product was sent for review. Review is my complete and honest opinion. I am not affiliated with/compensated by the company.)

Keratinology Sneak Peek: Care for Salon-Treated Hair

Thursday, February 9, 2012

1 comment
Keratinology is a haircare brand that is a subsidiary of Sunsilk. Launched in September 2011, the brand specifically targets salon-treated hair. As the name suggests, Keratinology is a combination of the words "keratin" and "technology", and claims to work on the hair from inside-out to prolong hair life after salon treatment. The leave-in conditioner and heat treatment products won a Cosmo Beauty Award, too, so the entire line seems quite promising.


Keratinology has three ranges of product, each targeting different concern for treated hair. Let's start with the first range, which is the Advanced Reconstruction Therapy range. This range claims to help your hair recover one year of damage in five days (yes, one year in five days, I didn't type wrongly!). The range consists of a shampoo, conditioner, spa mask, overnight reconstruction serum, heat protector spray, and a dual treatment shot. The shampoo has apparently received raves from beauty editors, and the spa mask and dual treatment shot are two key products in this range.

keratinology advanced reconstruction


The second range is the Korean Bounce Therapy range. As the name suggests, this is a range that is meant to care for curls and maintain their softness and bounciness. There are four products in this range - a shampoo, conditioner, mask and overnight treatment. The much-overlooked shampoo apparently is the most important step for curls and coloured hair. We were told that apparently it does make a difference to how long your hair retains its salon look!
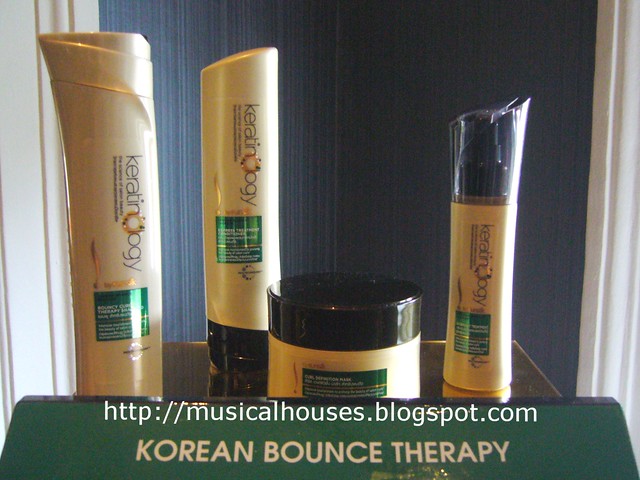
keratinology korean bounce therapy


Lastly, there is the Sun-Kissed Therapy, which isn't a tanning session for your hair (ha, ha, not funny, I know), but is a range that is meant to prolong vibrant hair colour. This has three products, namely a shampoo, conditioner, and an overnight treatment. Once again, shampoo is a key part of the haircare regime to prolong treatment.
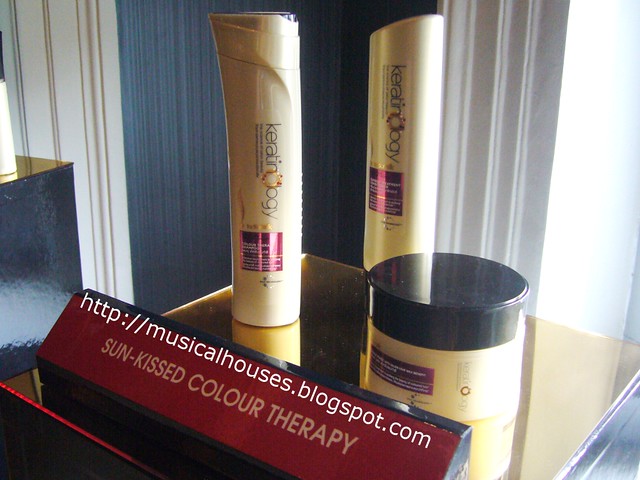
keratinology sun kissed colour therapy


We were also introduced to an iPhone app, the Keratinogram. The app basically has links to the product commercials and so on, but the really interesting bit about the app is that it shows you the cycle that your hair goes through, which stage your hair is currently at, and what products (Keratinology ones, needless to say) are recommended for your hair in that particular stage of its cycle. You basically start the app, and answer a few questions about the details of your last hair treatment and hair type, and the keratinogram is customized to your hair. It's free, so it's worth a shot - even if you don't plan on buying their products, it's interesting to see the cycle stages that hair goes through.

Screenshot from Appstore


Also, if you're interested, Keratinology is currently having a Facebook contest, with the grand prize being a trip to Korea! The Keratinology Facebook Page has more information on how to enter - it's quite easy though, you just have to upload a photo of yourself with your Keratinology product, and the photo with the most votes wins. The end date is 31 March, so there's still over a month to do it.


And now, for the fun part - random photos! There's me and Kristen, and some really, really bad lighting. The sun was streaming in from the window behind, so we both look pretty dark as a result. Oops.

keratinology event 2


These are of food - just because deep down inside, I'm an aspiring food photographer. Although my food photography (is that even a proper term?) isn't very great, I have to admit.

keratinology event food 1


I know I should compile the three photos into one single photo. Unfortunately I'm kinda lazy in that aspect, so you'll just have to bear with individual food photos. But that's okay, right? I mean, who doesn't love photos of food?

keratinology event food 2


I have to say, there is a great similarity between taking macro shots of food, and taking macro shots of makeup. The kind of camera angles and approaches towards picture composition is quite similar. Except that food is larger than makeup, so you don't have to squint as much.

keratinology event food 3
.

The Keratinology brand as a whole is rather affordable. Prices range from S$11.90 - S$22.90, and the products are available at Watsons. If you have salon-treated hair, or frequently go to salons to treat your hair, this range would definitely be of interest to you. If you're looking for an affordable yet effective way of caring for your hair, the Keratinology range is definitely worth checking out.

(Product information provided at an event. Opinions are my own. I am not affiliated with/compensated by the company.)

Linkwithin

Related Posts Plugin for WordPress, Blogger...