

Anyway, I realized when looking at Ciate's promotional materials, that 1) the Chalkboard Manicure kit wasn't available for sale yet (unless you were, of course, a Big Beauty Magazine Editor who Got It Free), and 2) actually, it just all looked like matte nail polish. Thus, an idea struck me - I could DIY my very own Chalkboard Manicure, using colours and stuff that I already had at home - because, really, who needs to buy a kit to acheive this effect? Besides, even if my polish-lemming self wanted to buy the damn set, it wasn't even available yet. Come on, you're telling me I have to wait to spend my money on an overpriced nail art set (this is assuming a girl like me in Asia can somehow get my hands on it)? Awww, shucks, but I want to wear it now, like the impatient consumer I am. *taps fingers impatiently*

So began my quest to do my own Ciate-inspired Chalkboard Manicure. (Disclaimer before Ciate tries to sue me: I'm not claiming I'm using Ciate products, nor am I claiming to sell Ciate products, I'm just providing a tutorial to show how you can get a similar effect using DIY techniques at home, and I'm doing this out of my interest in beauty. I'm not making any form of money or payment as a result of sharing my own DIY techniques.) This what I used.
You'll Need:
1. Black nail polish
2. Nail polish in a few other colours for the "chalk" (I used white, yellow, orange, purple, but of course there's more you could use)
3. Matte nail polish topcoat
4. Nail art brushes
5. Preferred base coat
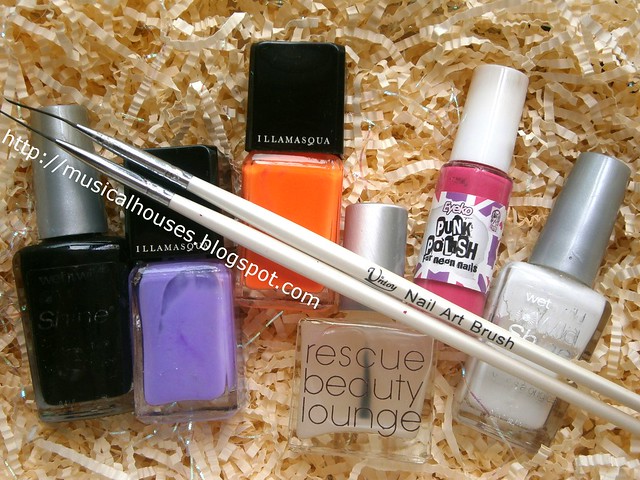
In the photos above, you can see I've used Wet n' Wild Black (my favourite black nail polish), Illamasqua Gemma, Illamasqua Jo'mina, Eyeko Punk Polish (previously featured here), Wet n' Wild White, and my LA Colors Art Deco White nail art striper. The matte topcoat was Rescue Beauty Lounge Matte Top Coat. For best results, I prefer to use colours that are bright (like almost-but-not-quite-neon kind of bright) and opaque in 1-2 coats, as they pop against a black base, and ensure that you don't need to make multiple passes to get a design to show up on your nail.
So. We have our stuff. Let's get to it!
Step 1: Paint your preferred base coat, then paint your nails black.
Do I need to explain further? Just do this and let your nails dry.

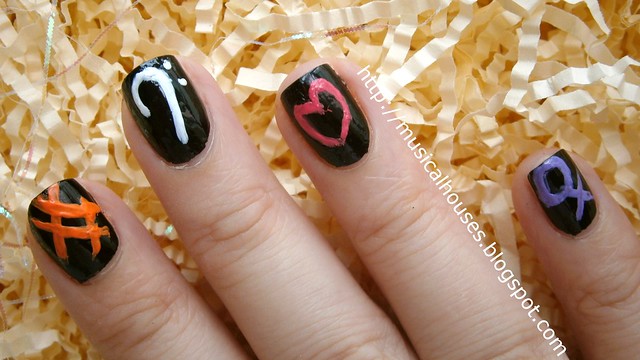
Step 2: Using your nail art brushes, do up your designs on your nails.
To create the designs, just take a nail art brush (I used the long bristled, slender nail art brushes you saw in the photo previously), dip it in the nail polish colour of your choice, and then use it to paint the design on your nail.
This was probably the trickiest step for me, so I'm going to share a super-useful tip you'll love if you're the clumsy-fingered, mistake-making kind of nail polish art doodler that I am: Since the base is black, if you make a mistake, you can "erase" your mistakes, by going over them with a nail art brush dipped in black nail polish! I used this trick, so you don't see the huge mistakes I made. Sad, I know, I cleaned up my mistakes and it still looks like I was doodling on my nails while I was half-asleep. Such are my nail art skills.
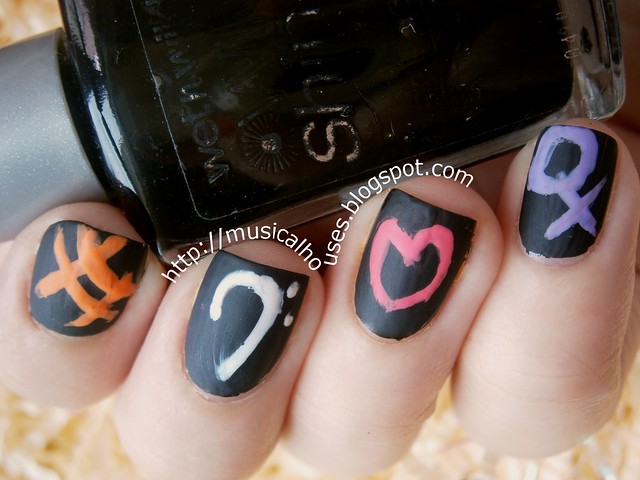
Step 3: Wait for your nail art to dry. Then paint with your matte nail polish topcoat.
I can't tell you how crucial it is to wait for your nail art to dry. You don't want to smudge your nail art with your topcoat! This happened to me on a couple of nails, which made me a little sad.

And there you hvae it, your very own DIY chalkboard nails! Here are a couple of completed shots of my manicure. I actually really like the effect - it does kinda look like chalk scribbles when mattified, and lends a very rocker-chic vibe to any look.

I guess the chalkboard manicure would probably be more convenient with Ciate's sets, but it isn't necessary to get the effect. Because the Ciate set features nail art pens with a chalky-looking ink rather than using a brush dipped in nail polish, it may be a bit easier to use for those who feel that they can't work with a nail art brush. So that could be one advantage of spending on the Ciate set.
In any case, given that I'm living in Asia and we don't have Ciate over here, I'm glad that there's a way for folks like us over here to get the look too! Or, since I'm in the mood for memes (as you can tell), in the words of Success Kid:


This looks awesome, thanks for the tutorial! No way am I spending that kind of money on Ciate's set but I might have a go at this :)
ReplyDeleteJesss xo
haha i love the idea so much!
ReplyDeleteanything else is definitely overpriced :D
This is awesome! :) x
ReplyDelete:) Great!:)
ReplyDeleteAwww...this is so cute! Love the color combos and designs. Thanks for sharing how to do these kinds of nails.
ReplyDeleteWhat was the matte top coat nail polish you used?
ReplyDelete@Anonymous: I think I mentioned it in the post, the matte topcoat I used was RBL's Matte Top Coat, but any matte topcoat will do :)
DeleteGreat diy tutorial, do you have any recommends on matte top coats? I can't find Rescue Beauty in Canada. Have you tried using the matte polish over glitter polishes?
ReplyDelete@Tiffany: I'm glad you liked the tutorial! There are tons of matte topcoats available, so don't worry if you can't find a particular one! Other than RBL, Essie, China Glaze, OPI, Nubar, and Orly all have them too. It's possible some drugstore brands near you may have them too (eg BeautyUK if you're in the UK), because they were quite the trend sometime back. I haven't tried all the matte topcoats out there, although I've tried a few, and to be honest other than a few not-so-great ones I don't really see a huge difference in performance between different brands, unless you're very picky. That said, I think the Essie and China Glaze ones seem to be the most popular ones used by bloggers.
DeleteAnd yes, you can absolutely use your matte topcoats on top of your glitter polishes! I've true it before, it gives you a pretty cool effect because you still see the glitter, but it's not glossy. If you give it a go, let me know how you like it! :)