Slider

Showing posts with label Matte. Show all posts

DIY Chalkboard Manicure Tutorial: Cheap, Easy and in 3 Steps!

Sunday, April 28, 2013

9 comments
Ciate has recently started promoting their Chalkboard Manicure, which involve nails that, look like chalkboard doodles on your nails. If you recall, Ciate was previously famous for their "I-claim-to-be-first-with-this-trend-although-I-wasn't" caviar manicure, and then threatening bloggers with legal action because they DIY'ed their own caviar manicures (not because they were trying to pass off their own nail art as Ciate's, by the way). Despite the issue with the Caviar manicure, I remain somewhat grudgingly impressed by Ciate's interesting innovation - I have to admit I haven't seen any other brand doing this yet, and it looks cool. (Okay, if I were to be more frank, I'm not just grudgingly impressed, I'm pretty impressed.)

Ciate's newest nail trend - Chalkboard manicure! (Source: Ciate Facebook)

Anyway, I realized when looking at Ciate's promotional materials, that 1) the Chalkboard Manicure kit wasn't available for sale yet (unless you were, of course, a Big Beauty Magazine Editor who Got It Free), and 2) actually, it just all looked like matte nail polish. Thus, an idea struck me - I could DIY my very own Chalkboard Manicure, using colours and stuff that I already had at home - because, really, who needs to buy a kit to acheive this effect? Besides, even if my polish-lemming self wanted to buy the damn set, it wasn't even available yet. Come on, you're telling me I have to wait to spend my money on an overpriced nail art set (this is assuming a girl like me in Asia can somehow get my hands on it)? Awww, shucks, but I want to wear it now, like the impatient consumer I am. *taps fingers impatiently*

wait to buy overpriced nail set
Impatient Ilya understands how I feel. Totally.

So began my quest to do my own Ciate-inspired Chalkboard Manicure. (Disclaimer before Ciate tries to sue me: I'm not claiming I'm using Ciate products, nor am I claiming to sell Ciate products, I'm just providing a tutorial to show how you can get a similar effect using DIY techniques at home, and I'm doing this out of my interest in beauty. I'm not making any form of money or payment as a result of sharing my own DIY techniques.) This what I used.

ManGlaze Fuggen Ugly vs Orly Iron Butterfly: Dupes or Not?

Friday, November 26, 2010

12 comments
Awhile back, I was gushing over ManGlaze Fuggen Ugly, the ubercool matte tar grey polish. I mentioned in the post that there were similar colours, so I thought I'd do a comparison post today swatching Fuggen Ugly side-by-side with one of its sisters, Orly Iron Butterfly.

Here are comparison swatches:

ManGlaze Fuggen Ugly Orly Iron Butterfly

L-R: First 2 fingers ManGlaze Fuggen Ugly, last 2 fingers Orly Iron Butterfly

As you can see, there are similarities and differences. The similarities are that both are matte, and have the same black-grey base. Both also apply very well, although I feel like Fuggen Ugly applies a bit better, because it goes on in thinner coats.

The differences are that Iron Butterfly has much bigger silver glitter than Fuggen Ugly. Fuggen Ugly isn't totally matte - there are very minute silver shimmer that adds a dimension to the colour, but the shimmer isn't visible on the finger, unlike in Iron Butterfly, where you can clearly see the discrete pieces of silver shimmer.

So, which one should you spring for? A lot is going to hinge on the shimmer for most people. If you want a more matte shade, then ManGlaze is the one to go for. But if you want some bling, then Orly's version will be your preferred choice.

ManGlaze Mayo: A Matte White Christmas!

Wednesday, October 27, 2010

12 comments
Okay, so it's not Christmas yet, but somehow, that was what I thought of when I was wearing ManGlaze's Mayo. Mayo is one of ManGlaze's latest colours, and an addition to their immensely popular matte nail polish range. And this one, unlike Manglaze's usual range of dark colours, is white! From what I know, the white has been requested for a while, but it took awhile to get the formula right. And on the ManGlaze website, they even tell you that "this stuff takes a skilled hand" to apply.

ManGlaze Mayo

ManGlaze, despite its relative newcomer status, has already been rapidly garnering a fan following, because of its grungy, edgy image. In a world where most polish brands produce masses of pinks and reds, and tack on everything from flowers to bows to annoyingly girly paraphernalia to boost sales, ManGlaze stands out, like that devil-may-care rocker chick wearing studs in a sea full of pink princess-y girls toting Hello Kitty bags.

manglaze mayo


Anyway, enough about Hello Kitty and goth girls, let's get to the nail polish. Yes, this colour is hard to apply, and yes, you do need a skilled hand and a good base coat. Mayo, when compared to ManGlaze's other colours, is trickier to apply. Unlike Fuggen Ugly, it doesn't go on nicely in smooth, thin and even coats. Mayo goes on thicker, and more unevenly. My personal experience was that it's better to apply this in as thin and even coats as possibe, and do two coats, rather than attempt to apply one single thick but even coat, because this doesn't even out that nicely.

manglaze mayo


Now that I've gotten the negatives out of the way, let's talk about the positives. Have I told you how cool this colour is? It's not jet-matte-white, like OPI's Alphine Snow Matte (which honestly I think is a little boring). But this one has some very fine flecks of glitter dotted throughout the polish. Once applied however, this glitter is invisible to the eye (I myself can only see it in the bottle), but I feel like it adds a little something to what would otherwise be just another matte white.

So, do you need this? Sure, if you don't have a matte white, and you want ManGlaze's punk-rock take on it, and you can deal with the application issues. You gotta admit, there is just something attractively cool about ManGlaze's aesthetic. But if you think you might have trouble with application, I suggest you go for Fuggen Ugly, or another colour.

(This product was sent to me for review. I am not affiliated/compensated for my review.)

ManGlaze Fuggen Ugly: A Fuggen Awesome NOTD!

Monday, October 25, 2010

10 comments
If you've been up to speed with your nail polish knowledge, then you'll know probably have heard of ManGlaze. The Chicago-based (woohoo, Chi-town!) brand is still small and niche, but they've steadily been making waves among the nail polish fanatic community.

As you might imagine, ManGlaze, with their matte shades, grungy colour names, and their punk-rock influenced aesthetic, was made with men in mind, but they've garnered huge following among ladies too. I guess you could say they're like the rock stars of nail polish, complete with controversy and all.

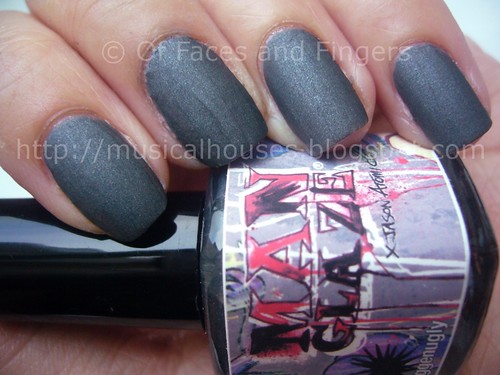
I know you're wondering how nail polish is supposed to be edgy, but take a look at the bottle:

ManGlaze Fuggen Ugly Bottle

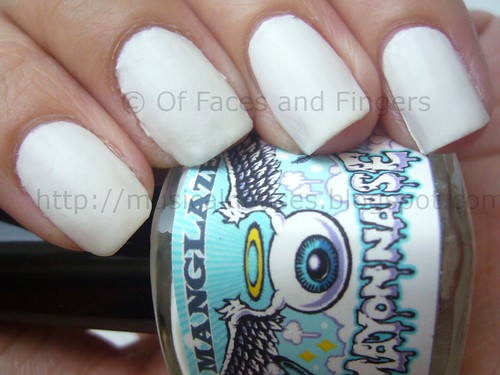
The bottles are quite attractive, with graffiti-inspired drawings on them. That's pretty cool, because as far as I know of they're the only nail polish brand that makes 'em like that.

Fuggen Ugly is a matte grey-black (it's almost black, but not quite), infused with really tiny silver shimmer that gives it a certain dimension, instead of just being matte and flat. The end result is a polish that kind of looks like OPI's Suede polishes.

fuggen ugly 1


Isn't it cool? It kind of looks like the tarmac surface of a road, doesn't it? Very industrial looking. I really like it.

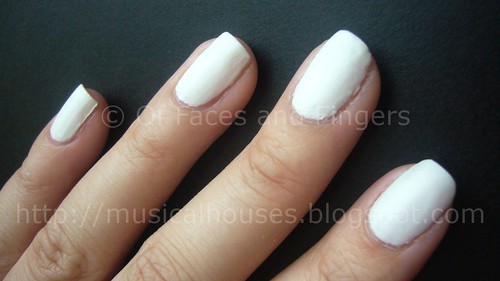
Application on this polish was one of the best as far as mattes go. This one went on evenly, and like most mattes it dried fast, but not too fast. Also, unlike some other matte polishes I've tried, you can layer two coats of this without it getting all weird and stringy and goopy. I really like the quality of Fuggen Ugly, and I think all the other matte polish makers ought to go get themselves a bottle of Fuggen Ugly and replicate it's ease of application.

fuggen ugly 2


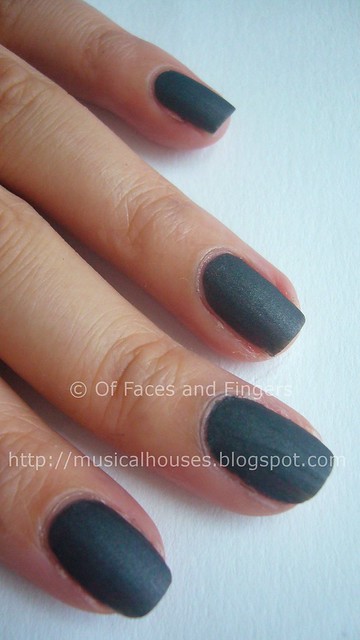
In most lights, you won't be able to see much of the silver shimmer - it just gives a certain depth and character to the polish, like in the second photograph above. However, in some lights you can see discrete bits of silver shimmer (like in the very first photograph shown), which I think is pretty cool. I actually like it better when the silver shimmer is visible, but either way the polish looks good.

Of course, ManGlaze's attempt at a matte grey-black isn't that unique - this one is going to bear comparisons to OPI's Suzi Skis in the Pyrenees Suede, Zoya's Dovima and Orly's Iron Butterfly. But of course, all the colours vary in colour intensity and shimmer density and size, so to a nail fanatic they're all worth owning. But what really makes Fuggen Ugly stand out is not just the colour, but also the gorgeous application, as well as it's really unique punk-rock positioning. And ManGlaze ships internationally too, so if you're outside the USA and having trouble getting your hands on some of the other colours, Fuggen Ugly might be worth a look at.

(This product was sent to me for review. I am not in anyway affiliated with or compensated by the company. This review is my complete and honest opinion.)

Sephora by OPI Domestic Goddess Matte: NOTD

Thursday, March 4, 2010

8 comments
Today's NOTD is a bright happy matte - Sephora by OPI Domestic Goddess Matte! Now I know the mattes trend isn't in the spotlight anymore, what with the advent of mint green, lilacs and neons, but there's still something about mattes that makes them look so cool to me. And to me the best thing about wearing mattes/suedes is that they dry super fast, so if I'm in a hurry they're perfect.

Domestic Goddess is a happy, bright purple that is still wearable despite being bright because of the matte finish. I kind of feel like the matte finish seems to "flatten" colours, and makes them less shocking? So while I would never wear Domestic Goddess if it wasn't matte (it would probably be a tad too bright for me), I'd happily wear it as as matte. And I feel like colours like Nails Inc Jermyn Street (here) look tres chic when they are not matte, but just look kind of blah when mattified. I suppose it's all a matter of preferences, but I personally prefer my mattes to be brighter (so that they don't look like blah mattes), and my non-mattes to be more muted (so they don't draw attention from my professors and remind them that I'm "that girl with the bright nail polish who's always late for class").

Here it is:


This is two coats. The first coat was a tad streaky and uneven, but two coats fixed it nicely. It also dries really fast, as is common for mattes and suedes.

Also, while I usually have a problem with wear when it comes to mattes, this particular one was actually surprisingly long-lasting on me, as far as mattes go. I think it lasted for a good 3-4 days (with base coat) before the first chip came on, so in effect it was probably as good as a regular non-matte polish. That's not bad at all. If you are using a base coat with this one though, it is vital that you wait for the base coat to dry before putting on any polish, because matte polish dries faster than normal polish, so to avoid problems with the different drying rates, it's just best to wait for the base coat to dry before putting on any matte polish.

Linkwithin

Related Posts Plugin for WordPress, Blogger...