Monday, January 31, 2011

Liz Earle Energising Body Wash and Scrub: The Perfect Bath Combination

Liz Earle is quickly making waves for its quality skin and body care, and I can see why. While I can't personally claim to like all their products, even when they haven't worked for me I coudn't fault the quality of the products. The last time I reviewed their products, I looked at the Energising Body Lotion, and guess what - there's a complementary body wash and body scrub to go with that too!

The Energising Body Wash and Energising Body Scrub all come in the same pastel sky blue plastic container packaging. Once again, as with the Energising Body Lotion, these were sensibly packaged products with flip-top caps for easy access in the shower. And like the body lotions, these come in packages that aren't actually that big - 200ml is a decent amount of body scrub if you don't use it everyday, but I can imagine 200ml of body wash being gone quite soon.

Liz Earle Body Wash Scrub

As with the Energising Body Lotion, the accompanying Body Scrub and Wash are both scented with the same herbal scent that's actually quite strong. However, while the scent seems to linger around more with the body lotion, with the scrub and the wash, the scent didn't seem to last as long - which could be a good or a bad thing, depending on your preferences.

The Body Wash is in a gel form, and comes with all these cute litte bubbles inside the gel, that I think are actually pretty cute!

liz earle energising body wash


It's not creamy or liquid-y like most other body washes that I've used in the past, so I found it rather refreshing to use, tying in very nicely with the "energising" portion of things. Also, I found that this did not lather as well as some of the more commericial brands of body wash, probably due to the fact that with natural ingredients, it can be hard to find something that causes lather. It does seem to me that, as a general rule, natural skin and body care products don't seem to foam as much as conventional products. Still, I was quite impressed with the lather that was there:

liz earle energising body wash foam


I found the Energising Body Wash to be pretty moisturizing, and it rinsed off well without leaving any residue on the skin. And I actually also quite liked the faint scent it left behind, so I have no complaints about this product at all.

The Energising Body Scrub is also in gel form, but this one has little brown bits that are meant to scrub and exfoliate your body. The little brown bits are actually ground up olive stones! Cool, right?

liz earle energising body scrub


The scrub also smells like the body wash and body lotion, and I really enjoyed the scent wafting up as I scrubbed my skin. One of the things I also liked very much was that the olive stones weren't harsh on my skin at all, but at the same time, I could feel the exfoliating going on. It's a fine balance to strike, and I think this was well acheived in the product.

I was also quite surprised to see that this one lathered very well - in fact, I think it lathers almost like a conventional product! I have no idea what natural ingredients were used to acheive this, or perhaps it could have been my scrubbing motions, but this one produced quite a nice amount of foam and bubbles.

liz earle energising body scrub foam


Like the body wash, it also washed off well, and didn't dry out my skin, or leave it sensitive and red. I actually really like this product.

So do you need this? If bathcare products are one of the things you treat yourself to, or if you are a bath junkie, then this would be worth your while. But of course, body washes are available cheaply and can be picked up anywhere for cheap, so if you'd like to try just one, I'd probably spring for the Body Scrub.

(Product was sent to me for review. Review is my complete and honest opinion. I am not affiliated with the company.)

Saturday, January 29, 2011

Chinese Lunar New Year Nails Using Color Club X'mas!

Chinese New Year is upon us soon, and in the spirit of celebrating the lunar new year, I thought I'd dress up my nails for the occasion! I went with the predominant colours of Chinese New Year - red and gold. And in the spirit of festivities, the brighter and gaudier the colours are, the better they are! LOL! So, I hunted around in my stash for the brightest, blingiest red and gold nail polishes I could find.

And lo and behold: I found these shades of red and gold glitter, perfect for the New Year!

color club enchanted holiday wish list red


But wait! Aren't those from Color Club's last Christmas collection? If that was your reaction, you're sharp - those are indeed the latest Christmas polishes from Color Club's Enchanted Holiday seasonal collection. Specifically, that gorgeous red is Wish List Red, and the gold is Enchanted Holiday. But whatdayaknow, those Christmassy shades of red and gold just also happen to be just right for Chinese New Year! Who says you can't do bling on both occasions?

So, since I had done the Christmas bling on my nails, I decided to do some Chinese New Year bling too. But since I had to wear this to work, the bling had to be a lot more toned down than I would have liked - I couldn't risk blinding my clients!

Here's the watered-down bling for the year of the rabbit. In the end I settled on a gradient manicure, using Wish List Red as a base, and layering Enchanted Holiday on the top:

Chinese lunar New Year nails

Isn't that awesome? It makes me feel all in the mood for firecrackers, red packets and dumplings! And the best part is - you can actually replicate a look like that for Christmas, because you're using the same colours! Talk about killing two birds with one stone!

Color Club Wish List Red is a gorgeous jelly-like red base with dense amounts of red glitter. I really like this one, it kind of reminds me a little bit of China Glaze's Ruby Slippers. Very pretty, and very eye-catching. Enchanted Holiday consists of gold glitter, but more sparsely distributed in a clear base. I also liked this one, and I think it'll be perfect for layering over other polishes.

Both polishes were a litte bit on the thick side, which is not my usual experience with Color Club. It could just be that the base formulation was made thicker to ensure even dispersal of glitter in the polish. Still, they applied well, and dried fast. As with most glitters, you may wish to use two coats of topcoat instead of one if you want a finish that's smooth to the touch. I made do with just one, though.

chinese new year nails


I'm so psyched about my nails, and I think they're a great way to celebrate the lunar new year! If you've been looking for nail colours for Chinese New Year, but can't seem to find any, Color Club's Wish List Red and Enchanted Holiday would be perfect. If, on the other hand, you don't celebrate Chinese New Year, but still wish it was Christmas, now you have the perfect excuse to continue wearing Christmas colours!

(Product provided for review. Review is my honest and complete opinion. I am not affiliated with/compensated by company.)

Friday, January 28, 2011

Beauty Blog Link Love

Rachel finds out if a body lotion can be energizing with Liz Earle.

Makeup Morsels finally tries out those famous Urban Decay Liners.

Looking for a similar powder to the Magic Cool Powder from MAC? Look no further - Sleek Makeup have one for half the price!

Check out Audrey Dao's review of Zoya's Spring 2011 Intimate Collection along with photos and swatches!

Daily Polish shows off sneak pictures of China Glaze's Holiday 2011 Collection Let It Snow!

Phyrra tells you about Shadow Transformation. She compares four products from Fyrinnae, Hi-Fi, Sobe Botanicals, and Medusa's Makeup. See which one comes out on top!

Kelly of Gouldylox Reviews finds a new love at the drugstore. It's quickly becoming a foundation favorite!

What do you do when your bosses go on leave? Why, wear crazy turquoise fishnet nails to work of course - Musicalhouses did it!

Retrodiva shares her five favorite tinted moisturizers that can be used even on oily skin.

One palette; how many looks can The Lip Print create? It's a Palette Challenge!

Sarah from IHeartCosmetics bypasses Bella Bamba and goes straight for Benefit's Prrrowl and Magic Ink.

Jo at Music and Makeup finally had a play with MAC Club eyeshadow and liked the results!

Are China Glaze Channelesque and China Glaze Below Deck dupes or not? Check out this post at Beauty addict's blog to find out!

Big pores? You need this! Hellcandy shares her love for Benefit's Porefessional.

Craving the new Make Up For Ever Lab Shine lip glosses? Well, you're in luck because Krasey Beauty has swatches of the full collection!

Mz. More of The Glamorous Gleam tries out OPI Shatter Nail Polish. Is it all it's "cracked" up to be?

Jenn over at Spiced beauty puts on her best glam face using BarryM Cosmetics!

theNotice chats about the new love in her life - that is, Clarins Rouge Hydra Nude lipsticks. Will you be picking up a tube before they're sold out?

Amy Antoinette reviews ELF's Studio Line blushes.

It’s all about glowing skin and pink hues this spring! Anita reviews (almost) the entire Guerlain spring collection over at Pleasureflush.

***


Beauty Crazed wants to solve your winter hair woes with $200 worth of Marc Anthony products! So enter the contest already!

Start the new year with a new you. Win a La Mav anti-age skin care pack and enjoy your new skin.

Help Cindy celebrate the one year anniversary of Prime Beauty. At this celebration the presents are for you!

Come by Jeweled Thumb to read a review of the Eyeko My Coral Crush Peachy Keen blush and also win one! Enter now to be one of the 2 lucky winners!

Socialite Dreams is hosting a giveaway of socialite approved goodies!

Thursday, January 27, 2011

Bling for your Eyes: Evil Shades Ice Star and Morning Star

Lately, I've been discovering a few lesser-known brands. One of my favourites of late is Evil Shades, which is all the work of Andrea, who, by the way also runs the blog Black Nail Polish and Lip Gloss. Yup, she's one pretty funky lady, so of course the shades she makes would also be out of the ordinary. As you can imagine, like most other indie brands, her mantra is high quality and high pigmentation at a low cost - but unlike other brands, Evil Shades actually lives up to its name.

Case in point is the collection of loose powder eyeshadows, called The Stars, which were released awhile back, but are still available on her Evil Shades website here. These look like unsuspecting normal eyeshadows, right?


Wrong! These are actualy pretty darn awesome - once you foil them. The two shades I have, Ice Star, and Morning Star, actually primarily consist of a coloured glitter base with larger complimentary glitter. So yes, these are glitter-heavy. They were formulated to glisten and sparkle like stars, which would account for the glitter-intense formulation.

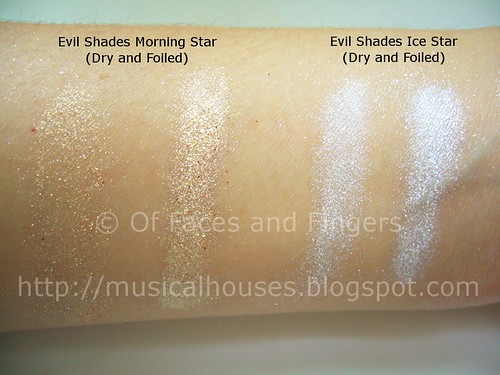
Here's a swatch of Morning Star and Ice Star:

evil shades morning star ice star


L - Morning Star (applied dry), Morning Star (foiled), Ice Star (applied dry), Ice Star (foiled)

Morning Star is just a bunch of orange glitter dry, but once foiled it's a gorgeous pale gold with red specks of larger circular glitter. Really like what a morning star might look like!

Ice Star is a white that leans slightly blue, and has larger specks of blue circular glitter. Very icy and cool. This one also looks better foiled, but the difference isn't as drastic as Morning Star.

These aren't as interesting dry, but once you foil them, they totally wow you with their absolute gorgeousness. In my swatches, I foled both Morning Star and Ice Star with jut a spritz of water, and already they're blinging like nobody's business. No wonder they're shining like stars! Even though I'm not too keen on glitter, I really like the effect these give foiled.

Now the bad part: glitter fall-out. Because these are essentially just bits of glitter in varying sizes and colours put together, they do tend to fall out more than other loose shadows. Evil Shades has formulated them with some adhesion properties, so that helps, but glitter is as glitter does. So if you're not too keen on dealing with fallout, then these may not be your cup of tea.

So do you need these colours? Not if you're glitter-averse, or don't want bling for your eyes. But if you love the high-shine, intense-sheen, metallic effect, and you have the patience to work with these, you'll love them.

(Products sent for review. Review is my complete and honest opinion. I am not affilated with the company.)

Tuesday, January 25, 2011

Orly Fantasea + Barry M Vivid Purple = Multidimensional Awesomeness!

There's something about the colour purple that I love so much, and I can't quite explain why. It could be that purple is a colour with enough oomph to not be boring, and yet still remains a colour that's pretty work-appropriate, or it could be that purple was the first colour of nail polish I tried, and fell in love with. Whatever the matter, I love purples, and I'm constantly trying to create more pretty purples to wear on my nails.

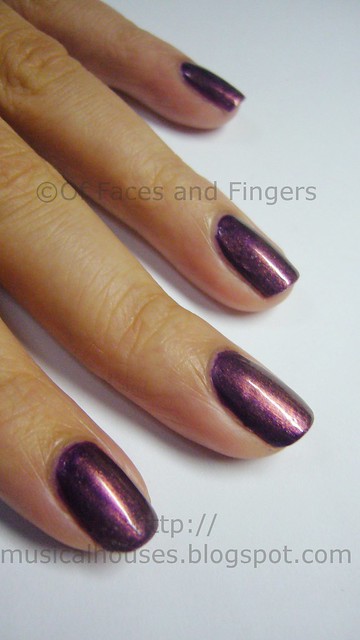
In one of my experiments, I tried creating a multidimensional purple on my nail, and I layered Orly Fantasea over Barry M Vivid Purple. Now both are gorgeous purples in their own right, and a quick google will turn up plenty of pretty NOTDs featuring one or the other worn alone, but I just had to try them together.

Here is the result:

Orly Fantasea Barry M Vivid Purple

Orly Fantasea, one of those hard-to-find but oh-so-gorgeous polishes, is a very pretty colour, consisting of multidimensional shimmer in a sheer purple base. It's the shimmer in Fantasea that's showing up on the nail and giving the entire layering experiment it's complexity. However, Orly Fantasea is quite sheer when worn alone on the nail, which is why I chose to layer it. I didn't want to waste my precious bottle of Fantasea trying to build up the colour by using 4 coats!

Barry M Vivid Purple, the base colour, is a purple with gold shimmer that's opaque in 1-2 coats, and one of the standouts in the entire Barry M nail polish lineup (in my opinion anyway). The gold shimmer doesn't really show through after the layering, but I'm sure it's in there contributing in some subtle way.

orly fantasea barry m vivid purple


I don't know about you, but I absolutely love the effect. The resulting purple is a gorgous deep purple with a certain multidimensional shimmer quality that I love. I can't quite describe it, but it seems to me to look like little flecks of shimmer just capture the light and wink at you. I can make out pink and blue, but I'm sure there are more colours in there I can't describe. It's not a duochrome, but it sure is pretty.

Application for both Barry M Vivid Purple and Orly Fantasea was smooth, and the entire combination lasted for about 4 days before chipping, which was average for me. I definitely love this colour, and I'm sure I'll wear it again soon!

Monday, January 24, 2011

And the Winner Is...


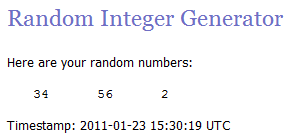
Thank you everyone for taking part in my giveaway for a Gucci Perfume! Three lucky people have won themselves a bottle of Gucci Flora Perfume!


They are:

1. The War Paint Guru
2. Charmed Chick
3. Brittany Love

Girls, please email me your name and mailing address, and hopefully your prizes will come soon!

Thank you to Argos, the sponsor, too. Of course I wouldn't have enough money to buy three of you perfumes, would I? :P

Saturday, January 22, 2011

Nose Clips: The Crazier Side of Asian Beauty

Growing up as an Asian girl in Asia, I couldn't help but notice that the girls around me were concerned with looking beautiful. Now the desire to look good is, of course, universal to all women (and men, I'm sure), but in the Asian context, it seemed to me to focus on two specific areas: the eyes, and the nose. I always found this a little bit funny, because it seemed to just be an Asian thing, perhaps. Girls around me were always trying to make their eyes look, bigger, rounder, and have a more prominent crease - basically, they were trying to make their eyes look more Caucasian. And then there was the nose. Basically, if you have a nose with no bridge, and a nose tip that isn't well defined - in Asian-speak, a nose that isn't Caucasian-looking - then your nose isn't as pretty.

Now of course, not all Asian girls want to look Caucasian, and not all Asian girls are obsessed with beauty, but it just happens to be a trend I've noticed over time. I always like to tell my American friends, just like how American girls are obsessed with boob size (and again that is another generalization), Asian girls are obsessed with the shape of their eyes and noses. I guess it's just human nature - there's always something about yourself you're not quite happy with, and it doesn't matter whether you're Asian, Caucasian, or Alien. LOL.

So it puzzled me when I discovered this little invention. I know most of my Asian readers will know what this is, but I bet my Caucasian friends are going to be a little confused as to what this contraption is:


It's a nose clip. Yup, you heard me right, a nose clip. It's been around in Asia for awhile, and seems to have a steady stream of buyers, despite looking a little like a torture device. But what is it used for?
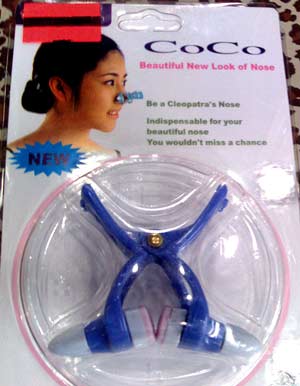

(Picture from: http://texyt.com/plastic+clip+diy+nose+job+cheap+00078)

Yes, you are indeed supposed to clip your nose, as in the illustration on the package. Basically, if you are one of those girls with - heaven forbid - a non-Caucasian-looking nose, you can now clip it into shape with this handy little gadget.

Don't believe me? Check out the product description, complete with Engrish explanations exhorting you to "be a Cleopatra nose" (what!):
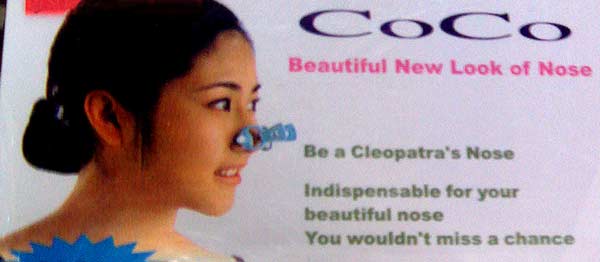

(Picture from: http://texyt.com/plastic+clip+diy+nose+job+cheap+00078)

Personally, I'm not a fan of these devices. I mean, I can understand girls who are unhappy about their nose - in fact, if you take a trip through any of my FOTDs, you'll see that I have the most bridge-less, flattest, un-Caucasian-like nose you can ever find. So I fully emphatise. But to go to the extent of clipping your nose like that? Personally, I'd rather whip out the contouring powder. More painless, and still effective, and it wouldn't make me feel like I was selling out by trying to reshape a part of my body in a rather painful way. (For the record, I don't actually have any contouring powder. I'm too lazy.)

That said, these little nose clips were all the rage for a period of time. Everyone and their mothers had one. Heck, even my roomate had one - and back then, we were studying in Chicago, and she had hers flown in all the way from Singapore just so she could use it! I never had one, but I thought it was crazy. I mean, I borrowed my friend's nose clips and tried it out once, and I couldn't keep that clip on for more than 5 seconds. It was PAINFUL, because those nose clips were made of hard plastic, and they were basically no more than glorified clothes pegs. Try putting a peg to your nose and telling me it isn't painful! In fact, I distinctly remember my roomate clipping her nose so much that the flesh on her nose became red and tender. Not very sexy, but at least it made her happy.

But nose clips aside, what really bugs me is also the advertising of these nose clips. Take a look at this photo on the packaging, advertising the nose clip:


(Picture from: http://texyt.com/plastic+clip+diy+nose+job+cheap+00078)

Asian girl looking longingly at Caucasian girl, check. Caucasian girl is on a TV screen while Asian girl is sitting at home, check. Asian girl is having this "I-wish-I-was-like-you" look while gazing wistfully at Caucasian girl, check. I don't know about you, but something about that image just unsettles me. It's almost as though that image is saying "Hey Asian girl, we both know you would rather be Caucasian, because Caucasian girls are all prettier. So why not use our nose clip, and you can be just like her?" I've always been a bit annoyed by ads that play into this whole "buy our product and you'll look more Caucasian" mindset, becaue it seems a little bit sterotypical. And I'm not too keen on companies attempting to cash in on sterotypes to make a quick buck.

Anyway, just in case anyone has questions about the efficacy of these products - well, I suppose if you did have the patience to clip your nose til it almost resembles Michael Jackson's, these products might just end up working - but only a tiny little bit, and only for a very short while. This is because these products just mold your nose by applying constant pressure to it. Over time, the pressure deforms the nose, and it attains a slightly different shape. However, this effect is only slight, because the underlying shape and structure of the nose remains unchanged. Furthermore, because this change is brought about only through sheer pressure, the result is that the change is not permanent. So the pressure has to be constantly applied in order to maintain the effect. It's kind of like Botox - it may help things for awhile, but it's not a permanent fix, and it doesn't do any real change. I also wouldn't be surprised if in the long run, it actually damages your skin and tissue underneath - I mean, all that pressure and squeexing can't be good.

So obviously, you can tell I'm not really a fan of such gadgetry. But I know lots of girls are. And I know this because the inventors of the nose clip have come out with yet another grotesque-looking nose-shaping device to make more money:


(Picture from http://inventorspot.com/articles/nose_jobs_without_surgery_devices_fix_your_flaws_39881)

Yup, I guess that must be for those who are REALLY unhappy with their noses, because it clips not just the nose, but the entire friggin nose bridge. Can you just say OUCH?

Anyway, like I've said before, I don't judge anyone. I don't judge people who wear only neutral makeup, I don't judge people who paint blue eyeshadow pigment all over their faces, and in the same vein, I don't judge people who wear nose clips. It's really that person's choice, after all, and what other people do to their noses is not in my purview.

But as I've said before - there is always something about yourself you're not going to like. If you're Asian, it could be your nose or eyes. If you're Caucasian, it could be your boobs. If you're Indian, it could be that you wish to be fairer. If you're African-American, it could be your hair. And the list goes on. What I'm saying is that no matter what ethnicity we are, no matter whether we think nose clips are OK or not, noone can ever be 100% happy with themselves, because nobody is perfect. So, past a certain point, we just have to accept ourselves for who we are. And I know that this going to sound odd on a beauty blog, but there is only so much makeup and skincare can do. At the end of the day, no matter who we are, or what our race is, beauty products and beauty companies can't love us, and they can't make us love ourselves more, although they can make us look more pretty. At the end of the day, we just have to love ourselves.

Thursday, January 20, 2011

False Eyelashes Before and After: KKCenterHK Review

I have to admit, I've never been a very big user of false lashes, despite my awfully puny lashes, which I've complained about before. However, sometimes, we just have to break out of our rut, and try something new. So, in the spirit of trying new things, I ended up getting a pair of false eyelashes from KKCenterHK.

KKCenterHK is an online retailer of various beauty accessories, based in Hong Kong. If you're a falsies kind of girl, they have like a gazillion lashes to choose from (if you don't believe me, you can check it out yourself at their website), so it was hard picking just one. But despite the distance, shipping was quick and efficient, and a box of lashes showed up in the mail soon after I had decided.

False Lashes KkCenterHK

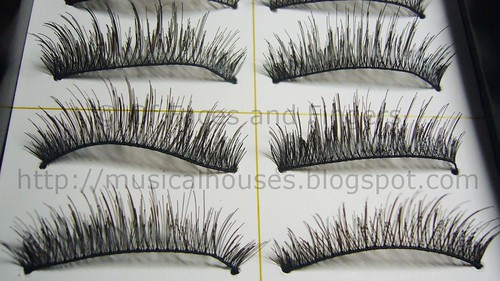
The order arrived safely and well-packed, although the paper box had gotten a little bit dinged up in transit. Nevertheless, the lashes inside were all fine. I had ordered false lahses model A218, which was billed as "soft heavy dark black eyelashes". A pretty accurate description, if you ask me.

The box contained 10 pairs of lashes - a good buy for any girl who wears them on a regular basis. The product picture on the KKCenterHK website is actually pretty accurate, too. Here's a close-up shot of the individual pairs:

false lashes kkhkcenter a218


With lashes as gorgeous looking as these, I was excited to try them out, and I'm pleased to say that these do add a dramatic flair to your lashes.

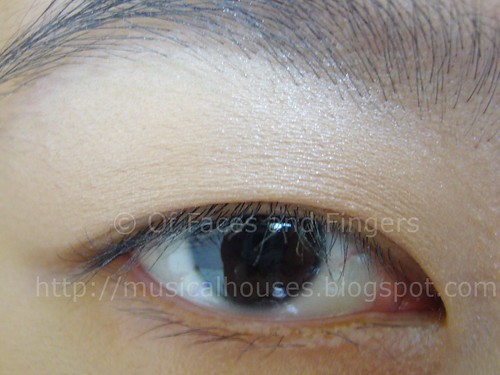
Here are some before pictures, kindly modeled by my sister. I had to bribe her for her to pose for me, so I hope you guys are appreciative of the effort that went into these photos!

Here's a shot of the eye without lashes, when the eye is open:

eye no lashes open


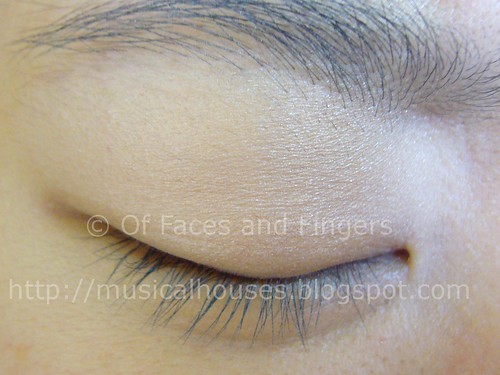
Now a shot without lashes, with the eye closed. On another note, have you ever tried getting a pet to stay still for a photo? You won't believe how many photos I had to take to get one which wasn't blurred. But then again, it could just have been my camera acting up that day.

eye no lashes closed


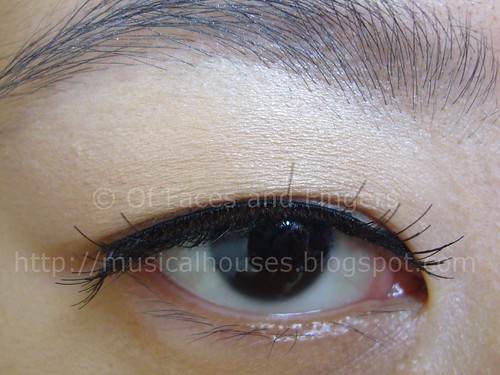
And of course, the Cinderella moment we've all been waiting for - the eye shots with those lashes!

eye lashes open


Looking at the difference, I was like, whoa mamma! These lashes really produce a very noticeable effect. I like that the lash hairs have longer strands of hairs interspersed with shorter strands. It gives a doe-eyed effect that is still more natural-looking than a set of lashes which consist of all long strands.
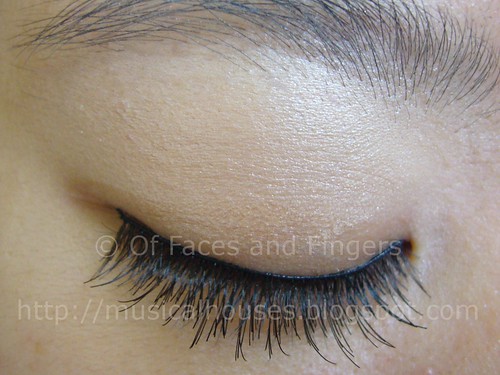
Here's a shot with the eye closed, just so you can really see the lashes on:

eye lashes closed


I'm not generally too much of a fan of falsies in general, but I really appreciated the comfort of wearing these lashes. The lash bone of this set of lashes is quite thin and flexible, making the lashes conform more easily to the contour of the lashline. I also liked that they didn't feel too heavy, or give me the sensation that my eye was being poked by plastic objects. I guess as far as false lashes go, these aren't bad.

So, are you into false lashes, or would you prefer to use mascara for the doe-eyed effect? If you're interested, these retail for US$8-9 on the KKCenterHK website.

(Product was sent for review. Review is my honest and complete opinion. I am not affiliated or compensated for this review.)

Tuesday, January 18, 2011

FOTD/Review: CUSkin BB Cream and Pure Whitening Cream

CUSkin is a brand hailing from Korea, and two of its most heavily advertised items are the requisite staples of Korean skincare - a BB Cream, and a whitening cream. The Whitening and Wrinkle Repair BB Cream, as well as the Pure Whitening Cream have both been getting a lot of press in the past couple of months, and I thought I'd take the opportunity to introduce my thoughts on these products to you.

Now, before I start on this review, I'd like to state upfront that I was only provided with sample sachets of the product, so my review will be limited in a couple of ways. I won't be able to tell you how these products work in the long run (e.g. I can't tell you whether it will break you out after 6 weeks), but I can do some swatches, as well as an FOTD. I'd also be able to give an overview of the texture, colour, and other cosmetic properties of the products. So now that all the disclaimers are out of the way, let's get on to the review, shall we?


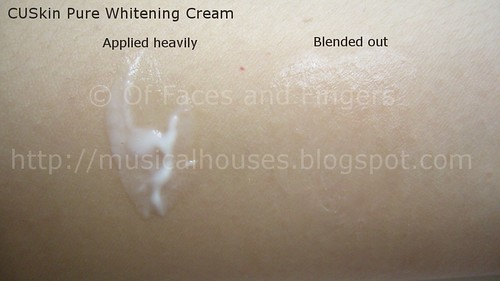
Anyway, let's start first with the Pure Whitening Cream. It's a cream, but it doesn't quite feel like one, having a very light texture that's a cross between a gel and a cream. It's white in the packaging, but it quickly spreads out and becomes clear upon application. It's also easily absorbed, so it's easy to wear in a hot or humid climate, or during summer. You won't get a sticky-face feeling with this one.

cuskin pure whitening cream


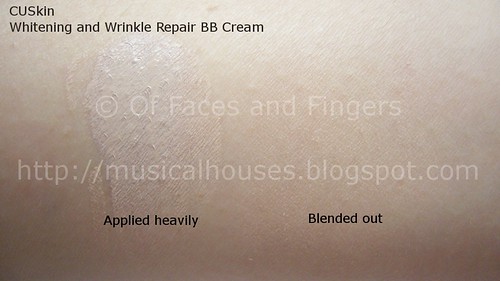
The Whitening and Wrinkle Repair BB Cream has some of the most grandiose of claims - whitening and wrinkle repair, both of them. While I can't exactly tell you whether it really fulfills its skincare claims, because I haven't tried it out for long enough, I am quite happy to say that as a BB cream, it's actually pretty good.

cuskin whitening wrinkle repair bb cream


Like most BB creams, this one has a very, well, creamy texture, that is actually quite similar to the primers found in Western brands. I half suspect this is due to the fact that BB Creams typically tend to be laden with silicones, in a manner that's similar to Western-brand primers. So if you've tried other BB creams and have liked them, and if you like the feel of silicon-bearing products, then this will be a good one for you to try.

Also, like most BB creams, the colour is actually on the pink side. I'm NC20, and I actually found it a bit too pink for me. Still, because it blends out well, as you can see from the photo above, the pink-ness isn't as bad as some other BB creams. I think even if the shade doesn't match perfectly, it's possible to pull it off, as long as there is plenty of blending. I've tried BB creams where the pink is so obvious that the colour looks all weird and pink and ashy when applied, but this one fortunately blends in much better, although it's not exactly a match.

And since I know we all love before-and-after photos, here's a before-and-after FOTD I've done just for you guys!

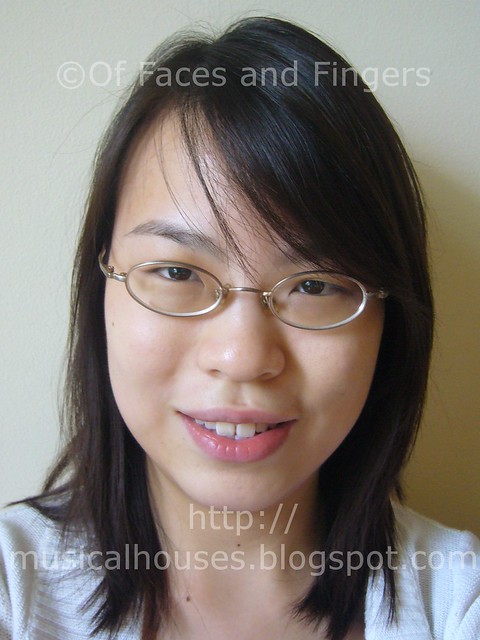
Here's a picture of my bare skin, with nothing but the Pure Whitening Cream. OMG I HAVE NO MAKEUP ON ! THE HORROR! :P

bare skin pure whitening bb cream


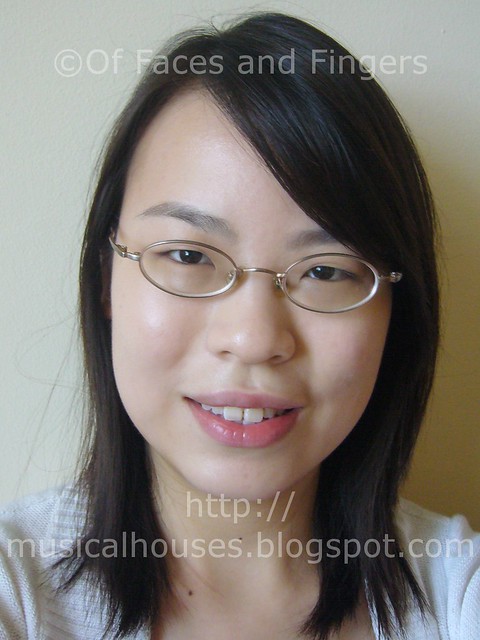
And here's a photo of me with just the BB cream on. As you can see, it provides pretty decent coverage for a BB cream, although it's still quite sheer. It covers up some smaller areas of blemishes, although for larger skin issues, such as acne spots or scars, it would be best paired with another conceaer underneath, or a powder on top to provide extra coverage.

cuskin whitening wrinkle bb cream


And although I thought it would be too pink for my skin, it actually blended in pretty well. If you squint and look closely, you'd be able to see that my face is perhaps a hair pinker than my neck, but I don't think most people would notice the colour difference, unless they were searching for it.

Lastly, as the photos show, the CUSkin BB cream has a very luminous finish - and I mean, very luminous. You can positively see the light bouncing off my face in the photo, LOL!

And here's the finished FOTD. I decided to go for a clear skin, red lips kind of look. Can you see the light reflecting off my face?

cuskin bb cream fotd


Here's the breakdown of the look for anyone interested:
Face:
CUSkin Whitening and Wrinkle Repair BB Cream
Stila Peony Convertible Color

Eyes:
NARS Abyssinia
Urban Decay Underground 24/7 Eyeliner Pencil
Rimmel Lash Accelerator Mascara

Lips:
GOSH Velvet Touch Lipstick Hot n' Sweet 139

So, do you need this? Well, if you're into whitening products, and have been looking for a lightweight BB cream and whitening cream, this one is worth a go. It's best suited for girls who have a slightly pinker tinge to their skin, who like reflective foundations, and do not require much coverage. If you're NW20 or so, this is going to be your perfect shade. However, if you are sensitive to silicones, and are very warm-toned or have a very yellow cast to your skin, then this might not be the best product for you. But as far as Asian skincare products go, this is definitely more than adequate, and worth looking at.

(Product samples provided for review. I'm not affiliated with the company, or compensated for my review in anyway. Thus, this review is my honest and complete opinion on the product.)

Sunday, January 16, 2011

Soft and Feminine Dior Spring Inspired Eye: Get the Look for Cheap

Spring makeup always features a range of soft, feminine and girly looks, and while I'm not exactly a soft, feminine, girly kind of person, I can still appreciate the beauty in such looks. In particular, Dior's Spring 2011 Collection is one of those which has caught my fancy. The eyeshadows are all pinks and greys, which is such a pretty combination of colours. While I was drooling buckets over the pretty pictures, a thought struck me: Surely I already have at least a few pinks and greys in the abundance that is my makeup stash?


(Image from pleasureflush.blogspot.com)

Thus, began my quest to dupe the Dior Spring 2011 eye look. After all, not every girl can afford US$58 eyeshadow quints, right? So, I told myself while pulling my eyes away from those pictures, there had to be a cheaper way to dupe the look, or at least come up with something similar.

Here's a simple outcome using just two colours:

Dior Inspired Spring Eye

For the pink eyeshadow, I used Stila Fleur all over the lid, and then I applied MAC Knight Divine in the contour area, and applied a smidgen of it on the lashline as a liner.

Stila Fleur is a gorgeous baby pastel pink which I had from waaay back when, when Stila was still headed by Jeanine Lobell. I'm not even sure if they still make this colour. It's a gorgeous shell pink shade, although it is a little on the shimmery side. MAC's Knight Divine is a colour that is a more recent purchase, and currently available as a permanent shade in MAC's collection. It's a blue-based gunmetal grey shade wish silver shimmer. Very cool, almost like knight's armour. Both are fantastic shades, in terms of application and staying power.

dior spring eye dupe using stila and mac


So if you're a cheapskate like me, or just have too much makeup and don't want too many similar colours in your collection, duping the look might be a good idea. This is especially so if the look just uses simple basic colours, as in the case of this pink and grey Dior look. Have you ever tried duping a look before? Do you routinely dupe looks, or are you of the opinion that looks are difficult to dupe without the right colours?

Friday, January 14, 2011

Beauty Blog Link Love

Jellyminx introduces some Spring colours to get over the Winter blues in her latest look.

At Beauty Reflections, Tracy tests the redness reducing power of Smashbox Halo Yellow Color Correcting Hydrating powder. See the results for yourself!

Angela at DO WANT Makeup reviews her newest favourite, Hard Candy Baked Blush in Pin Up.

Vonnie of Socialite Dreams test runs the famous NAKED palette and shows a simple, sexy look.

Rae checks out Urban Decay's cult-favourite Primer Potion in Sin, over at theNotice... but can't decide if she loves it or not. What do you think?

Phyrra battles it out with powerhouse MAC Feline vs. newcomer Urban Decay Perversion. See which one wins for the deepest, longest wearing black eyeliner.

Need to take a photo for a professional shoot, or a resume photo? Musicalhouses shows you some makeup tips for professional photos that should come in handy!

Over at The Glamorous Gleam, Mz. More gives us a sneak peak of Sleek MakeUp's Scandalous Blush from the upcoming Limited Edition Stiletto Collection.

Retrodiva takes a look at some of her skincare favorites for 2011, including PREP by ybf to get a good start on the year.

LaaLaa Monroe over at Dolce Vanity experiment's with home-made wax hair removal to try & save the pennies for 2011.

Jenn from Spiced Beauty makes neutrals pop with the Physicians Formula Shimmer Strips for Blue Eyes palettes.

Rachel reviews Bourjois' 10 hour sleep effect foundation over at Queen of Turquoise - but is it up to the job?

Sugarpill gets some love all the way in Trinidad! Check out this FOTD by Teaserhi using the Burning Heart Palette.

Amy Antoinette trials some natural looking false eyelashes.

Lipgloss86 dives into the world offacial oil.

Curious about MAC's newest collection, Peacocky? Well, Krasey Beauty has the scoop, complete with swatches!

K at Beautifully Addicted To gives you a look at a lesser known but stunning MAC Lippie in Syrup.

It's a dry shampoo showdown at Eyelining Obsessions.

Hot Beauty Health shares 8 effective beauty tips for glowing skin.

Emma reviews Max Factors 'Weightless' Foundation over at BirdsDecorateBranches. But is it really weightless?

***


Happy Blog-o-ersary to Prime Beauty! Help Cindy celebrate the one year anniversary of Prime Beauty.She is hosting a giveaway EVERY DAY in January! Stop by every day to see what's up for grabs and enter to win!

Beauty Crazed is giving away over $400 worth of Make Up For Ever products so one of our lucky readers will really have enough makeup to last forever!

Come by Jeweled Thumb to read a review of the Eyeko Graffiti Eyeliner Pen and also win one! Enter now to be one of the 3 lucky winners!

Check out Anita's lipgloss collection and enter her giveaway to win some great goodies.

Sigma Angled Top Kabuki F84: Contour and Buff at One Go

Sigma is a beauty brand hailing from the USA, and the brand is most famous for its makeup brushes. That's no surprise - the ones I've tried have been actually worth the price. Good makeup brushes don't come cheap, and some of the most famous brushes (Trish Mcevoy, Shu Uemura, etc) can be prohibitively expensive for a girl on a budget, so it's always great to find a brand that manages to combine both quality and price into one package.

The Sigma Angled Top Kabuki F84, is one-third of the recently-released Sigma Synthetic Face Kit, which I've also briefly reviewed previously. Today's post, as part of my journey to delve into each individual brush in the kit in greater detail, focuses on the Angled Top Kabuki F84. (In case you've missed it, I've previously looked at the Flat Top Kabuki and the Round Top Kabuki previously.)

Sigma Angled Top Kabuki F84

Of all the three kabukis in the Sigma Synthetic Face Set, I have to say this is probably my favourite, probably because it's the most versatile. I love the angled shape, which makes it very handy for applying blush, bronzer, or contouring products. And although this is a kabuki brush, its use doesn't stop at buffing. I think this one could actually apply products, should you wish to use a heavier hand. I think it would be great to apply lightly pigmented products that need building up, because the bristles do tend to pick up quite a bit of product.

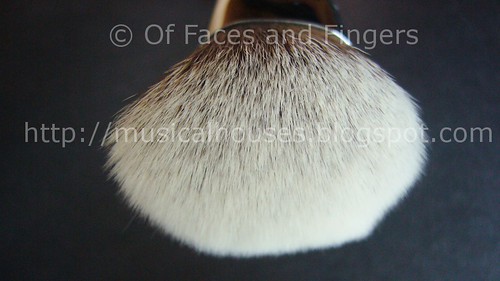
Another thing I like about the Angled Top Kabuki is the qualaity of the bristles. These are synthetic bristles that are very fine and soft. I find them comparable in quality to the bristles of some of the other brands with great synthetic brushes, like Urban Decay, The Body Shop, Too Faced, and Ecotools. As far as bristles go, I can't fault this one.

sigma angled top kabuki F84 bristles


Because the bristles are made out of synthetic material, these brushes are pretty nifty for applying cream and liquid products, in addition to powder. Unlike natural bristles, synthetic bristles don't soak up liquids, so that makes them good for applying cream, gel, and liquid products.

So do you need this brush? I'd say yes, if you use mineral blush, bronzer, or contouring products that require you to buff and blend, or if you've been looking for a contouring brush to apply liquid and cream blushes and bronzers with. The Angled Top Kabuki is of good quality, so if it suits your needs, it's worth checking out.

(Product was provided for review. Review is my complete and honest opinion. I am not compensated by or affiliated with the company in any way.)

Wednesday, January 12, 2011

China Glaze For Audrey + Konad Fishnet = Awesome Nails!

It rarely happens, but I actually managed to wear un-boring nails to work for one entire week! It was during the Christmas season, so I didn't have any client meetings, and both my bosses were on leave for the holidays. So a thought popped into my head - since I wasn't going to be doing much work that required me to look professional, why shouldn't I jazz up my nails? Thus, I promptly combined China Glaze For Audrey with the awesome fishnet/lace print on my nails.

China Glaze has a few colours that are famous, and For Audrey is one of them. It's purportedly named after Audrey Hepburn for her role in Breakfast at Tiffany's, and the colour was apparently created to be the same shade of blue-green as a Tiffany's box. Now is that cool or what? I know most people who are more colour-shy won't see turquoise as a colour is classic, or for that matter, classy. But if you think about it, what can be more classy than a Tiffany's box? And if a Tiffany's box is classy, why shouldn't we wear that gorgeous colour on our nails?

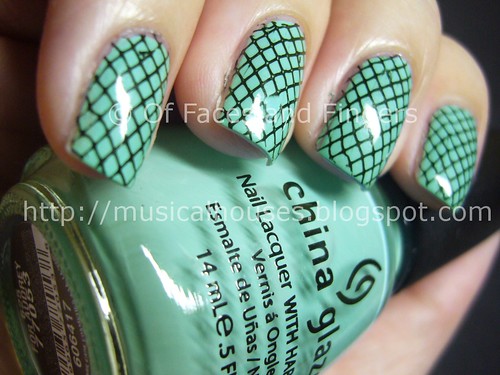
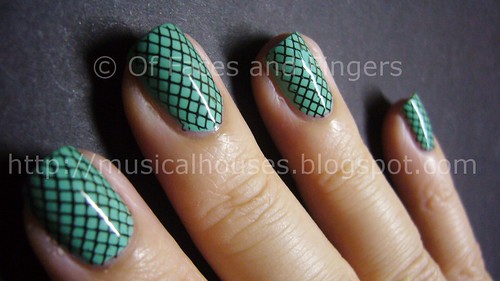
So behold, my awesome manicure the colour of a Tiffany's box! It's absolutely gorgeous, and in some lights it looks more blue, but in others it looks more green. I can't quite decide whether it's more of a blue or a green.

China Glaze For Audrey Konad

Oh, right, I have to admit, that mani was made slightly awesome by the fact that I smudged the konad design on my ring finger after having painstakingly stamped it on. But it doesn't make it any less stunning, doesn't it? Right? *Awkward silence*

Alright, yes, I was a klutz with the konad. I used my all-time favourite (and oh-so-cheap) black nail polish for the fishnet/lace print, Wet n' Wild Black. And the design came from one of my favorite konad plates of all time, M57. Back then when konading was a new thing, the M57 plate was so hard to get hold of, because every nail polish fanatic wanted one, and it was perpetually out of stock.

chg for audrey konad


After applying China Glaze For Audrey, I can definitely see why it's a classic. This colour was trouble-free in it's application - in fact, it virtually applied itself. It was fully opaque in two coats, although I suspect if you do thicker coats, you could get away with one. And it didn't streak at all. I enjoyed painting on this colour. Wet n' Wild Black, which was used for this konad to imprint the lace/fishnet pattern, is one of the fan favourites of nail polish addicts for konading. It's cheap, it's black, and it works well with the konad stamp and plate set. What's not to like?

Lasting power was about average - it lasted about 4 days on me before the first chip appeared, which was pretty usual. I don't have any complaints about the lasting power of China Glaze polishes in general. Some brands have trouble staying on my nails (ahem, Zoya and Barielle, I'm looking at you!), but China Glaze isn't one of them.

ChG for audrey konad


I don't know about you, but I was in love with my nails for the time I wore it. Everyone I met commented on my nails, from fellow colleagues to sales staff I would encounter on the way hhome from work. It actually pained me to remove the colour when the holiday season was over and work started picking up again at the office. Of course I had to take it off and replace it with a more sensible, work-appropriate colour. But at least I got to have funky nails for awhile!

Monday, January 10, 2011

Liz Earle Energising Body Lotion: The Perfect Summer Lotion

If you live in a hot climate, or experience hot summers, then you'll absolutely understand my perpetual dilemma surrounding body lotion. Often, I have dry skin, even in hot weather, but most lotions feel too heavy in a humid climate, and don't absorb well. So I often end up stuck between a rock and a hard place - do I want dry skin, or sticky skin?

The latest Liz Earle product, the Energising Body Lotion, promises to solve just this problem. It's a lightweight lotion that still has all the powers of moisturization. So you can imagine how excited I was to get my grubby little hands on this one! Would it be able to solve my hot weather moisturization woes?

Liz Earle Energising Body Lotion

The Liz Earle Energising Body Lotion comes in a sensibly-packaged tube with a flip-top. The tube contains 150ml of lotion, which isn't a great amount considering it's a body lotion. But as we all know, great things can come in small packages.

The lotion is white, and very light in terms of texture. This definitely isn't one of those heavy creamy body lotions. It also has a very invigorating herbal scent, that kind of reminds me of the scent that Liz Earle uses in its haircare range. I imagine the scent is probably a love it or hate it thing. The scent is pretty strong, though, so if you're going to be applying this, it'll be lingering around for awhile before dissipating. I personally like it thought - the herbal scent wafting on my skin kind of reminds me of aromatherapy, and is actually quite stimulating.

liz earle energising body lotion


So how does it work as a body lotion? I'm pleased to report that it actually absorbs really well, without leaving any sticky residue or any icky I-just-applied-lotion feeling. And it actually moisturizes, too, although I don't think it would be sufficient for those freezing cold winters. But for warmer weather, I think this would be perfect.

So do you need it? Well, not if you live on the North Pole, or rarely ever see hot weather, or don't like strongly scented lotions. But if you have been looking for a lotion that's perfect for summer, or hot climates, and you love scented products or are into aromatherapy, this one is worth checking out.

Sunday, January 9, 2011

Reader Question: Eyeliner for Asian/Partially Folded Eyes

When I put eyeliner on, when I hope my eyes the eyeliner disappears due to my weird eyelid/fold. Are there some other techniques or ways to make my eyes stand out?

(Now, I don't normally copy questions from my Formspring page over to my blog, but I thought this would be useful, as a lot of Asian eyes I come across seem to have this problem. Hope it helps someone!)

Welcome to the club! I know exactly what you mean, because that's what my eyes are like, too. Liner is fine on the lower lid, but not on the upper lid, because the upper lid is obscured by the flesh of the eyelid. It's actually quite common among Asians.

There are various ways you can make your eyes stand out, and generally, different people prefer different methods. If you still wish to use eyeliner, then the most common method to counter the "sleepy-looking" fold that obscures your lashline is to simply draw a thicker line. This ensures that even when your eyes are open, the liner doesn't disappear. A lot of girls I know do this, although I myself am not personally too keen on this for one reason: that if the lid is very heavy, then the line that you end up drawing can be really thick in order for the liner to show up even when your eyes are open. Another tip for eyeliner is to make the line thicker at the outer corner of your eye, and thinner towards the inner corners. This helps to leave some liner visible on the eye even when the lid is opened, without giving that "one fat line of eyelier" look. I guess whether thickening the eyeliner works for you or not would depend on how obscured your lashline is - if you don't have to draw a very thick line for it to be visible, this method would work for you. But if you're like me and the line needs to be a quarter of an inch thick before it's visible, then usually I would just skip lining the upper eye altogether.

If you skip lining the upper eye altogehter (as I often do), there are still other ways to bring out your eyes. For me, I find that lining the lower lashline really helps a lot, even if I don't line the upper lashline. And also mascara - this is a much overlooked tip, but curled lashes with a good mascara on really helps to make the eyes look bigger. Lastly, there is also eyeshadow to play around with to emphasize the eyes. Contouring your eyes with eyeshadow can subtly make them appear to have more dimension. I've actually done a series of posts on eyeshadow for various types of Asian eyes, although it's incomplete. I believe the first post is located here: http://musicalhouses.blogspot.com/2010/03/eyeshadow-tutorial-for-asian-eye-shapes.html

It can be pretty frustrating if liner doesn't seem to always work for you, but there's always other tools you can use. If you need examples of eye looks where the eye is brought out without the use of liner on the upper lid, feel free to look through my EOTDs on my blog - I don't think I've ever lined the upper eye in anyone of them, because lining the upper lid is so useless on my small puny obscured eye, LOL. But rest assured you're not the only one, and there are definitely still ways to make your eyes look good even if liner doesn't look good on your lids.

Ask me anything

Saturday, January 8, 2011

Sonia Kashuk Synthetic Flat Top Brush vs Sigma Round Top Kabuki: A Comparison

A synthetic flat-top brush is a necessity if you work with liquids and creams often. It's very useful for applying liquid or cream foundation, as well as other cream products, like brush. I was recently playing around with my Sigma Beauty Round Top Kabuki Brush F82, and I realized it was actually pretty similar to another brush in my collection, the much-acclaimed Sonia Kashuk Synthetic Flat Brusher Blush.

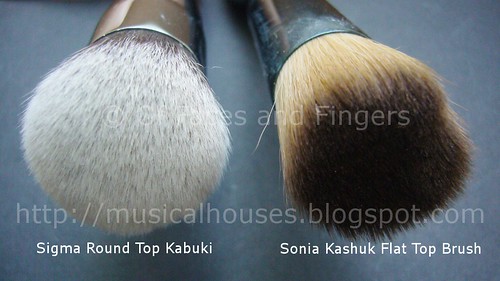
Although it's billed as a brusher blush, the Sonia Kashuk Synthetic Flat Top Brush h has been getting raves for liquid foundation application. Two Sigma brushes I have, the Flat Top Kabuki F80, as well as the Round Top Kabuki F82, are quite similar to the brushes. Since I've already talked about the Flat Top Kabuki before, I thought I'd deal with the Round Top Kabuki in this one.

Sonia Kashuk Flat Top Brush vs Sigma Kabuki

Both brushes are similar, and both are of surprisingly good quality, considering the price. Both have synthetic bristles, and the bristles are quite densely packed. Both also have a similar brush diameter. In many respects, the similarities in bristle type and density mean that both brushes will be pretty similar. If you liked the Sonia Kashuk for liquid application, you'd probably like the Sigma Kabuki for a similar effect, too. If you liked the Sonia Kashuk for buffing and blending, you'd probably like the Sigma Round Top for the same, too. And if you liked the small, handy size of the Sonia Kashuk brush for working around tiny areas of the face, like the nose, then the Sigma Kabuki would perform in exactly the same way.

That said, there are some slight differences. The Sonia Kashuk Flat Top Brush has bristles that are slightly longer than the sigma Kabuki, and the Sigma Round Top Kabuki has a brush shape that is slightly rounded at the sides, whereas the Sonia Kashuk is totally flat. Thus, the Sigma brush is more likely to give a denser application of product as compared to the Sonia Kashuk brush. Also, some people might prefer the rounded shape of the Sigma Kabuki, as they feel it might help them maneuver around the contours of their faces better. The differences may not be very noticeable, but I'm splitting hairs for the sake of a review here.

Sigma Round Top Kabuki vs Sk Flat Top


So which one do you need? Well, I'd say both are pretty compable, and I guess ultimately which one you end up with would depend on which one is available. For girls who live outside of the USA (or for that matter, within the USA but far away from a Target), where Sonia Kashuk is unavailable or hard to get, then the Sigma Round Top Kabuki or Flat Top Kabuki would be a very close substitute. Sigma Beauty does ship worldwide, so it's easily gotten hold of.

(The Sigma brush was sent to me for review. Review is my complete and honest opinion. I am not compensated or affiliated with the company in any way.)

Friday, January 7, 2011

St Tropez's New Year Promotion: Back to Basics!


St. Tropez is getting ‘Back to Basics’ to start the new year and offering a discount to all the fans who sign up to the VIP club before 5pm Monday 10th January. You can sign up for the VIP club here, and the Back to basics promotion is located here. St Tropez usually does have pretty good promotions, so I wouldn't miss out on this one if I were you There's just a few days left, so head over and sign up now!

Thursday, January 6, 2011

Face Shop Illuminating Cushion Blusher Swatches!

Even if you have only a customary knowledge of Asian beauty brands, you would probably have heard of The Face Shop before. It's a drugstore brand of makeup hailing from Korea, and in addition to the requisite cute, girly, and drowned-in-pink packaging that Asian brands seem to be fond of, it's also pretty well known in Asia for engaging hot Korean stars (both males and females), and putting them in very girly, pink advertisements. Yes, girly and pink, and kawaii. Even the guys.

Case in point: an example of a typical Face Shop ad that just ran for Christmas 2010 featured some Korean star (Kim Hyun Joong, but I have no idea who he is because I don't follow Kpop) for the following ads:


See? What did I say? Pink and girly, and he's a guy!

Now, here's kawaii:


(Images are courtesy of http://fangurls.blogspot.com)

Having lived in the West for 4 years, I am always slightly bemused by these ads, because these are the kinds of ads that would sell products to people in Asia, but not necessarily in the West. I mean, I can already imagine the reaction some of my American friends would have to ads like these: "Oh my gosh, is he gay?!", "Wait, you mean, this is normal advertising in Asia?" "So noone in Asia thinks this is too effeminate for a guy?" "Wait, are these ads targeting the gay segment?" "Ewwww....that's so gay." Ah well. But just as the West has its on advertising idosyncracies, so does the East. After all, if Paris Hilton can sell false lashes and perfume, I'm sure we can wrap our male stars up in pink and make them look all girly. You know, whatever sells.

Anyway, yes, this post was about the Illuminating Cushion Blusher. Not much to be said about it really - just like those ads pictured above, it rides more on it's innate cuteness and girly packaging instead of actual product quality. The packaging for these blushes is absolutely adorable - they come in little round paper pots with a little ribboned powder puff in them. As the name suggests, it's a Cushion Blusher because you use that little powder puff (which they have called the cushion) to apply the blusher. Cute, right?

By request, I've updated the post with an actual product picture. It's a pretty last-minute update, so I took the liberty of plucked off from another website, a Thai makeup selling forum. (Picture courtesy of 212cafe.com)


Here are swatches. These are my own, of course:

Face Shop Illuminating Cushion Blusher

L-R: 01 Pink, 02 Orange, 03 Violet.

01 Pink is a candy pink shade that leans slightly cool. 02 Orange is a similarly candy-looking orange shade, while 03 Violet isn't actually violet, but a very pale pinky-white with a hint of violet. I personally can't imagine wearing either the Orange or the Violet colour, but I can imagine that some girls might like them. The colours have some shimmer, but nothing too OTT for work. I personally like the pink best, for that naturally-flushed-cheeks look.

That said, when I swatched these, the product was a little disappointing. For one, it was quite sheer, and you really need to layer these on for them to show up. My swatches reflect a heavier application. But I guess as far as Asian cosmetic brand blushes go, this is pretty alright. For some reason, Asian brand blushes tend to be pretty sheer, probably because sheerer blushes seem to sell better in Asia. Also, I'm dubious about the efficacy of using a powder puff to apply blush. I mean, wouldn't you need to blend it out with a brush anyway? I guess it adds to the kawaii factor.

So these blushes are decent, but they aren't perfect. But for anyone who wants a piece of kawaii, you know which brand to start looking at!

Tuesday, January 4, 2011

Sigma Flat Top Kabuki vs MAC 187: A Comparison

The MAC 187 is one of the most famous makeup brushes in makeupdom. I remember when I was a newbie to the makeup world, everyone I knew had one, wanted one, or thought it was absolutely necessary to have one. Over time, of course, dupes and similar brushes came out. And since I'm doing a review on the Sigma Flat Top Synthetic Kabiki F80, I thought I'd photograph the two brushes next to each other, since they do appear to be similar.

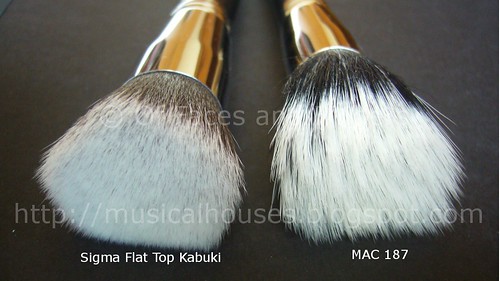
Both brushes have comparable handle length, and bristle colour. You can see below that they are of a similar size, so if you liked the MAC 187's size, you'd probably like the Sigma Flat Top Kabuki as well. The quality of both brushes is also very good - I have to admit that I wasn't expecting much from a Sigma brush - after all, nothing lives up to its hype, right? - but I am forced to admit that the Sigma brush is actually of much better quality than I expected.

MAC 187 sigma Kabuki Brush

Top: Sigma Flat Top Kabuki, Bottom: MAC 187

However, despite their similarities, they perform totally different functions. After all, the MAC 187 is a duo fiber/skunk/stippling brush (whichever terminology you prefer), while the Sigma Flat Top Kabuki, is well, a kabuki/buffing brush. In short, this means that the MAC 187 would be bettr for applying product in a sheer, sparing manner (e.g. for heavily pigmented blushes or foundations), while the Sigma Kabuki would be best for buffing, or blending (e.g. blending after all product is applied, or buffing in mineral makeup). But let's explore the brushes a little more.

sigma kabuki mac 187 bristles


The MAC 187 has bristles that are a lot less dense than the Sigma Kabuki. So for more pigmented products, the 187 might be a better choice, since less product will be picked up and deposited. However, for sheerer products, the Sigma Kabuki would be better, as it can really pack on product.

Also, the MAC 187 has natural bristles, as opposed to the Sigma Kabuki which has synthetic bristles. While there are no hard and fast rules for what brush goes with what product, it has been my general experience that natural bristles do better with powder products, while synthetic bristles work better with cream, liquid, or gel products. With natural bristles, they deposit powder products evenly, but if used with liquid products, the bristles tend to absorb some of the moisture from the product, making application uneven. On the other hand, synthetic bristles tend to work well with liquids and creams because they don't absorb any moisture, however I do find that for some reason they don't deposit as much powder as natural bristles do. For some reason the powder just seems to get "trapped" in synthetic bristles, but not in natural hair ones.

So, although they might look similar, they actually aren't when it comes to function. The MAC 187 is better for powder products, and for products that are more pigmented, while the Sigma kabuki works well with cream, liquid and gell products, and also for products that are more sheer. The 187 is a stippling brush, while the kabuki is a buffing brush. They actually complemnt each other very well in that regard. Well worth owning both, in my opinion.

(The Sigma brush was sent to me for review. Review is my own honest and complete opinion. I am not affiliated with/compensated by the company for this review.)